Showing posts with label Blogger Hack. Show all posts

How to Overcome Add Widget HTML / Javascript Untitled


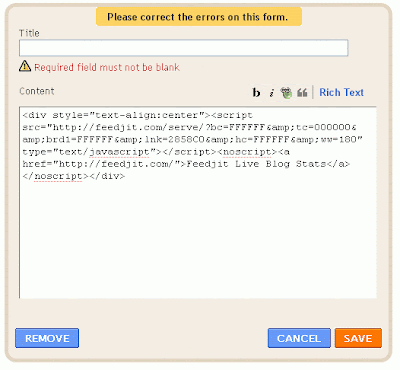
Yesterday when I want to edit one of the widget HTML / Javascript without the title, I am experiencing a problem where when i press the button Save the error message that says I have to give the title of the column title. This also happens when I want to add the widget HTML / javascript new. Whereas before I could do it without a title.Initially I thought maybe this blog template that error then I try it on another blog, but the result is the same. I was trying to figure out this problem by Googling but no one has discussed it. With anxiety I was trying to ask some other bloggers. Apparently they are also experiencing the same thing. Calm had my heart because blogger.com itself that changes the system not because my account is problematic I do not know why blogger.com to do this because I think so little flexibility. What do you think?Btw, as a user I can only accept it: ( So is there any way to get this widget title does not appear? Yup after check and re finally I found one way to titlenya not appear on the blog pages by removing the code of the widget title . similar results exactly with the old look. those of you who want to add the widget HTML / javascript without a caption. following way: 1. Make first widget HTML / Javasript you want to add to your blog title any premises up. 2. If so, go to menu Design -> Edit HTML . You can check the "Expand Widget Templates." To be safe backup of your template after the title search widget that you created earlier example you give the title of " banner ads "then find the word in your template. 3. order more easily, use the Find box to search for it. Press Ctrl + F and enter a key word and then tap Next . 4. If you have found searching the code <h2 class='title'> <data:title/> </ h2> which is located several line below. Consider the figure below ( click to enlarge).

widget error


widget title

5. Delete the code are then tap Save Template . Finish. If at any time you want to bring back titlenya stay just add code <h2 class='title'> <data:title/> </ h2> in the same place or remove the widget and create a new one. Gampangkan? May be useful. those of you who have a more effective way could share here. thanks 

How to Make a Dropdown Menu In Blogger


Dropdown menu is the menu that contains a bunch of text or links are shortened to a single menu. example looks like this:


Its contents will only appear if you click on the menu so that it can save space blog.This method can be used as alternative blogroll or other needs. Well to make it, it is very easy: 1. Log in to Blogger . offer menu Design -> Page Elements 2. Clicks Add a Gadget -> HTML / Javascript 3. Enter the code below into the box


<select onChange="document.location.href=this.options[this.selectedIndex].
value;">
<option value="http://alamatblog.com/#" selected>Blogroll</option>
<option value="http://alamatLink.com/">Nama Link</option>
<option value="http://alamatLink.com/">Nama Link</option> 
</select>

If you want to add a new link again to add the code < option value = "http://alamatLink . com / "> Link Name </ option> above the </ select> Replacealamatblog with with your blog address. Replace text colored red with the address of the link you want to install. Replace text colored blue with the name of the link you want displayed. 4. If you already click Save . Finish Note: the code above to open links in the same page. If you want to open a link in a new page. Change the code


<select onChange="document.location.href=this.options[this.selectedIndex].
value;">
Be

<select onchange="javascript:window.open(this.options[this.selectedIndex].
value);">

Good luck ..

Making Guide + Horizontal Navigation Menu Search Box


Yesterday someone asked me how to create a navigation menu that says home, paypal, contact me as on my blog. Hmm .. The actual menu is available from the template. And most new template now add menu page. But for those of you who do not provide a menu template, you can also add your own with a little modification in your template css. In this post, I will explain how to create a navigation menu that comes with a search box like this. 

those of you who are interested, please follow the steps the following steps: 
1. Log in to blogger menu. Click Design -> Edit HTML 
2.Backup your template 
3. After that, place the following code above the ]]> </ b: skin>


Horizontal menu navigasi


/ * - (Nav & Search Box) - * /
# nav {
background : # 1c426d; / * Warna backgroud Kotak Navigasi * /
height: 31px; / * Tinggi Kotak Navigasi 
0px 0px 0px; } # nav ul { position: relative; overflow: hidden; padding-left: 5px; padding-top: 1px; margin: 0; font: 1.1em / * Font tab Ukuran navigasi * / Arial, Helvetica , sans -serif; font-weight: bold; } # nav ul li {float: left; list-style: none } # nav ul li a, # nav ul li a: visited { display: block; color: # ffffff; / * Warna teks pada Kotak navigasi * / margin: 0 8px; padding: 5px 7px } # nav ul li a: hover { color: # ffffff; background -color: # C4C5B8; / * Kotak ketika Warna Text cursor melintasi navigasi * / margin: 0 8px; padding: 5px 7px } # nav ul li a.current, # nav ul li a.current: visited, # nav ul li a.current: hover {margin: 0 8px;background -color: # A6A994; color: # ffffff; padding: 5px 7px} # searchform { margin: 0; padding: 0; overflow: hidden; display: inline; # searchbox { background : # EEE url (http://lh3.ggpht.com/_15FopxVONSo/THEhOlDrX4I / AAAAAAAAD28/5oYAsTcO0G8/search-icon.gif) no-repeat top left;width: 180px; height: 16px; color: # 202020; font-size: 12px; font-family: Verdana, Arial, Helvetica , sans-serif; font-weight: normal;margin: 2px 0px 0px 15px; padding: 4px 0px 3px 25px; border-top: 1px solid # DDD; border-right: 1px solid # 666; border-left: 1px solid # DDD; border-bottom : 1px solid # 666; display: inline; }# searchbutton { background : # 1c426d; / * Warna backgroundtombol pencari * / color: # FFF; / * Text tombol Warna pencari * / font-size: 11px; font-family: Verdana, Arial, Helvetica , sans-serif;margin: 0px; padding: 2px 3px 0px 3px; font-weight: bold;border-top: 1px solid # DDD; border-right: 1px solid # 666;border-left: 1px solid # DDD; border-bottom: 1px solid # 666; }


Description:
Post-colored red on a description of each code. Please change according to your template. If you want to change the background image with the navigation menu, then add the code url (the address of your image) behind the code "colorbackground navigational boxes ". For example: background : # 1c426d url (http://url-gambar) ; 4. After that look for the code as shown below


<div id='header-wrapper'>
<b:section class='header' id='header' maxwidgets='3' showaddelement='no'>
<b:widget id='Header1' locked='true' title='Herman Blog (Header)' type='Header'/>
</b:section>
<div style='clear: both'/>
</div>
Find the code in your template that most closely with the above code 5. If you have found, place the following code below.


<div id='nav'>
<b:section class='header-tabs' id='header-tabs' preferred='yes' showaddelement='no'>
<b:widget id='LinkList1' locked='true' title='Top Tabs' type='LinkList'>
<b:includable id='main'>
<div class='widget-content'>
<b:if cond='data:title'/>
<div id='nav-left'>
<ul>
<li><a href='/'>Home</a></li>
<b:loop values='data:links' var='link'>
<li><a expr:href='data:link.target'><data:link.name/></a></li>
</b:loop>
</ul>
</div>
</div>
</b:includable>
</b:widget>
<b:widget id='HTML30' locked='true' title='Search' type='HTML'>
<b:includable id='main'>
<div id='nav-right'>
<form action='/search' id='searchform' method='get' style='display:inline;'>
<input id='searchbox' maxlength='250' name='q' onblur='if (this.value == &quot;&quot;) {this.value = &quot;cari artikel disini...&quot;;}' onfocus='if (this.value == &quot;cari artikel disini...&quot;) {this.value = &quot;&quot;}' type='text' value='cari artikel disini...'/>
<input id='searchbutton' type='submit' value='GO'/>
</form>
</div>
</b:includable>
</b:widget>
</b:section>
</div>
6. So that the order will be like this:

<div id='header-wrapper'>
<b:section class='header' id='header' maxwidgets='3' showaddelement='no'>
<b:widget id='Header1' locked='true' title='Herman Blog (Header)' type='Header'/>
</b:section>
<div style='clear: both'/>
</div>

<div id='nav'>
<b:section class='header-tabs' id='header-tabs' preferred='yes' showaddelement='no'>
<b:widget id='LinkList1' locked='true' title='Top Tabs' type='LinkList'>
<b:includable id='main'>
<div class='widget-content'>
<b:if cond='data:title'/>
<div id='nav-left'>
<ul>
<li><a href='/'>Home</a></li>
<b:loop values='data:links' var='link'>
<li><a expr:href='data:link.target'><data:link.name/></a></li>
</b:loop>
</ul>
</div>
</div>
</b:includable>
</b:widget>
<b:widget id='HTML30' locked='true' title='Search' type='HTML'>
<b:includable id='main'>
<div id='nav-right'>
<form action='/search' id='searchform' method='get' style='display:inline;'>
<input id='searchbox' maxlength='250' name='q' onblur='if (this.value == &quot;&quot;) {this.value = &quot;cari artikel disini...&quot;;}' onfocus='if (this.value == &quot;cari artikel disini...&quot;) {this.value = &quot;&quot;}' type='text' value='cari artikel disini...'/>
<input id='searchbutton' type='submit' value='GO'/>
</form>
</div>
</b:includable>
</b:widget>
</b:section>
</div>
7. If so, Save Template and see the results. If you do not want to use the search box to stay clear code in bold. Beres .. To add a link in the navigation menu. Open the menu Page Element and click Edit on the "Top Tabs". Add a link which you want to display there. Ok. Good luck. Hopefully useful.

Installing Reply Option In Blogger Comments Form


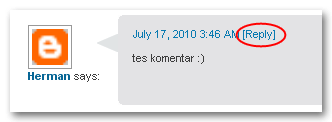
In this post I will show you how to install the reply option in the blogger comment form. As we know, this is very useful tool to facilitate the blog owners and visitors in reply to a comment. If the Wordpress platform tool is automatically installed in the comment form. As with the blogger platform. However, you can also install the reply option in your blogspot blog with just a few additions to the code in your blog template. those of you who want to know how it works, just practice on this blog because I've put reply option on comment form. Nah for If you are interested to put up reply option on your blog comment form. Here's the tutorial: 1. Login to navigation dashboard Blogger. Open the menu Design -> Edit HTML 2. You can check the 'Expand Widget Templates' 3. Find code

form comments


<data:commentPostedByMsg/>
or

<data:comment.timestamp/>
4. Place the following code on it

<span class='comment-reply'><a expr:href='&quot;https://www.blogger.com/comment.g?blogID=BloggerIdAnda&amp;postID=&quot; + data:post.id + &quot;&amp;isPopup=true&amp;postBody=%40%3C%61%20%68%72%65%66%3D%22%23&quot; + data:comment.anchorName + &quot;%22%3E&quot; + data:comment.author + &quot;%3C%2F%61%3E#form&quot;' onclick='javascript:window.open(this.href, &quot;bloggerPopup&quot;, &quot;toolbar=0, location=0, statusbar=1, menubar=0, scrollbars=yes, width=400, height=450&quot;); return false;'>[Reply Comment]</a></span>

Replace the words in red with the id of your blog. To find your blog id click menuDesign and note-digit number in your address bar. If you want to change the word that appears in the reply comment form, edit the text in green. 5. If so save your template and see what happens. be more interesting you can also change the icon image reply posts. The trick, replace the green paper with the <img src = " url-image "/> Do not forget to change the image url with the address of your image icon. Eg: http://lh4.ggpht.com/_15FopxVONSo/TEF6-vtUqHI/rcwCiaUc-Os/reply.png For example, here I provide some models reply icon. If interested, please upload images to your icon image hosting you or copy the image icon beside the address to tries. Hopefully useful.


Creating Alert Message Box (2)


After my post about how to make the alert message box . Apparently there is a friend who asked kesaya how to make alert box message that there is confirmation.maybe the question is like this time yes Hmm,, I think no one here we go . After cruising to and fro, go here and there. Finally, see also the tips. Ok without further ado, let 's get started. 1. As usual, log into blogger. Then go to the menu Design ->Edit HTML 2. Place the following code under <head> or rather between <head>and <b:skin>


sengihnampakgigi


<script type='text/javascript'>
if (confirm(&quot;Thank you for visiting this blog. Click OK to continue ")) { 
window . location = " http://www.hermanblog.com/ "; 

else { 
window . location = " http://google. com / "; 

</ script>
Description :
Writing in bold is the text that appears in the alert box. Please replace with the text you want
colored paper red is the web address that will open if the user clicks OK
Posts colored green is the address that will open if the user clicks Cancel or Close3. If so, click Save Template and see what happens Moreover alert box that is below the above there is one more type of alert box with the prompt field like the example below. alert box to make it do the same as above. The difference is only in the script. To be more clear please note the following ways. 1. Log in to blogger.Then open the menu Design -> Edit HTML 2. Enter the following script code below<head> 


<Script type = "text / javascript "> 
var name = prompt (" nama anda Masukkan Disini "," Nama "); 
alert (" Welcome to my blog ") 
</ script>

Caution: 
If you've ever installed a script alert box then removed once the script before installing this script. 

text in bold is the message that appears in the alert box
text color red is the text that appears in the answer box.
text color green is a message that appears after visitors click OK. Please replace as you wish.


3. If so, click Save Template . 4. Completed. Please see the results. 
Creating Related Posts with Thumbnail


related-post

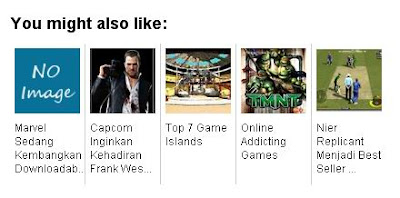
Previously I've been posting about how to create a related post to display a list of post titles related to the main post. Making it easier for readers to find related topics.To learn more about related post read here . Well this time I want to discuss how to create a more interesting related post is by adding a thumbnail or picture in it .To be more clear the picture below. Interesting is not it? 
This method can be used in conjunction with a related post without thumbnail.
 For those of you who are interested to set it up, follow these steps: 

1. Open the menu Design -> Edit HTML
2. You can check the "Expand Widgets Templates" 3. Put the code following the above </ head>


<!--Related Posts with thumbnails Start-->
<!-- remove --><b:if cond='data:blog.pageType == &quot;item&quot;'>
<style type='text/css'>
#related-posts {
float:center;
height:100%;
min-height:100%;
padding-top:10px;
padding-left:15px;
padding-right:15px;
}

#related-posts h2{
font-size: 1.3em;
color: black;
font-family: Arial;
margin-bottom: 0.75em;
}

#related-posts a{
color:black;
}

#related-posts a:hover {
background-color:#eeeeee;
}
</style>
<script type='text/javascript'>
var defaultnoimage="https://blogger.googleusercontent.com/img/b/R29vZ2xl/AVvXsEgr8IVqGSSpq_wyjyYy6mnRTwD9g7gBxgYledyeQHLb1R3PwklH8GqWu4DvX4rVgueDgrkyHVSGB8utlNJveMV-6GEMeY7d-CsS9PTAHD54J6gihxAkT6oENGOdoJadLj18WasqxYBcN1EC/";
var maxresults=5;
var splittercolor="#cccccc";
var relatedpoststitle="You might also like:";
</script>
<script src='http://hbhost.googlecode.com/files/related-posts-with-thumbnails-for-blogger.js' type='text/javascript'/>
<!-- remove --></b:if>
<!--Related Posts with thumbnails End-->

4. Then look <p class='post-footer-line post-footer-line-1'/>

5. If not found try searching for post-footer-line

6. Put the code follows below.

<!-- Related Posts with Thumbnails Code Start-->
<!-- remove --><b:if cond='data:blog.pageType == &quot;item&quot;'>
<div id='related-posts'>
<b:loop values='data:post.labels' var='label'>
<b:if cond='data:label.isLast != &quot;true&quot;'>
</b:if>
<script expr:src='&quot;/feeds/posts/default/-/&quot; + data:label.name + &quot;?alt=json-in-script&amp;callback=related_results_labels_thumbs&amp;max-results=6&quot;' type='text/javascript'/></b:loop>
<script type='text/javascript'>
removeRelatedDuplicates_thumbs();
printRelatedLabels_thumbs(&quot;<data:post.url/>&quot;);
</script>
</div><div style='clear:both'/>
<!-- remove --></b:if>
<!-- Related Posts with Thumbnails Code End-->

7. If it Save your template. Specification: var images that appear on postings that do not have a picture. You can replace the image with another image . maxresults var = indicate the number of posts that appear on the related post. Please set the number of posts that would appear to change the number . splittercolor var = "#cccccc shows color dividing line. Replace cccccc with code color you want.relatedpoststitle var = " You might also like: show related post titles. Replace the red text with the title you want. those of you who feel the way the above is too difficult, you can use the related post with thumbnail widget provided bylinkwithin.com . For installation very easy way, here are the steps: 1. Go towebsite http://www.linkwithin.com 2. Fill in the required data on the form that has been provided


Email : Your email address Blog link : Video blog where you install the related posts widget with thumbnail Platform : select Other Width : choose the number of related posts that would appear


You can check the little box if you are using a background template, dark 3. ClickGet Widget 4. Copy and paste the code script given above </ body> on your blog template and save your template. Finish If there are less obvious or experience difficulties in installing related post with thumbnails please leave your comment below. I will try to help you.

How to Create Related Posts Widget V2


Yesterday there was a friend who asked me, 'how do I make a widget related posts as I use on this blog. " Actually I create a widget related posts I've been posting on this blog, it's just the version related posts that I use now is different from theversion related posts that have been posted on this blog. Therefore, in this post I will explain how to create related posts as I use on this blog or that I gave the namerelated posts v2 . 


Maybe you will ask what is the difference between v1 and v2 related posts? If the v1 related posts , related posts will be shown along with titles grouped by label and label each. For example, consider the following screenshot. while version 2, related posts or Articles related to only display post titles alone (without title label) and all related articles merged into one so Similar to the related posts widget belongs to WordPress. An example looks like this:

 For those of you who want to install related posts or related posts wordpress v2 style please follow the steps below: 

1. On page dashboard blogger, go to Design -> Edit HTML 
2. You can check the "Expand Widget Templates" 
3. Find the code ]]> </ b: skin> 
4. Put the code below css thereon


related posts widget


# Related-posts { float: left; width: 250px; margin-left: 5px; font-size: 12px; line-height: 1.8em; margin-bottom: 10px; # related-posts a { color: # 4b4b4b; 
# related-posts a: hover { 
color: # ca1717; 
# related-posts. widgets { list-style-type: none; margin: 0 5px 5px 0;padding: 0; # related-posts. widgets h2, # related-posts h2 { font-size: 20px; font-weight: normal; margin: 5px 7PX 0; padding: 0 0 5px; # related-posts a { text-decoration : none; # related-posts a: hover { text-decoration : none; # related-posts ul { margin: 10px 5px 5px 20px; padding: 0; }
5. Then look up </ head>

6. Put the code javascript follows thereon 

<Script src = 'http://hbhost.googlecode.com/files/Related-posts.js' type =' text / javascript '/>
7. Then find <p> <data:post.body/> </ p> or <data:post.body/>

8. If there are two codes are the same, choose the first 9. Put the code follows below


<b:if cond='data:blog.pageType == "item"'>
<div id='related-posts'>
<div style='font-size:18px'> <b> Related Posts: </ b > </ div>
<b:loop values='data:post.labels' var='label'>
<b:if cond='data:label.isLast != "true"'/>
<b: if cond = 'data: <b:if == "item"'>
<script expr: src = '"/ feeds/posts/default/- /" + data: label.name + "? alt = json-in-script & callback = related_results_labels & max-results = 5"'type =' text / javascript '/> </ b: if>
</ b: loop>
<script type = 'text / javascript '> removeRelatedDuplicates (): printRelatedLabels ();
</ script>
</ div>
</ b: if>
Description:
The text in bold is the title of the widget and the number 5 is the number of posts that Appear in the related posts. Please replace as Desired 10. If it is, save your template and see the results. If it works do not forget to push the button like below

Attach Avatar in Blogger Comments Box


avatar on blogger comment form

Thanks to features Show your face from Blogger blogger comment box is now able to display images or photos from visitors who comment on blogs.


 To displayan avatar , it is very easy. You simply turn it on by going to the menu Settings -> H then on the "Showprofile images on comments "choose YES . Wrong ..It's just the way it applies only to certain particular template templates provided by blogger and the results are less than optimal in which avatars only appear when visitors leave a comment with blogger id.While that comment with openid or anonymous avatar does not appear.Nevertheless, you can also bring it to do a little editing on your template code so that the result will be like this.

 Implementing:
 1. First go to the menu Settings ->Comments . Choose and YES on the "Show profile images "and press Save . 
2.After that, go to Design-> Edit HTML
3. You can check the "Expand Widget Templates". To be more secure backup of your template. 
4. Find the following code:


avatar on blogger comments


<dl id='comments-block'>
5. Replace the code with this code

<dl expr:class='data:post.avatarIndentClass' id='comments-block'>
6. After that, find the following code

<a expr:name='data:comment.anchorName'/>
7. Replace the code with the following code

<b:if cond='data:comment.favicon'>
<img expr:src='data:comment.favicon'/>
</b:if>
<a expr:name='data:comment.anchorName'/>
<b:if cond='data:blog.enabledCommentProfileImages'>
<div expr:class='data:comment.avatarContainerClass'>
<data:comment.authorAvatarImage/>
</div>
</b:if>
8. After that add the following CSS code above ]]> </ b: skin>

#comments-block .avatar-image-container img {
background: #fff url(http://i37.photobucket.com/albums/e74/mrphoto16/Hermanblog/avatar.gif) no-repeat left top;
width:32px;
height:32px
}

Description: 

Text in red is the address of the picture for avatar anonymous. While the bold text is the size of an avatar . You can change as you wish.

9. Kalu is save your template. Finish a try. Good luck


smile