Showing posts with label Blogger Tutorial. Show all posts

Facebook: how to stop receiving updates on your wall, without breaking the friendship

face-likeFacebook: how to stop receiving updates on your wall, without breaking the friendship - Perhaps not everyone knows this function, but you can stop receiving updates from friends and relatives on Facebook, without the person knowing. Currently, I have seen many people complaining about other people's posts on Facebook and I think every one should post what you will, but ..... stop following a friend or relative can be a little embarrassing, leading to family conflicts. 


If you want to get rid of the publications of someone without having to stop following that person - what is called in Facebook "undo friendship" just knowing configure what should appear on your wall, in "news feeds." 
Guinea pig, I'll get the profile of our former columnist, Luan Felipe: 


fecabook-perfil


In the new timeline, clicking the "friends" appear several options. If you do not want to receive more NO-related update boring friend, simply uncheck the "show in the news feed." 
If you want to select the updates that will appear on your wall, click on "settings" and choose from the options available: 


face-feeds
As you can see, I subscribe to the posts straight Luan Smiley flashing
Another way to limit the publications of several people at the same time, putting them in the "known".In this case, we receive the updates, but with little frequency. Go to "start page" in the left column and click on "Friends" (until the other day it was called "list", but Mark Zuckerberg loves change ...). Click on 'known' 


facebook-listas
On the right side, you will see the option to add everyone you want 


conhecidos-facebook
My "known" will stay a secret hehehe. And yet the facebook suggests who can put on that list. Get to work! Cheerful

Translator Widget - a new translator for blogs


Translator Widget - a new translator for blogsSince I started my promotion templates in foreign sites, I received many emails in other languages. It had been a long time I was looking for a widget with a Google translator to make life easier for my readers gringos, but could not find anything I liked.
After much research on the web, I have gathered several codes and ended up creating a widget to my taste, the result of which can be seen in our first sidebar.
Commenting on Twitter, several readers were interested in using the widget on their blogs, so I decided to make it available for everyone \ o /


TRANSLATOR WIDGET WITH EDGE AND THE BACKGROUND (customizable)

Tradutor com fundo e borda

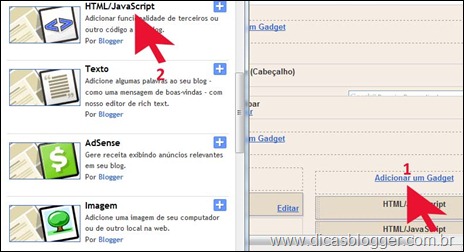
Click the link above and copy all the code. Among the Blogger dashboard and click design. On page elements tab, click add gadget (1) and choose html / javascript (2). Paste the code and save the translator.


The translator comes with edge and dark gray with light gray background. To change the colors, change the following pieces of code (= red border, green background =)

<div style=" solid # ccc border :1px ;padding:10px 4px 3px 4px;text-align:center;background-color:# efefef ;">

If you do not know the color number you want to use, check the color chart web .
If you prefer, we have a translator widget with transparent background.


TRANSLATOR EDGE WIDGET WITHOUT AND WITH TRANSPARENT BACKGROUND

Tradutor com fundo transparente

I ask that the credits are kept at the bottom of the gadget. Thank you.

How to put a link in an image


How to put a link in an imageYou thought the series was over First Steps? Nothing! Every day I get more and more questions with the very basics. So today I will teach step-by-step, how to put a link on an image to direct it to another web page.
  1. Choose the picture
  2. Stay at a site of your choice ( learn more here )
  3. Copy the image address ( read more )
  4. Use the code below
<a href="endereço of site"> <img src="endereço of imagem" /> </ a>
Example: 
I will use the image to put Feeds Template Songs: 

Feeds 
Now I'll host it in Picasa and copy her address 
upload url 
I obtained the following address: 
http://lh4.ggpht.com/_mcq01yDJ2uY/SXUiVhRAGgI/AAAAAAAAAUs/pu2fQkzWOoc/600px-Feed_Icon_Bl-Or.png
I want this user to direct the feeds from my blog. The code looks like this: 
<a href="http://feeds.feedburner.com/dicasblogger"> <img /> </ A>
You see the result by clicking the image below:
 
There are several other ways of doing this: 
In Windows Live Writer 
Choose the hard disk image, click on it and choose "link to url". In the box that will open, put the url of the image. Do not know what is Windows Live Writer? Then click here .
live writer 
In NVU Portable 
Click the icon to add a picture. In the new window, put the url of the image in "address" and the link to be directed on the "link". In "description" put a phrase to help the user locate and "Alternate Text", a word to identify the image. Copy the code and paste it where you want.

configuração código-fonte 
To know what is NVU Portable, click here . 


Access the updated post and stay on top of new options for the new interface!! Putting links to open in new window 


Tip Aunt Juliana 
When I want to link an image to a post, I use the Writer. For the sidebar, always use NVU, the possibility of putting a description. 
Until next time!

Changing the Header Template In Blogger

blogger template header

Changing the Header Template In BloggerSo that your blog look unique or different from the others. 
Then you have to change the look of your blog. There are many ways to do it. For example, by changing the template created by a third party but the average template is already using it. Unless you create your own templates, but this method requires a long time and is not easy to make a good template. 

So one of the most convenient and effective way is to change the header on a template . 


Header is the most important element in a template for every visitor that comes to your blog first seen is a header. So changing the header is the most appropriate way. Header does not have to be a picture. You can also use the text as an important header unsightly. 
If you want to use an image as a header but could not make it. Do not worry, because now there are many websites that provide free header images so you just download it. 
Some websites have a pretty good header like: 100pixel.blogspot.com , freewebpageheaders.com ,smashingmagazine.com , and much more. In this post I will discuss about changing the header of freewebpageheaders.com . 


To download it, please follow the steps below: 

1. Go to website http://freewebpagesheaders.com/gallery 
2.To download headers. You must have an account first. Click register to register. 
3.Click Agree . 

Then you will be asked to fill out the Registration form. 
This form consists of 2 parts: Required information and optional information . Required information is the info you need to provide for the registration while the optional information is information that is used to display your data when you login to the visitor. If you feel no need then ignored for this section 

4. Then click Submit Registration Form . If it is you will get a message like this. 
5. Open the email you used to register. Click on the link provided to mengakftifkan your account.
 6. If you have, you will get a message that your account has been activated.
 7. click Return to the front page of free Web Page Headers . 
8. Then click Login to download the image header. 
9. Select a category header you want. If you have found a suitable picture. Click on the image and then click Download . 1
0. Then the picture will open in a new page. Right click on the image and choose Save Image As and press Save . 
11. Completed. 


Now the image is stored on your computer the next step you should do is find out how the size of the header in your template so that when mamasang size fit your template header. 

How: 

1. Click the Layout -> Edit HTML . 
2. Find code # header-wrapper . So that's easy to search for, press Ctrl + Ftype "header-wrapper" and then press Next . 
3. If you have found there is usually a code width and height around. For example, # header-wrapper {background: url} no-repeat; width: 980px; height: 100px; Width is the length of the header andHeight are the width of the header. Meaning you have to resize the image to 980x100 pixels. You can use an image processing program such as MS Paint, ACD See, photoshop for meresizenya. 
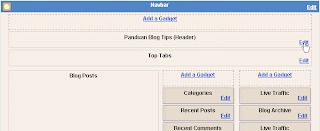
4. Once completed. Go to Blogger , go toDesign -> Page Elements . 
5. Click Edit on the Header. 
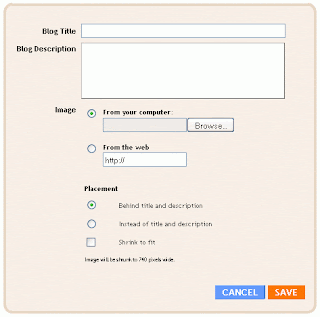
6. Then a new page will appear. 
7. Select Browse from your computer if the picture is stored dikomputer or Browse from the web if the images are stored on image hosting such as Imageshack, Photobucket, and Geocities. 
8. In the "Placement". Select Behind title and description if you want to showing the picture behind the blog title and description or select Instead of title and description if you want to cover the blog title and description. 
9. Then click Save . 
Click View Blog to see the results. 


Note:Not all templates can be mounted image. Some use text only. So choose the template as needed. luck. Good luck ...


How to Make Related Articles / Related Post with scroll

How to Make Related Articles / Related Post with scroll How to Create Articles related - Perhaps the term related post or the linked article is not foreign anymore for bloggers. for who do not know it's related article is a collection of articles relating to or associated with the title of the post mate,, well for related articles this time I modified a little by adding a scroll function. By adding the scrolling function on related posts widget so visitors no longer bothered with related articles that are too long down. Moreover, related post widget is placed on the bottom of the post. nahh for my friend who already install related posts widget long without scrolling function , it must be removed first. Confused how to remove it? How did the backward flow (from bottom up) by following the instructions. Examples Related Articles I mean kaya gini nihh:


Related Articles

In the picture there appears to be a scroll that can be hung upside down to see related postings. Okay, go to  How to Create Related Articles / Related Post with a scroll  in the bottom of the post to your blog.

  1. Login to blogger with your id
  2. Click the Draft
  3. On the tab menu, select Edit HTML
  4. Check the small box Expand Widget Templates
  5. Search code <p> <data:post.body/> </ p> atau <data:post.body/>
  6. Place the following code under the code above:


<b:if cond='data:blog.pageType == &quot;item&quot;'>
<H2>Related Post:</H2>
<div class='rbbox'>
<div style='margin:0; padding:10px;height:200px;overflow:auto;border:1px solid #ccc;'>
<div id='albri'/>
<script type='text/javascript'>
var homeUrl3 = &quot;<data:blog.homepageUrl/>&quot;;
var maxNumberOfPostsPerLabel = 4;
var maxNumberOfLabels = 10;
maxNumberOfPostsPerLabel = 50;
maxNumberOfLabels = 3;
function listEntries10(json) {
var ul = document.createElement(&#39;ul&#39;);
var maxPosts = (json.feed.entry.length &lt;= maxNumberOfPostsPerLabel) ?
json.feed.entry.length : maxNumberOfPostsPerLabel;
for (var i = 0; i &lt; maxPosts; i++) {
var entry = json.feed.entry[i];
var alturl;
for (var k = 0; k &lt; entry.link.length; k++) {
if (entry.link[k].rel == &#39;alternate&#39;) {
alturl = entry.link[k].href;
break;
}
}
var li = document.createElement(&#39;li&#39;);
var a = document.createElement(&#39;a&#39;);
a.href = alturl;
if(a.href!=location.href) {
var txt = document.createTextNode(entry.title.$t);
a.appendChild(txt);
li.appendChild(a);
ul.appendChild(li);
}
}
for (var l = 0; l &lt; json.feed.link.length; l++) {
if (json.feed.link[l].rel == &#39;alternate&#39;) {
var raw = json.feed.link[l].href;
var label = raw.substr(homeUrl3.length+13);
var k;
for (k=0; k&lt;20; k++) label = label.replace(&quot;%20&quot;, &quot; &quot;);
var txt = document.createTextNode(label);
var h = document.createElement(&#39;b&#39;);
h.appendChild(txt);
var div1 = document.createElement(&#39;div&#39;);
div1.appendChild(h);
div1.appendChild(ul);
document.getElementById(&#39;albri&#39;).appendChild(div1);
}
}
}
function search10(query, label) {
var script = document.createElement(&#39;script&#39;);
script.setAttribute(&#39;src&#39;, query + &#39;feeds/posts/default/-/&#39;
+ label +
&#39;?alt=json-in-script&amp;callback=listEntries10&#39;);
script.setAttribute(&#39;type&#39;, &#39;text/javascript&#39;);
document.documentElement.firstChild.appendChild(script);
}
var labelArray = new Array();
var numLabel = 0;
<b:loop values='data:posts' var='post'>
<b:loop values='data:post.labels' var='label'>
textLabel = &quot;<data:label.name/>&quot;;
var test = 0;
for (var i = 0; i &lt; labelArray.length; i++)
if (labelArray[i] == textLabel) test = 1;
if (test == 0) {
labelArray.push(textLabel);
var maxLabels = (labelArray.length &lt;= maxNumberOfLabels) ?
labelArray.length : maxNumberOfLabels;
if (numLabel &lt; maxLabels) {
search10(homeUrl3, textLabel);
numLabel++;
}
}
</b:loop>
</b:loop>
</script>
<small><p>Widget by [ <a href='http://iptek-4u.blogspot.com' target='new'>Iptek-4u</a> ]</p></small>
</div>
<script type='text/javascript'>RelPost();</script>
</div>
</b:if>


7. If so, now find this code ]]> </ b: skin>

8. Place the following code in the code above:
/ * - Modified by http://blogs-id.blogspot.com-- related posts * /
. rbbox {border: 1px solid # D8D8D8; padding: 5px;
background-color: # E0F8E0;-moz-border-radius : 5px; margin: 5px;}
. rbbox: hover {background-color: # EFFBEF;}


9. Click SAVE TEMPLATE 


10. Done 


There is a script in red Related Posts can be replaced with your favorite text. For color codes too, customize your template design. Now let's see one of your posts. Thus  Related Articles / Related Posts with scroll  will be under the posts. It looks even more beautiful with the box that surrounds this widget. Easy is not it, okay good luck. ^ _ ^


How to Make Related Articles / Related Post with scroll  
How to Make Related Post How to Make Related Articles / Related Post with scroll  How to Make Related Post How to Make Related Articles / Related Post with scroll  How to Make Related Post How to Make Related Articles / Related Post with scroll  How to Make Related Post How to Make Related Articles / Related Post with scroll  How to Make Related Post How to Make Related Articles / Related Post with scroll  How to Make Related Post How to Make Related Articles / Related Post with scroll  How to Make Related Post How to Make Related Articles / Related Post with scroll  How to Make Related Post How to Make Related Articles / Related Post with scroll  How to Make Related Post How to Make Related Articles / Related Post with scroll  How to Make Related Post How to Make Related Articles / Related Post with scroll  How to Make Related Post How to Make Related Articles / Related Post with scroll  How to Make Related Post How to Make Related Articles / Related Post with scroll  How to Make Related Post How to Make Related Articles / Related Post with scroll  How to Make Related Post How to Make Related Articles / Related Post with scroll  How to Make Related Post

Displaying Post Title Only On Page Search


Usually if there are visitors who are looking for our blog articles either by label or the search box or search box. So that appears is the title of post and its contents. Try to imagine if the content contains the keywords you want to search visitors reached 50-100 articles. How long does it take the viewer to search for items of interest.Moreover, items of interest are posted on the back of the visitor might be blurred before finding content. thus you will need to deal with it show the title post it on the search page. Examples like the picture. Which appears only title posting only. Ok then how to implement it? 1. Log in to blogger. Open the menu Edit HTML 2.Backup your template and then check the " Expand Widget Templates " 3. Findthe code that below

post title


<b:include data='post' name='post'/>
4. Replace the code above with the code below

<B: if cond = 'data: blog.homepageUrl
! = date: blog.url '>
<b:if cond='data:blog.pageType != "item"'>
<a expr: href = 'data: post . url '> <data:post.title/> </ a>
<br/>
<b:else/>
<b:include data='post' name='post'/>
</ b: if>
<b:else/>
<b:include data='post' name='post'/>
</ b: if>
5. If you already click Save Template . Please try results

Changing the Author Name Or Name Author In Blog


Have multiple blogs under one account is common for every blogger. Because it's easy to create a blog and not limited in number. If you make a lot of blogs in one account then all the blog author will have the same name. For those of you who do not know what that author name, Author name is the name of the author of the content or the person who has a blog. Well sometimes there are bloggers who are reluctant to show original identity. If that means my friend had to change his name by another name. Then what can? Sure you can. 

Even very simple. Here's how: 

1.Log in to blogger 
2. On the menu Design -> Edit HTML
 3. Tick ​​the " Expand Widget Templates " 
4. Find the code below


author name


<b:if cond='data:top.showAuthor'> 
<data:top.authorLabel/> <data:post.author/> 
</ b: if>
Replace the words are printed in red with the name you want to use. Examples

<b:if cond='data:top.showAuthor'>
<data:top.authorLabel/> Admin
</ b: if>
5. If so click Save Template . 6. Completed. Please see the results.

Color Link Or Make Colorful Rainbow Link Blog


Rainbow rainbow links or a link where if the mouse pointer we were directed to the link the link will flash colorful as a rainbow of colors. If you are still confused. Please visit here then point your mouse cursor to one of the links to see the results. Gmn pulled? Well to put this colorful link is very easy. You simply enter the code in the javascript his blog you then the effect will work immediately. 'll be easier. Please follow these steps: 1. As usual, log into blogger. Then on the menu Edit HTML 2.Put the code below the above code <body>


<script src='http://hbhost.googlecode.com/files/rainbow-link.js'/>
3. Click Save Template . 4. Completed. Please see the results.

Installing Snow Effect in Blog


Pingin snowing on your blog to make it look more lively and cool (read: cool)? Well, then you need to put on the blog snow effect you. To install snow effect, it is very easy: 1. Open blogger. Go to the menu Design -> Page Elements 2. Click Add a Gadgets -> HTML / Javascript 3. Insert the following script into the box


<script src='http://hbhost.googlecode.com/files/snow.js' type='text/javascript'> </script>
4. Press Save . Finish is tough is not it? If you do not want to bother ya use any of the following ways 1. clicking the Add Effect Snow In the blog below


2. Select the blog you want to install snow effect and then click Add Widget 3.Finish. luck ... 


smile