Sitemap for Blogger / Blogspot


Sitemap for Blogger / Blogspot - How about having a page on your blog where all your posts are organized by date? We might call this page or Sitemap Blog Archive and it can be quite useful when a visitor can not find any specific post on your blog using search or even if this visitor want to read everything you've posted.
If you want to see how well a page, take a look at what I created on my blog at this link . If you want a page equal to your blog, follow the tutorial below.


First create a new page on your blog (1) and enter the HTML editing mode (2). Copy the code below, changing the part in red the full address of your blog. Paste the code into the html page (3) and click publish now.

<script style="text/javascript" src="http://100rede.com/mapablogger.js"> </ script>
<Script
sitemap_blogger

See the result file's Blogger Tips in the image below: 

Arquivo ou mapa
Remarks:
I got this tip from the blog Abu Farhan , credits the script were kept, and I just translate the month names into Portuguese.
I do not know how Google bots can interpret this new page on your blog full of internal links, I believe it would not yield any punishment in Google search results, but I can not say such a thing with certainty.
Realize that there is a value in the URL that indicates the number of posts to be displayed, in the example above this value is set to 1000 because I wanted to show all of my blog posts on the map.Change the value as the number of posts on your blog, always put a value well above the number of posts on your blog will ensure that all are shown.

How to put a Facebook button on Blogger


How to put a Facebook button on Blogger - With the popularity of applications like Farmiville and other online games, Facebook got an explosive growth in Brazil. Stay out of Facebook is to miss the opportunity to receive thousands of visitors to your blog or site. I'll start a series of articles teaching how to integrate a blog to Facebook, and the first is how to put a Facebook button on Blogger: 


The advantage of using the "Like" button (or "Like" in English and "Like", in Portuguese of Portugal) is that whenever someone clicks on the button will be a status update on the mural with the Facebook profile link the post in question.
 The friends of this profile also will receive this update. To put this button, like the Twitter button , you do not need Facebook account. 

Integrating Facebook button on Blogger: 
The "Like" button can be inserted anywhere. I recommend that you put on the end of the post, is where the reader will perform the next action after reading it, but this is not a rule. Before making this change, make a full backup of your blog template. 

Among the Blogger dashboard, click design and then edit in HTML. Check the box to expand Widget Templates and search for: 
<data:post.body/>
Copy and paste the below code above: 
<Iframe allowTransparency = 'true' expr: src = '"http://www.facebook.com/plugins/like.php?href =" + data: + post.urlframeborder = '0 'scrolling =' no 'style =' border: none; overflow: hidden; width: 450px; height: 40px; '/>
If you want the Facebook button appear at the top of the post, next to the title, put the code just below this line: 
<div class='post-header-line-1'/>
Optimize Facebook button: 
For the button does not appear on the home page, only the posts, please enter the code in green: 
<b:if cond='data:blog.pageType == "item"'>
<Iframe allowTransparency = 'true' expr: src = '"http://www.facebook.com/plugins/like.php?href =" + data: + post.urlframeborder = '0 'scrolling =' no 'style =' border: none; overflow: hidden; width: 450px; height: 40px; '/>
</ B: if>
For the photos that appear to users who liked, must change the false to true, and the size of the widget to 40px 80px: 
<Iframe allowTransparency = 'true' expr: src = '"http://www.facebook.com/plugins/like.php?href =" + data: + post.urlframeborder = '0 'scrolling =' no 'style =' border: none; overflow: hidden; width: 450px; height: 80px; '/>
Another thing that can be done is to change "Like" to "Recommend", simply change it   Like (in red in the code above), recommend. 

The source of the letters can be changed, by default comes in Arial, but you can use other sources. 

Save and see if everything was correct. 

Hack "Read more" automatic and images


Hack "Read more" automatic and imagesI was looking for this hack, the request of a client -DB products and services found in and Templates for you , dear blog friend missing and Golden. 
This is a hack that summarizes the posts of the home page (home) and also automatically displays a small image ( thumbnail ) on the left side of the post. 
First of all, I recommend that you install this hack on a test blog, or if you want to install directly on the blog, do before a backup template . 

How to put the hack with images Read More 

Among the Blogger dashboard, click design and then edit in HTML. 
Check the box to expand Widget Templates and search for: 

<div class='post-body entry-content'>
<data:post.body/>

Replace the line <data:post.body/> by:
 

<b:if cond='data:blog.pageType != "item"'>
<b:if cond='data:blog.pageType != "static_page"'>
<div expr:id='"summary" data:post.id' style='display:none;'> <data:post.body/> + </ div>
<script type='text/javascript'> createSummaryAndThumb ("summary <data:post.id/>") </ script>
<div style="clear:both" align='right' class='rmlink'> <a expr:href='data:post.url'> Read more »» </ a> </ div>
</ B: if> </ b: if>
<b:if cond='data:blog.pageType == "item"'>
<data:post.body/> </ b: if>
<b:if cond='data:blog.pageType == "static_page"'> <data:post.body/>
</ B: if>


WARNING:
 For those who use my templates that come with another hack "read more" and / or break the jump from Blogger, the path is another.
 Search for: 

<b:if cond='data:blog.pageType == "item"'>
<style> # fullpost {display: inline;} </ style>
<p> <data:post.body/> </ p>
<b:else/>
<style> # fullpost {display: none;} </ style>
<p> <data:post.body/> </ p>
<b:if cond='data:post.hasJumpLink'>
<div class='jump-link'>
<a expr:href='data:post.url "#more"'> <data:post.jumpText/> + </ a>
</ Div>
</ B: if>
<span id='showlink'>
<a expr:href='data:post.url'> Continue reading >> </ a>
</ Span>
<script type='text/javascript'>
checkFull ("post-" + "<data:post.id/>");
</ Script>
</ B: if>
<div style='clear: both;'/> <! - clear for photos floats ->


Replace it by:
 

<b:if cond='data:blog.pageType != "item"'>
<b:if cond='data:blog.pageType != "static_page"'>
<div expr:id='"summary" data:post.id' style='display:none;'> <data:post.body/> + </ div>
<script type='text/javascript'> createSummaryAndThumb ("summary <data:post.id/>") </ script>
<div style="clear:both" align='right' class='rmlink'> <a expr:href='data:post.url'> Read more »» </ a> </ div>
</ B: if> </ b: if>
<b:if cond='data:blog.pageType == "item"'>
<data:post.body/> </ b: if>
<b:if cond='data:blog.pageType == "static_page"'> <data:post.body/>
</ B: if>
<div style='clear: both;'/> <! - clear for photos floats ->

Now go in the CSS template and before the closing]]> </ b: skin> Paste this code:
 

. {Rmlink
font-size: 100%;
float: right;
margin-right: 30px;
margin-top: 10px;
font-weight: bold;}
. Rmlink a {
font-style: normal;
font-weight: bold;
font-variant: small-caps;
font-family: Arial, Sans-Serif;
color: # 24618e; / * Link color * /}
. Rmlink a: visited {color: # 649dc7;} / * Link color after clicked * /
. Rmlink a: hover {color: red;} / * Link color when mousing over * /

Then look for the tag </ head> and paste this code on top of her other:


Reference sources 


Hiding the footer of the post on the homepage 

To hide the date and footer of posts on the home page, look for: 

]]> </ B: skin>

Paste the following code after this tag:
 

<b:if cond='data:blog.pageType == "index"'>
<style type='text/css'>. post-footer {display: none;} </ style>
</ B: if>
<b:if cond='data:blog.pageType == "index"'>
<style type='text/css'> h2.date-header {display: none;} </ style>
</ B: if>


To better understand the conditional Blogger, go to:
 
This last tip worked on Minimum Template and in my templates, but may not work for others, since the name of the selectors (. H2.date and post-footer-header), can vary from one model to another. 
Displaying only the text 
If you want to show only the text on the home and not the pictures, look for: 

<style type="text/css">
. Thumbnailimg IMG {
max-width: 150px;
width: expression (this.width> 150? 150: true);
max-height: 120px;
height: expression (this.height> 120? 120: true);
}
. {Thumbnailimg
float: left;
padding: 10px 0px 0px 5px;
}

Replace the whole section up by this:
 

<style type="text/css">
. Thumbnailimg IMG {
max-width: 150px;
width: expression (this.width> 150? 150: true);
max-height: 120px;
height: expression (this.height> 120? 120: true);
display: none:
}
. {Thumbnailimg
float: left;
padding: 10px 0px 0px 0px;
}

Slideshow on Blogger


Slideshow on BloggerThe latest craze on custom templates for Blogger, is the use of a slideshow at the top or bottom of posts header. 

There were already several ways to put a slideshow on Blogger, but most of them depended on externally host a file type. Js (javascript). 

Why was it bad? Because there is no on Blogger hosting service files, free services, many change rules without notice, deleting files or changing the URLs (addresses) of the same. 

Today I saw the excellent MetaBlog Spanish Gem Blog , a way to use a slideshow without hosting the external javascript file. 

See an example of this beautiful template Mamanunes - Template Animal 


To put a slideshow on your blog, first of all you need to find the images that will be part of the slide deck. In the tutorial girlfriend Gemma, images were used in the size 750 x 250 px. Edit the images of your choice, using an appropriate program or site and host them in Picasa. 
Make a backup of the template . Go to design> edit HTML and using the command Ctrl + F on your keyboard, look for the tag </ head>. Paste the following code before it: 

<style> #slidearea{ height: 250px; overflow: hidden; position: relative; width:980px; background:#fff; border:5px solid #fff; margin:20px 0px 20px 0px; box-shadow: 0 0 10px #aaa; -moz-box-shadow: 0 0 10px #aaa; -webkit-box-shadow: 0 0 10px #aaa; } ul.kwicks{ margin:0px; padding:0px 10px; list-style:none; } .kwicks li { float: left; width: 196px; height: 250px; position:relative; } .kwikmet{ position:absolute; bottom:10px; left:10px; right:10px; display:none; background:url(https://blogger.googleusercontent.com/img/b/R29vZ2xl/AVvXsEjCCHxmhMDvFI6F8sdQBfwIoH6KrXdhelSoxAKvmX8D7VIWNfWCsc6Yv-B6FJPmJrShtJgQOdC9fPVuz_yQ5L6DfZU7taHBgFZFbqWDMxReKqtSIVCt8ZFzehBhDTC-QTPkVvRpcC7qxfg/s1600/trans.png); padding:10px; width:710px; color:#888; } .kwikmet h2 a{ color:#fff; font-size:16px; font-family:georgia; font-weight:normal; padding-bottom:10px; } .slidimg{ width:750px; height:250px; } .rounded{ border-radius: 5px; -moz-border-radius: 5px; -webkit-border-radius: 5px; } </style> <script src='http://ajax.googleapis.com/ajax/libs/jquery/1.4.3/jquery.js' type='text/javascript'/> <script type='text/javascript'><!--//--><![CDATA[//><!-- /** * hoverIntent r5 // 2007.03.27 // jQuery 1.1.2+ * <http://cherne.net/brian/resources/jquery.hoverIntent.html> * * @param f onMouseOver function || An object with configuration options * @param g onMouseOut function || Nothing (use configuration options object) * @author Brian Cherne <brian@cherne.net> */ (function($){$.fn.hoverIntent=function(f,g){var cfg={sensitivity:7,interval:100,timeout:0};cfg=$.extend(cfg,g?{over:f,out:g}:f);var cX,cY,pX,pY;var track=function(ev){cX=ev.pageX;cY=ev.pageY;};var compare=function(ev,ob){ob.hoverIntent_t=clearTimeout(ob.hoverIntent_t);if((Math.abs(pX-cX)+Math.abs(pY-cY))<cfg.sensitivity){$(ob).unbind("mousemove",track);ob.hoverIntent_s=1;return cfg.over.apply(ob,[ev]);}else{pX=cX;pY=cY;ob.hoverIntent_t=setTimeout(function(){compare(ev,ob);},cfg.interval);}};var delay=function(ev,ob){ob.hoverIntent_t=clearTimeout(ob.hoverIntent_t);ob.hoverIntent_s=0;return cfg.out.apply(ob,[ev]);};var handleHover=function(e){var p=(e.type=="mouseover"?e.fromElement:e.toElement)||e.relatedTarget;while(p&&p!=this){try{p=p.parentNode;}catch(e){p=this;}}if(p==this){return false;}var ev=jQuery.extend({},e);var ob=this;if(ob.hoverIntent_t){ob.hoverIntent_t=clearTimeout(ob.hoverIntent_t);}if(e.type=="mouseover"){pX=ev.pageX;pY=ev.pageY;$(ob).bind("mousemove",track);if(ob.hoverIntent_s!=1){ob.hoverIntent_t=setTimeout(function(){compare(ev,ob);},cfg.interval);}}else{$(ob).unbind("mousemove",track);if(ob.hoverIntent_s==1){ob.hoverIntent_t=setTimeout(function(){delay(ev,ob);},cfg.timeout);}}};return this.mouseover(handleHover).mouseout(handleHover);};})(jQuery); //--><!]]></script> <script type='text/javascript'><!--//--><![CDATA[//><!-- /* Kwicks for jQuery (version 1.5.1) Copyright (c) 2008 Jeremy Martin http://www.jeremymartin.name/projects.php?project=kwicks Licensed under the MIT license: http://www.opensource.org/licenses/mit-license.php Any and all use of this script must be accompanied by this copyright/license notice in its present form. */ (function($){$.fn.kwicks=function(n){var p={isVertical:false,sticky:false,defaultKwick:0,event:'mouseover',spacing:0,duration:500};var o=$.extend(p,n);var q=(o.isVertical?'height':'width');var r=(o.isVertical?'top':'left');return this.each(function(){container=$(this);var k=container.children('li');var l=k.eq(0).css(q).replace(/px/,'');if(!o.max){o.max=(l*k.size())-(o.min*(k.size()-1))}else{o.min=((l*k.size())-o.max)/(k.size()-1)}if(o.isVertical){container.css({width:k.eq(0).css('width'),height:(l*k.size())+(o.spacing*(k.size()-1))+'px'})}else{container.css({width:(l*k.size())+(o.spacing*(k.size()-1))+'px',height:k.eq(0).css('height')})}var m=[];for(i=0;i<k.size();i++){m[i]=[];for(j=1;j<k.size()-1;j++){if(i==j){m[i][j]=o.isVertical?j*o.min+(j*o.spacing):j*o.min+(j*o.spacing)}else{m[i][j]=(j<=i?(j*o.min):(j-1)*o.min+o.max)+(j*o.spacing)}}}k.each(function(i){var h=$(this);if(i===0){h.css(r,'0px')}else if(i==k.size()-1){h.css(o.isVertical?'bottom':'right','0px')}else{if(o.sticky){h.css(r,m[o.defaultKwick][i])}else{h.css(r,(i*l)+(i*o.spacing))}}if(o.sticky){if(o.defaultKwick==i){h.css(q,o.max+'px');h.addClass('active')}else{h.css(q,o.min+'px')}}h.css({margin:0,position:'absolute'});h.bind(o.event,function(){var c=[];var d=[];k.stop().removeClass('active');for(j=0;j<k.size();j++){c[j]=k.eq(j).css(q).replace(/px/,'');d[j]=k.eq(j).css(r).replace(/px/,'')}var e={};e[q]=o.max;var f=o.max-c[i];var g=c[i]/f;h.addClass('active').animate(e,{step:function(a){var b=f!=0?a/fg:1;k.each(function(j){if(j!=i){k.eq(j).css(q,c[j]-((c[j]-o.min)*b)+'px')}if(j>0&&j<k.size()-1){k.eq(j).css(r,d[j]-((d[j]-m[i][j])*b)+'px')}})},duration:o.duration,easing:o.easing})})});if(!o.sticky){container.bind("mouseleave",function(){var c=[];var d=[];k.removeClass('active').stop();for(i=0;i<k.size();i++){c[i]=k.eq(i).css(q).replace(/px/,'');d[i]=k.eq(i).css(r).replace(/px/,'')}var e={};e[q]=l;var f=lc[0];k.eq(0).animate(e,{step:function(a){var b=f!=0?(ac[0])/f:1;for(i=1;i<k.size();i++){k.eq(i).css(q,c[i]-((c[i]-l)*b)+'px');if(i<k.size()-1){k.eq(i).css(r,d[i]-((d[i]-((i*l)+(i*o.spacing)))*b)+'px')}}},duration:o.duration,easing:o.easing})})}})}})(jQuery); //--><!]]></script> <script type='text/javascript'> jQuery().ready(function() { jQuery(&#39;.kwicks&#39;).kwicks({ max: 750, duration: 1000 }); jQuery(&quot;.kwik&quot;).hoverIntent(function() { jQuery(this).children(&quot;.kwikmet&quot;).fadeIn(&quot;slow&quot;) ; }, function() { jQuery(this).children(&quot;.kwikmet&quot;).fadeOut(&quot;3000&quot;); }); }); </script> 

Preview the template to check if everything is fine and save. 

Now, go to design> page elements and click add gadget. 

Choose the gadget HTML / JavaScript and paste the following code: 

 <div id='slidearea'> <ul class='kwicks'> <li class='kwik'> <a href='#'> <img alt="" class="slidimg" src="URL da imagem" style="width: 750px; height: 250px;" /> </a> <div class='kwikmet rounded'> <h2><a href='#' rel='bookmark' title=''>Título</a></h2> <p>Conteúdo</p> </div> </li> <li class='kwik'> <a href='#'> <img alt="" class="slidimg" src="URL da imagem" style="width: 750px; height: 250px;" /> </a> <div class='kwikmet rounded'> <h2><a href='#' rel='bookmark' title=''>Título</a></h2> <p>Conteúdo</p> </div> </li> <li class='kwik'> <a href='#'> <img alt="" class="slidimg" src="URL da imagem" style="width: 750px; height: 250px;" /> </a> <div class='kwikmet rounded'> <h2><a href='#' rel='bookmark' title=''>Título</a></h2> <p>Conteúdo</p> </div> </li> <li class='kwik'> <a href='#'> <img alt="" class="slidimg" src="URL da imagem" style="width: 750px; height: 250px;" /> </a> <div class='kwikmet rounded'> <h2><a href='#' rel='bookmark' title=''>Título</a></h2> <p>Conteúdo</p> </div> </li> <li class='kwik'> <a href='#'> <img alt="" class="slidimg" src="URL da imagem" style="width: 750px; height: 250px;" /> </a> <div class='kwikmet rounded'> <h2><a href='#' rel='bookmark' title=''>Título</a></h2> <p>Conteúdo</p> </div> </li> </ul> <div class='clear'/> </div></div> 

Each slide is that you include, make the following substitutions: 

<a href=''> # (put the link that will be associated with the image)
<img alt="" class="slidimg" src=" image URL "style="width: 750px; height: 250px;" />
</ A> (paste the URL of the image and size)
<div class='kwikmet rounded'>
<h2> <a href='#' rel='bookmark' title=''> Title </ a> </ h2> (give a title to the image)
<p> Content </ p> (type a description)

See an example, using the template Style: 

<A href = ' http://www.templates.dicasblogger.com.br/2010/09/template-style.html '> (link to be associated with the image)
<Img alt = "" class = "slidimg" src = "https://blogger.googleusercontent.com/img/b/R29vZ2xl/AVvXsEhk8wobslrmPC23yFaHm_kg-Au7hz940JmFFTmfJx687kWN3bII3_slkzAfZBAS7mKzRdMwxaZcWnN64B4OEYRYq_4KFzAqve9Ya2xNtfmYWN3TNDlegRvpKQpreXHt0xOo5KxHkCJDy6V-/?imgmax=800 "style =" width: 750px; height: 250px ; "/>
</ A> (URL and image size)
<div class='kwikmet rounded'>
<h2> <a href='#' rel='bookmark' title=''> Template Style </ a> </ h2> (title)
<p> Style template has 1 column on each side etc ... </ p> (description)

Facebook: how to stop receiving updates on your wall, without breaking the friendship

face-likeFacebook: how to stop receiving updates on your wall, without breaking the friendship - Perhaps not everyone knows this function, but you can stop receiving updates from friends and relatives on Facebook, without the person knowing. Currently, I have seen many people complaining about other people's posts on Facebook and I think every one should post what you will, but ..... stop following a friend or relative can be a little embarrassing, leading to family conflicts. 


If you want to get rid of the publications of someone without having to stop following that person - what is called in Facebook "undo friendship" just knowing configure what should appear on your wall, in "news feeds." 
Guinea pig, I'll get the profile of our former columnist, Luan Felipe: 


fecabook-perfil


In the new timeline, clicking the "friends" appear several options. If you do not want to receive more NO-related update boring friend, simply uncheck the "show in the news feed." 
If you want to select the updates that will appear on your wall, click on "settings" and choose from the options available: 


face-feeds
As you can see, I subscribe to the posts straight Luan Smiley flashing
Another way to limit the publications of several people at the same time, putting them in the "known".In this case, we receive the updates, but with little frequency. Go to "start page" in the left column and click on "Friends" (until the other day it was called "list", but Mark Zuckerberg loves change ...). Click on 'known' 


facebook-listas
On the right side, you will see the option to add everyone you want 


conhecidos-facebook
My "known" will stay a secret hehehe. And yet the facebook suggests who can put on that list. Get to work! Cheerful

Translator Widget - a new translator for blogs


Translator Widget - a new translator for blogsSince I started my promotion templates in foreign sites, I received many emails in other languages. It had been a long time I was looking for a widget with a Google translator to make life easier for my readers gringos, but could not find anything I liked.
After much research on the web, I have gathered several codes and ended up creating a widget to my taste, the result of which can be seen in our first sidebar.
Commenting on Twitter, several readers were interested in using the widget on their blogs, so I decided to make it available for everyone \ o /


TRANSLATOR WIDGET WITH EDGE AND THE BACKGROUND (customizable)

Tradutor com fundo e borda

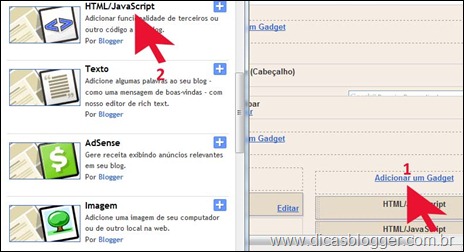
Click the link above and copy all the code. Among the Blogger dashboard and click design. On page elements tab, click add gadget (1) and choose html / javascript (2). Paste the code and save the translator.


The translator comes with edge and dark gray with light gray background. To change the colors, change the following pieces of code (= red border, green background =)

<div style=" solid # ccc border :1px ;padding:10px 4px 3px 4px;text-align:center;background-color:# efefef ;">

If you do not know the color number you want to use, check the color chart web .
If you prefer, we have a translator widget with transparent background.


TRANSLATOR EDGE WIDGET WITHOUT AND WITH TRANSPARENT BACKGROUND

Tradutor com fundo transparente

I ask that the credits are kept at the bottom of the gadget. Thank you.

How to put a link in an image


How to put a link in an imageYou thought the series was over First Steps? Nothing! Every day I get more and more questions with the very basics. So today I will teach step-by-step, how to put a link on an image to direct it to another web page.
  1. Choose the picture
  2. Stay at a site of your choice ( learn more here )
  3. Copy the image address ( read more )
  4. Use the code below
<a href="endereço of site"> <img src="endereço of imagem" /> </ a>
Example: 
I will use the image to put Feeds Template Songs: 

Feeds 
Now I'll host it in Picasa and copy her address 
upload url 
I obtained the following address: 
http://lh4.ggpht.com/_mcq01yDJ2uY/SXUiVhRAGgI/AAAAAAAAAUs/pu2fQkzWOoc/600px-Feed_Icon_Bl-Or.png
I want this user to direct the feeds from my blog. The code looks like this: 
<a href="http://feeds.feedburner.com/dicasblogger"> <img /> </ A>
You see the result by clicking the image below:
 
There are several other ways of doing this: 
In Windows Live Writer 
Choose the hard disk image, click on it and choose "link to url". In the box that will open, put the url of the image. Do not know what is Windows Live Writer? Then click here .
live writer 
In NVU Portable 
Click the icon to add a picture. In the new window, put the url of the image in "address" and the link to be directed on the "link". In "description" put a phrase to help the user locate and "Alternate Text", a word to identify the image. Copy the code and paste it where you want.

configuração código-fonte 
To know what is NVU Portable, click here . 


Access the updated post and stay on top of new options for the new interface!! Putting links to open in new window 


Tip Aunt Juliana 
When I want to link an image to a post, I use the Writer. For the sidebar, always use NVU, the possibility of putting a description. 
Until next time!