Showing posts with label Blogger Template. Show all posts

Installing Snow Effect in Blog


Installing Snow Effect in Blog - Pingin snowing on your blog to make it look more lively and cool (read: cool)? Well, then you need to put on the blog snow effect you. 

To install snow effect, it is very easy: 
1. Open blogger. Go to the menu Design -> Page Elements 
2. Click the Add a Gadgets -> HTML / Javascript 
3. Insert the following script into the box


<script src='http://hbhost.googlecode.com/files/snow.js' type='text/javascript'> </script>
4. Press Save . Finish is tough is not it? If you do not want to bother ya use any of the following ways 1. click the Add Effect Snow In the blog below


2. Select the blog you want to install snow effect and then click Add Widget
3. Finish. luck ...

How to Change Cursor Display Blog


How to Change Cursor Display Blog - By default, the display cursor on the blog are arrow-shaped, but for those of you who are bored with the look of them or would like to give admiration for visitors. You can replace the icon image so that when a visitor comes to your blog, the display cursor icon will change according to what you use. In order to more clearly you can see here .

change the cursor into the image icon, it is very easy. Here are the steps: 
1. Log in to Blogger. Go to the menu Design-> Edit HTML 
2. Find the code</ head> 
3. Put the following css code above


<style type="text/css">
HTML,BODY{cursor: url("http://downloads.totallyfreecursors.com/thumbnails/cool1.gif"), auto;}
</style>

Description: 


The text in red is the url address of the cursor. Please change the url address you want to use the cursor.

4. After that, save your template. Done If you do not have a cursor icon, try visiting http://www.totallyfreecursors.com . 
The site provides hundreds of thousands of interesting cursor icon that you can choose according to taste. Congratulations creative blog :)

Designer model - how to remove navbar


Designer model - how to remove navbar - If you're already using one of the new Blogger templates, page through Blogger in Draft , know that removing the navbar just got easier.
I have explained in this post How to create a template for Blogger / Blogspot , but it seems that not everyone could understand. Therefore, I will explain in detail.

Access the template designer, click Advanced (1) and then add CSS (2). Paste the code below into the blank portion (3) and press the enter key on your keyboard.

# Navbar-iframe {height: 0px; visibility: transparent; display: transparent;}

retirar_navbar
Click on image to enlarge

Once you paste the code and hit the enter key, the navbar will be invisible. 
To my knowledge, there is no restriction on the part of the Blogger as the withdrawal of navbar: 

Confirmed: Blogger NavBar is optional - User Compulsive blog
While we do not recommend or support the removal of the Blogger navbar, there is nothing in our Terms of Service That Explicitly mandate its use. Source: Blogger forum English


UPDATE - This method is no longer working as well, since the team has been making changes in Blogger Template Designer. The @velosomanel , posted on his blog Blogger Drafts, a way to completely remove the navbar and that can be adapted to new models. Among the html and search for <body class='loading'>
Cole just before the following code:

<- Navbar ->
<script type='text/javascript'>
<! [CDATA [
<-
/ * <body> * /
->
]]>
</ Script>
<- Navbar ->

Accept deleting the widget and save navbar.
 
Sources: Blogger Plugins and Blogger Drafts

Slideshow on Blogger


Slideshow on BloggerThe latest craze on custom templates for Blogger, is the use of a slideshow at the top or bottom of posts header. 

There were already several ways to put a slideshow on Blogger, but most of them depended on externally host a file type. Js (javascript). 

Why was it bad? Because there is no on Blogger hosting service files, free services, many change rules without notice, deleting files or changing the URLs (addresses) of the same. 

Today I saw the excellent MetaBlog Spanish Gem Blog , a way to use a slideshow without hosting the external javascript file. 

See an example of this beautiful template Mamanunes - Template Animal 


To put a slideshow on your blog, first of all you need to find the images that will be part of the slide deck. In the tutorial girlfriend Gemma, images were used in the size 750 x 250 px. Edit the images of your choice, using an appropriate program or site and host them in Picasa. 
Make a backup of the template . Go to design> edit HTML and using the command Ctrl + F on your keyboard, look for the tag </ head>. Paste the following code before it: 

<style> #slidearea{ height: 250px; overflow: hidden; position: relative; width:980px; background:#fff; border:5px solid #fff; margin:20px 0px 20px 0px; box-shadow: 0 0 10px #aaa; -moz-box-shadow: 0 0 10px #aaa; -webkit-box-shadow: 0 0 10px #aaa; } ul.kwicks{ margin:0px; padding:0px 10px; list-style:none; } .kwicks li { float: left; width: 196px; height: 250px; position:relative; } .kwikmet{ position:absolute; bottom:10px; left:10px; right:10px; display:none; background:url(https://blogger.googleusercontent.com/img/b/R29vZ2xl/AVvXsEjCCHxmhMDvFI6F8sdQBfwIoH6KrXdhelSoxAKvmX8D7VIWNfWCsc6Yv-B6FJPmJrShtJgQOdC9fPVuz_yQ5L6DfZU7taHBgFZFbqWDMxReKqtSIVCt8ZFzehBhDTC-QTPkVvRpcC7qxfg/s1600/trans.png); padding:10px; width:710px; color:#888; } .kwikmet h2 a{ color:#fff; font-size:16px; font-family:georgia; font-weight:normal; padding-bottom:10px; } .slidimg{ width:750px; height:250px; } .rounded{ border-radius: 5px; -moz-border-radius: 5px; -webkit-border-radius: 5px; } </style> <script src='http://ajax.googleapis.com/ajax/libs/jquery/1.4.3/jquery.js' type='text/javascript'/> <script type='text/javascript'><!--//--><![CDATA[//><!-- /** * hoverIntent r5 // 2007.03.27 // jQuery 1.1.2+ * <http://cherne.net/brian/resources/jquery.hoverIntent.html> * * @param f onMouseOver function || An object with configuration options * @param g onMouseOut function || Nothing (use configuration options object) * @author Brian Cherne <brian@cherne.net> */ (function($){$.fn.hoverIntent=function(f,g){var cfg={sensitivity:7,interval:100,timeout:0};cfg=$.extend(cfg,g?{over:f,out:g}:f);var cX,cY,pX,pY;var track=function(ev){cX=ev.pageX;cY=ev.pageY;};var compare=function(ev,ob){ob.hoverIntent_t=clearTimeout(ob.hoverIntent_t);if((Math.abs(pX-cX)+Math.abs(pY-cY))<cfg.sensitivity){$(ob).unbind("mousemove",track);ob.hoverIntent_s=1;return cfg.over.apply(ob,[ev]);}else{pX=cX;pY=cY;ob.hoverIntent_t=setTimeout(function(){compare(ev,ob);},cfg.interval);}};var delay=function(ev,ob){ob.hoverIntent_t=clearTimeout(ob.hoverIntent_t);ob.hoverIntent_s=0;return cfg.out.apply(ob,[ev]);};var handleHover=function(e){var p=(e.type=="mouseover"?e.fromElement:e.toElement)||e.relatedTarget;while(p&&p!=this){try{p=p.parentNode;}catch(e){p=this;}}if(p==this){return false;}var ev=jQuery.extend({},e);var ob=this;if(ob.hoverIntent_t){ob.hoverIntent_t=clearTimeout(ob.hoverIntent_t);}if(e.type=="mouseover"){pX=ev.pageX;pY=ev.pageY;$(ob).bind("mousemove",track);if(ob.hoverIntent_s!=1){ob.hoverIntent_t=setTimeout(function(){compare(ev,ob);},cfg.interval);}}else{$(ob).unbind("mousemove",track);if(ob.hoverIntent_s==1){ob.hoverIntent_t=setTimeout(function(){delay(ev,ob);},cfg.timeout);}}};return this.mouseover(handleHover).mouseout(handleHover);};})(jQuery); //--><!]]></script> <script type='text/javascript'><!--//--><![CDATA[//><!-- /* Kwicks for jQuery (version 1.5.1) Copyright (c) 2008 Jeremy Martin http://www.jeremymartin.name/projects.php?project=kwicks Licensed under the MIT license: http://www.opensource.org/licenses/mit-license.php Any and all use of this script must be accompanied by this copyright/license notice in its present form. */ (function($){$.fn.kwicks=function(n){var p={isVertical:false,sticky:false,defaultKwick:0,event:'mouseover',spacing:0,duration:500};var o=$.extend(p,n);var q=(o.isVertical?'height':'width');var r=(o.isVertical?'top':'left');return this.each(function(){container=$(this);var k=container.children('li');var l=k.eq(0).css(q).replace(/px/,'');if(!o.max){o.max=(l*k.size())-(o.min*(k.size()-1))}else{o.min=((l*k.size())-o.max)/(k.size()-1)}if(o.isVertical){container.css({width:k.eq(0).css('width'),height:(l*k.size())+(o.spacing*(k.size()-1))+'px'})}else{container.css({width:(l*k.size())+(o.spacing*(k.size()-1))+'px',height:k.eq(0).css('height')})}var m=[];for(i=0;i<k.size();i++){m[i]=[];for(j=1;j<k.size()-1;j++){if(i==j){m[i][j]=o.isVertical?j*o.min+(j*o.spacing):j*o.min+(j*o.spacing)}else{m[i][j]=(j<=i?(j*o.min):(j-1)*o.min+o.max)+(j*o.spacing)}}}k.each(function(i){var h=$(this);if(i===0){h.css(r,'0px')}else if(i==k.size()-1){h.css(o.isVertical?'bottom':'right','0px')}else{if(o.sticky){h.css(r,m[o.defaultKwick][i])}else{h.css(r,(i*l)+(i*o.spacing))}}if(o.sticky){if(o.defaultKwick==i){h.css(q,o.max+'px');h.addClass('active')}else{h.css(q,o.min+'px')}}h.css({margin:0,position:'absolute'});h.bind(o.event,function(){var c=[];var d=[];k.stop().removeClass('active');for(j=0;j<k.size();j++){c[j]=k.eq(j).css(q).replace(/px/,'');d[j]=k.eq(j).css(r).replace(/px/,'')}var e={};e[q]=o.max;var f=o.max-c[i];var g=c[i]/f;h.addClass('active').animate(e,{step:function(a){var b=f!=0?a/fg:1;k.each(function(j){if(j!=i){k.eq(j).css(q,c[j]-((c[j]-o.min)*b)+'px')}if(j>0&&j<k.size()-1){k.eq(j).css(r,d[j]-((d[j]-m[i][j])*b)+'px')}})},duration:o.duration,easing:o.easing})})});if(!o.sticky){container.bind("mouseleave",function(){var c=[];var d=[];k.removeClass('active').stop();for(i=0;i<k.size();i++){c[i]=k.eq(i).css(q).replace(/px/,'');d[i]=k.eq(i).css(r).replace(/px/,'')}var e={};e[q]=l;var f=lc[0];k.eq(0).animate(e,{step:function(a){var b=f!=0?(ac[0])/f:1;for(i=1;i<k.size();i++){k.eq(i).css(q,c[i]-((c[i]-l)*b)+'px');if(i<k.size()-1){k.eq(i).css(r,d[i]-((d[i]-((i*l)+(i*o.spacing)))*b)+'px')}}},duration:o.duration,easing:o.easing})})}})}})(jQuery); //--><!]]></script> <script type='text/javascript'> jQuery().ready(function() { jQuery(&#39;.kwicks&#39;).kwicks({ max: 750, duration: 1000 }); jQuery(&quot;.kwik&quot;).hoverIntent(function() { jQuery(this).children(&quot;.kwikmet&quot;).fadeIn(&quot;slow&quot;) ; }, function() { jQuery(this).children(&quot;.kwikmet&quot;).fadeOut(&quot;3000&quot;); }); }); </script> 

Preview the template to check if everything is fine and save. 

Now, go to design> page elements and click add gadget. 

Choose the gadget HTML / JavaScript and paste the following code: 

 <div id='slidearea'> <ul class='kwicks'> <li class='kwik'> <a href='#'> <img alt="" class="slidimg" src="URL da imagem" style="width: 750px; height: 250px;" /> </a> <div class='kwikmet rounded'> <h2><a href='#' rel='bookmark' title=''>Título</a></h2> <p>Conteúdo</p> </div> </li> <li class='kwik'> <a href='#'> <img alt="" class="slidimg" src="URL da imagem" style="width: 750px; height: 250px;" /> </a> <div class='kwikmet rounded'> <h2><a href='#' rel='bookmark' title=''>Título</a></h2> <p>Conteúdo</p> </div> </li> <li class='kwik'> <a href='#'> <img alt="" class="slidimg" src="URL da imagem" style="width: 750px; height: 250px;" /> </a> <div class='kwikmet rounded'> <h2><a href='#' rel='bookmark' title=''>Título</a></h2> <p>Conteúdo</p> </div> </li> <li class='kwik'> <a href='#'> <img alt="" class="slidimg" src="URL da imagem" style="width: 750px; height: 250px;" /> </a> <div class='kwikmet rounded'> <h2><a href='#' rel='bookmark' title=''>Título</a></h2> <p>Conteúdo</p> </div> </li> <li class='kwik'> <a href='#'> <img alt="" class="slidimg" src="URL da imagem" style="width: 750px; height: 250px;" /> </a> <div class='kwikmet rounded'> <h2><a href='#' rel='bookmark' title=''>Título</a></h2> <p>Conteúdo</p> </div> </li> </ul> <div class='clear'/> </div></div> 

Each slide is that you include, make the following substitutions: 

<a href=''> # (put the link that will be associated with the image)
<img alt="" class="slidimg" src=" image URL "style="width: 750px; height: 250px;" />
</ A> (paste the URL of the image and size)
<div class='kwikmet rounded'>
<h2> <a href='#' rel='bookmark' title=''> Title </ a> </ h2> (give a title to the image)
<p> Content </ p> (type a description)

See an example, using the template Style: 

<A href = ' http://www.templates.dicasblogger.com.br/2010/09/template-style.html '> (link to be associated with the image)
<Img alt = "" class = "slidimg" src = "https://blogger.googleusercontent.com/img/b/R29vZ2xl/AVvXsEhk8wobslrmPC23yFaHm_kg-Au7hz940JmFFTmfJx687kWN3bII3_slkzAfZBAS7mKzRdMwxaZcWnN64B4OEYRYq_4KFzAqve9Ya2xNtfmYWN3TNDlegRvpKQpreXHt0xOo5KxHkCJDy6V-/?imgmax=800 "style =" width: 750px; height: 250px ; "/>
</ A> (URL and image size)
<div class='kwikmet rounded'>
<h2> <a href='#' rel='bookmark' title=''> Template Style </ a> </ h2> (title)
<p> Style template has 1 column on each side etc ... </ p> (description)

Changing the Header Template In Blogger

blogger template header

Changing the Header Template In BloggerSo that your blog look unique or different from the others. 
Then you have to change the look of your blog. There are many ways to do it. For example, by changing the template created by a third party but the average template is already using it. Unless you create your own templates, but this method requires a long time and is not easy to make a good template. 

So one of the most convenient and effective way is to change the header on a template . 


Header is the most important element in a template for every visitor that comes to your blog first seen is a header. So changing the header is the most appropriate way. Header does not have to be a picture. You can also use the text as an important header unsightly. 
If you want to use an image as a header but could not make it. Do not worry, because now there are many websites that provide free header images so you just download it. 
Some websites have a pretty good header like: 100pixel.blogspot.com , freewebpageheaders.com ,smashingmagazine.com , and much more. In this post I will discuss about changing the header of freewebpageheaders.com . 


To download it, please follow the steps below: 

1. Go to website http://freewebpagesheaders.com/gallery 
2.To download headers. You must have an account first. Click register to register. 
3.Click Agree . 

Then you will be asked to fill out the Registration form. 
This form consists of 2 parts: Required information and optional information . Required information is the info you need to provide for the registration while the optional information is information that is used to display your data when you login to the visitor. If you feel no need then ignored for this section 

4. Then click Submit Registration Form . If it is you will get a message like this. 
5. Open the email you used to register. Click on the link provided to mengakftifkan your account.
 6. If you have, you will get a message that your account has been activated.
 7. click Return to the front page of free Web Page Headers . 
8. Then click Login to download the image header. 
9. Select a category header you want. If you have found a suitable picture. Click on the image and then click Download . 1
0. Then the picture will open in a new page. Right click on the image and choose Save Image As and press Save . 
11. Completed. 


Now the image is stored on your computer the next step you should do is find out how the size of the header in your template so that when mamasang size fit your template header. 

How: 

1. Click the Layout -> Edit HTML . 
2. Find code # header-wrapper . So that's easy to search for, press Ctrl + Ftype "header-wrapper" and then press Next . 
3. If you have found there is usually a code width and height around. For example, # header-wrapper {background: url} no-repeat; width: 980px; height: 100px; Width is the length of the header andHeight are the width of the header. Meaning you have to resize the image to 980x100 pixels. You can use an image processing program such as MS Paint, ACD See, photoshop for meresizenya. 
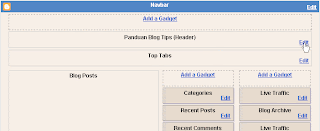
4. Once completed. Go to Blogger , go toDesign -> Page Elements . 
5. Click Edit on the Header. 
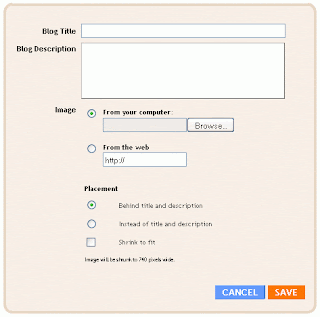
6. Then a new page will appear. 
7. Select Browse from your computer if the picture is stored dikomputer or Browse from the web if the images are stored on image hosting such as Imageshack, Photobucket, and Geocities. 
8. In the "Placement". Select Behind title and description if you want to showing the picture behind the blog title and description or select Instead of title and description if you want to cover the blog title and description. 
9. Then click Save . 
Click View Blog to see the results. 


Note:Not all templates can be mounted image. Some use text only. So choose the template as needed. luck. Good luck ...


How to Overcome Add Widget HTML / Javascript Untitled


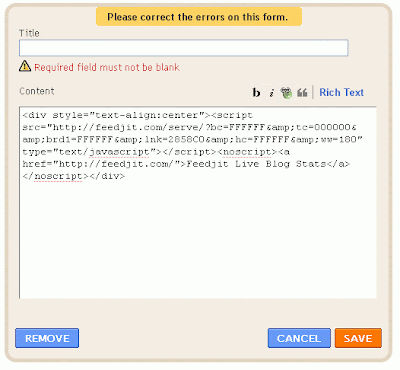
Yesterday when I want to edit one of the widget HTML / Javascript without the title, I am experiencing a problem where when i press the button Save the error message that says I have to give the title of the column title. This also happens when I want to add the widget HTML / javascript new. Whereas before I could do it without a title.Initially I thought maybe this blog template that error then I try it on another blog, but the result is the same. I was trying to figure out this problem by Googling but no one has discussed it. With anxiety I was trying to ask some other bloggers. Apparently they are also experiencing the same thing. Calm had my heart because blogger.com itself that changes the system not because my account is problematic I do not know why blogger.com to do this because I think so little flexibility. What do you think?Btw, as a user I can only accept it: ( So is there any way to get this widget title does not appear? Yup after check and re finally I found one way to titlenya not appear on the blog pages by removing the code of the widget title . similar results exactly with the old look. those of you who want to add the widget HTML / javascript without a caption. following way: 1. Make first widget HTML / Javasript you want to add to your blog title any premises up. 2. If so, go to menu Design -> Edit HTML . You can check the "Expand Widget Templates." To be safe backup of your template after the title search widget that you created earlier example you give the title of " banner ads "then find the word in your template. 3. order more easily, use the Find box to search for it. Press Ctrl + F and enter a key word and then tap Next . 4. If you have found searching the code <h2 class='title'> <data:title/> </ h2> which is located several line below. Consider the figure below ( click to enlarge).

widget error


widget title

5. Delete the code are then tap Save Template . Finish. If at any time you want to bring back titlenya stay just add code <h2 class='title'> <data:title/> </ h2> in the same place or remove the widget and create a new one. Gampangkan? May be useful. those of you who have a more effective way could share here. thanks 

Another STUNNING Magazine Style Blogger Template "Noventure"


stunning blogger template Novinture

It's been quite a while since I've released any new blogger template...because of my studies,etc..but, Here I'm ...again back with another Stunningly looking Magazine Style Blogger Template.."Noventure".

I've did so many blogger templates sofar, but for me this one is the best of all.. I love the color combination..looks very professional and cool... and of course with amazing slideshow feature.


Features :
  • Top Nav links
  • Stunning Slideshow
  • Retweet button
  • Facebook Share button
  • 4 Column footer
  • Email Subscriptions
  • Feed Counter
  • Built in Search Box
  • Wonderful Comment section (with avatars)
  • Most Wanted feature.. Page Navigation Enabled
  • Automatic Thumbnails on homepage
  • Automatic Post summaries on homepage
  • Advertisement banner ready (on header)
  • many more.....


screenshots...

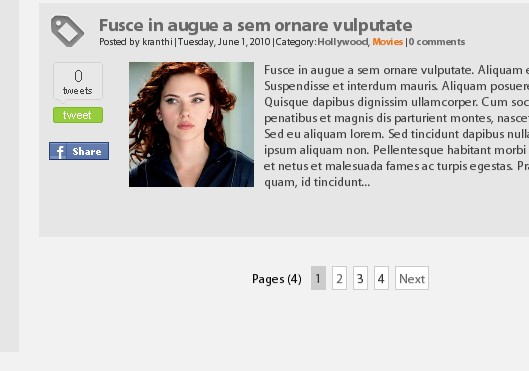
Page Navigation Ready!


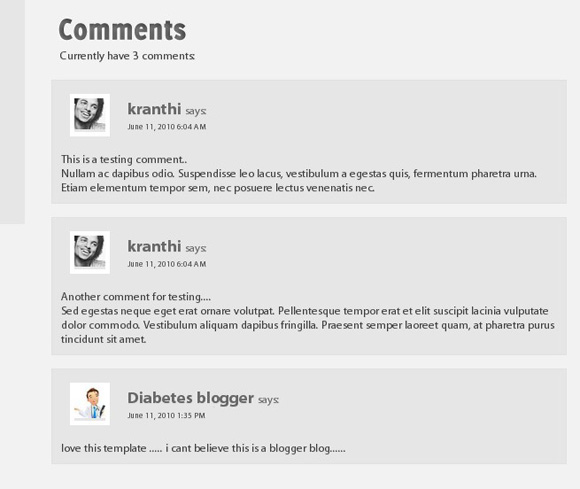
Clean and Professional Comments Section


comments section

And the best thing is..its very easy to install.

Here are Installation Instructions:
(Before you do this, first backup your current template)

1. Download the template and Sign into Blogger » Design » Edit html

and Upload the template file (xml file) and Save it.

2. Editing Top Navigation Links...

To Edit the top Nav links (Home, About Us, Photos,etc..)

Sign into Blogger » Design » Edit html » Tick the "Expand Widget Templates"

Control + F (to search)

Find these lines

<li>

<a href='http://www.bloggertricks.com'>Blog Tips</a>

<ul>

<li><a href='http://templates.bloggertricks.com'>Blogger Templates</a></li>

</ul>

</li>
<li><a href='http://YOURLINK.blogspot.com'>About Us</a></li>

<li><a href='http://YOURLINK.blogspot.com'>Photos</a></li>

<li><a href='http://YOURLINK.blogspot.com'>Videos</a></li>

<li><a href='http://YOURLINK.blogspot.com'>Contact</a></li>


Edit the URL's and their respective Anchor Text's to whatever you like.


3. Editing the Feedburner links

Suppose, if your Blog's Feedburner url is

http://feeds2.feedburner.com/YOURBLOG


Search for "BloggerTricksdotcom" in the template code.. (it will appear 5 times)
and replace every "BloggerTricksdotcom" with "YOURBLOG"

Save the template!


And for Editing Slideshow, Adding Adsense inside post,etc .. Refer to the Complete guide.

If you've any questions,doubts... feel free to ask HERE (template support link) .. I'll help you out..

I hope All of you like the template... looking forward for the comments! :)