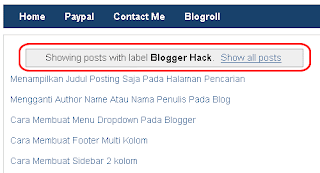
Showing posts with label Blogger Hack. Show all posts

How to Display Form Comments Only in Specific Postings


How to Display Form Comments Only in Specific PostingsA few days ago, there was a blogger friend who asked me via email about how to display the comment form only in certain posts . Since the question is quite interesting and it is possible there are other bloggers who do not know how. 

So on this occasion I will try to explain it here. Well to display the comments form only in a particular post is very easy, because blogger.com has provided an option for it, so we just want to determine which post comments displayed form and which are not .
these options can be found at the bottom of the page post editor. Watch my column below the red line:


By default, the comments will always be "allow", if you do not want readers to comment on your posts, simply select "Do not allow" the commentary form will disappear. It's as easy a try. If there are less obvious please inquire through the comment form.

Submit your RSS feed to Facebook


Submit your RSS feed to Facebook - If you want your blog posts can be read by more people then one way you have to do is submit your RSS feed to Facebook .
 By submitting your blog RSS feed into Facebook, then every time you post a new article, the article will appear automatically posted on your facebook profile so your friends or your facebook friends can read your blog posts directly on your facebook profile page. If your articles are good they certainly will visit your blog to read further so that it can also promote your blog. 
Regarding how to submit your RSS feed to Facebook actually I've posted on this blog. But because Facebook has changed the display page and to submit RSS feature has also been removed so that way previously been unusable. Though Facebook already does not provide a feature to submit rss feed.But now there are many facebook applications that can perform this task. One that I use is the RSS Graffiti . 

RSS Graffiti will automatically submit your blog posts to your facebook profile page every time you update the post so you do not have to submit articles manually to facebook. What you should do is open the app and graffiti RSS add the address of your blog feed. After that everything will run automatically .. tis .. tis .. tis addition, RSS Graffiti also provides multiple settings so you can customize the display according to the feeds you want. Several features provided by the RSS graffiti such as:


  1. Allows you to set the appearance of the article in the form of regular feed or short messages such as Twitter
  2. Filtering articles from a specific date
  3. Giving an additional message on any article published
  4. Set posting schedule
  5. Tweak to publish twitter facebook

How to submit RSS feeds to RSS Graffiti

1. Log in to Facebook. 
2. Open the RSS Graffiti application and run it. 
3. After that, click Add Feed . 
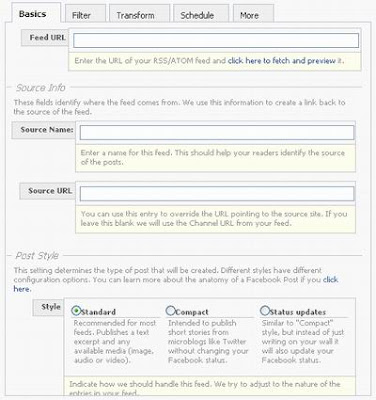
4. Then the page will appear as follows

Feed URL : browse your blog feed address. Examplehttp://bloganda.blogspot.com/feeds/posts/default 
Source Name : Fill in the name of your blog Source URL : Fill out your blog style Post : Let the 'Standard'. If you want to post up in the form of a short message such as Twitter select 'Compact' or 'status updates'

5. If you have press Save . Done Now every time you post an article, the article will automatically appear at page facebook.

Designer model - how to remove navbar


Designer model - how to remove navbar - If you're already using one of the new Blogger templates, page through Blogger in Draft , know that removing the navbar just got easier.
I have explained in this post How to create a template for Blogger / Blogspot , but it seems that not everyone could understand. Therefore, I will explain in detail.

Access the template designer, click Advanced (1) and then add CSS (2). Paste the code below into the blank portion (3) and press the enter key on your keyboard.

# Navbar-iframe {height: 0px; visibility: transparent; display: transparent;}

retirar_navbar
Click on image to enlarge

Once you paste the code and hit the enter key, the navbar will be invisible. 
To my knowledge, there is no restriction on the part of the Blogger as the withdrawal of navbar: 

Confirmed: Blogger NavBar is optional - User Compulsive blog
While we do not recommend or support the removal of the Blogger navbar, there is nothing in our Terms of Service That Explicitly mandate its use. Source: Blogger forum English


UPDATE - This method is no longer working as well, since the team has been making changes in Blogger Template Designer. The @velosomanel , posted on his blog Blogger Drafts, a way to completely remove the navbar and that can be adapted to new models. Among the html and search for <body class='loading'>
Cole just before the following code:

<- Navbar ->
<script type='text/javascript'>
<! [CDATA [
<-
/ * <body> * /
->
]]>
</ Script>
<- Navbar ->

Accept deleting the widget and save navbar.
 
Sources: Blogger Plugins and Blogger Drafts

Sitemap for Blogger / Blogspot


Sitemap for Blogger / Blogspot - How about having a page on your blog where all your posts are organized by date? We might call this page or Sitemap Blog Archive and it can be quite useful when a visitor can not find any specific post on your blog using search or even if this visitor want to read everything you've posted.
If you want to see how well a page, take a look at what I created on my blog at this link . If you want a page equal to your blog, follow the tutorial below.


First create a new page on your blog (1) and enter the HTML editing mode (2). Copy the code below, changing the part in red the full address of your blog. Paste the code into the html page (3) and click publish now.

<script style="text/javascript" src="http://100rede.com/mapablogger.js"> </ script>
<Script
sitemap_blogger

See the result file's Blogger Tips in the image below: 

Arquivo ou mapa
Remarks:
I got this tip from the blog Abu Farhan , credits the script were kept, and I just translate the month names into Portuguese.
I do not know how Google bots can interpret this new page on your blog full of internal links, I believe it would not yield any punishment in Google search results, but I can not say such a thing with certainty.
Realize that there is a value in the URL that indicates the number of posts to be displayed, in the example above this value is set to 1000 because I wanted to show all of my blog posts on the map.Change the value as the number of posts on your blog, always put a value well above the number of posts on your blog will ensure that all are shown.

How to put a Facebook button on Blogger


How to put a Facebook button on Blogger - With the popularity of applications like Farmiville and other online games, Facebook got an explosive growth in Brazil. Stay out of Facebook is to miss the opportunity to receive thousands of visitors to your blog or site. I'll start a series of articles teaching how to integrate a blog to Facebook, and the first is how to put a Facebook button on Blogger: 


The advantage of using the "Like" button (or "Like" in English and "Like", in Portuguese of Portugal) is that whenever someone clicks on the button will be a status update on the mural with the Facebook profile link the post in question.
 The friends of this profile also will receive this update. To put this button, like the Twitter button , you do not need Facebook account. 

Integrating Facebook button on Blogger: 
The "Like" button can be inserted anywhere. I recommend that you put on the end of the post, is where the reader will perform the next action after reading it, but this is not a rule. Before making this change, make a full backup of your blog template. 

Among the Blogger dashboard, click design and then edit in HTML. Check the box to expand Widget Templates and search for: 
<data:post.body/>
Copy and paste the below code above: 
<Iframe allowTransparency = 'true' expr: src = '"http://www.facebook.com/plugins/like.php?href =" + data: + post.urlframeborder = '0 'scrolling =' no 'style =' border: none; overflow: hidden; width: 450px; height: 40px; '/>
If you want the Facebook button appear at the top of the post, next to the title, put the code just below this line: 
<div class='post-header-line-1'/>
Optimize Facebook button: 
For the button does not appear on the home page, only the posts, please enter the code in green: 
<b:if cond='data:blog.pageType == "item"'>
<Iframe allowTransparency = 'true' expr: src = '"http://www.facebook.com/plugins/like.php?href =" + data: + post.urlframeborder = '0 'scrolling =' no 'style =' border: none; overflow: hidden; width: 450px; height: 40px; '/>
</ B: if>
For the photos that appear to users who liked, must change the false to true, and the size of the widget to 40px 80px: 
<Iframe allowTransparency = 'true' expr: src = '"http://www.facebook.com/plugins/like.php?href =" + data: + post.urlframeborder = '0 'scrolling =' no 'style =' border: none; overflow: hidden; width: 450px; height: 80px; '/>
Another thing that can be done is to change "Like" to "Recommend", simply change it   Like (in red in the code above), recommend. 

The source of the letters can be changed, by default comes in Arial, but you can use other sources. 

Save and see if everything was correct. 

Hack "Read more" automatic and images


Hack "Read more" automatic and imagesI was looking for this hack, the request of a client -DB products and services found in and Templates for you , dear blog friend missing and Golden. 
This is a hack that summarizes the posts of the home page (home) and also automatically displays a small image ( thumbnail ) on the left side of the post. 
First of all, I recommend that you install this hack on a test blog, or if you want to install directly on the blog, do before a backup template . 

How to put the hack with images Read More 

Among the Blogger dashboard, click design and then edit in HTML. 
Check the box to expand Widget Templates and search for: 

<div class='post-body entry-content'>
<data:post.body/>

Replace the line <data:post.body/> by:
 

<b:if cond='data:blog.pageType != "item"'>
<b:if cond='data:blog.pageType != "static_page"'>
<div expr:id='"summary" data:post.id' style='display:none;'> <data:post.body/> + </ div>
<script type='text/javascript'> createSummaryAndThumb ("summary <data:post.id/>") </ script>
<div style="clear:both" align='right' class='rmlink'> <a expr:href='data:post.url'> Read more »» </ a> </ div>
</ B: if> </ b: if>
<b:if cond='data:blog.pageType == "item"'>
<data:post.body/> </ b: if>
<b:if cond='data:blog.pageType == "static_page"'> <data:post.body/>
</ B: if>


WARNING:
 For those who use my templates that come with another hack "read more" and / or break the jump from Blogger, the path is another.
 Search for: 

<b:if cond='data:blog.pageType == "item"'>
<style> # fullpost {display: inline;} </ style>
<p> <data:post.body/> </ p>
<b:else/>
<style> # fullpost {display: none;} </ style>
<p> <data:post.body/> </ p>
<b:if cond='data:post.hasJumpLink'>
<div class='jump-link'>
<a expr:href='data:post.url "#more"'> <data:post.jumpText/> + </ a>
</ Div>
</ B: if>
<span id='showlink'>
<a expr:href='data:post.url'> Continue reading >> </ a>
</ Span>
<script type='text/javascript'>
checkFull ("post-" + "<data:post.id/>");
</ Script>
</ B: if>
<div style='clear: both;'/> <! - clear for photos floats ->


Replace it by:
 

<b:if cond='data:blog.pageType != "item"'>
<b:if cond='data:blog.pageType != "static_page"'>
<div expr:id='"summary" data:post.id' style='display:none;'> <data:post.body/> + </ div>
<script type='text/javascript'> createSummaryAndThumb ("summary <data:post.id/>") </ script>
<div style="clear:both" align='right' class='rmlink'> <a expr:href='data:post.url'> Read more »» </ a> </ div>
</ B: if> </ b: if>
<b:if cond='data:blog.pageType == "item"'>
<data:post.body/> </ b: if>
<b:if cond='data:blog.pageType == "static_page"'> <data:post.body/>
</ B: if>
<div style='clear: both;'/> <! - clear for photos floats ->

Now go in the CSS template and before the closing]]> </ b: skin> Paste this code:
 

. {Rmlink
font-size: 100%;
float: right;
margin-right: 30px;
margin-top: 10px;
font-weight: bold;}
. Rmlink a {
font-style: normal;
font-weight: bold;
font-variant: small-caps;
font-family: Arial, Sans-Serif;
color: # 24618e; / * Link color * /}
. Rmlink a: visited {color: # 649dc7;} / * Link color after clicked * /
. Rmlink a: hover {color: red;} / * Link color when mousing over * /

Then look for the tag </ head> and paste this code on top of her other:


Reference sources 


Hiding the footer of the post on the homepage 

To hide the date and footer of posts on the home page, look for: 

]]> </ B: skin>

Paste the following code after this tag:
 

<b:if cond='data:blog.pageType == "index"'>
<style type='text/css'>. post-footer {display: none;} </ style>
</ B: if>
<b:if cond='data:blog.pageType == "index"'>
<style type='text/css'> h2.date-header {display: none;} </ style>
</ B: if>


To better understand the conditional Blogger, go to:
 
This last tip worked on Minimum Template and in my templates, but may not work for others, since the name of the selectors (. H2.date and post-footer-header), can vary from one model to another. 
Displaying only the text 
If you want to show only the text on the home and not the pictures, look for: 

<style type="text/css">
. Thumbnailimg IMG {
max-width: 150px;
width: expression (this.width> 150? 150: true);
max-height: 120px;
height: expression (this.height> 120? 120: true);
}
. {Thumbnailimg
float: left;
padding: 10px 0px 0px 5px;
}

Replace the whole section up by this:
 

<style type="text/css">
. Thumbnailimg IMG {
max-width: 150px;
width: expression (this.width> 150? 150: true);
max-height: 120px;
height: expression (this.height> 120? 120: true);
display: none:
}
. {Thumbnailimg
float: left;
padding: 10px 0px 0px 0px;
}

Eliminating paper Blogger Showing Post With Label


When you search for content through the search box or label or category. So usually a small box will appear containing Showing Post With Label as pictured below. If you feel disturbed by the presence of the box and also to relieve loading blog. 

You may use the following ways: 
1. Go to the menu Design -> Edit HTML 
2.Tick ​​the " Expand Widgets Templates " 
3. Find the code below:


showing post with label


<b:includable id='status-message'> 
<b: if 


style = 'clear: both;' /> 
</ b: if> 
</ b: includable>
4. Replace the code above with the code below

<b:includable id='status-message'>
<b:if cond='data:navMessage'>
<div>
</ div>
<div style='clear: both;'/>
</ b: if>
< / b: includable>
5. If so click Save Template . 6. Completed. Please see the results. Hopefully useful

Displaying Post Title Only On Page Search


Usually if there are visitors who are looking for our blog articles either by label or the search box or search box. So that appears is the title of post and its contents. Try to imagine if the content contains the keywords you want to search visitors reached 50-100 articles. How long does it take the viewer to search for items of interest.Moreover, items of interest are posted on the back of the visitor might be blurred before finding content. thus you will need to deal with it show the title post it on the search page. Examples like the picture. Which appears only title posting only. Ok then how to implement it? 1. Log in to blogger. Open the menu Edit HTML 2.Backup your template and then check the " Expand Widget Templates " 3. Findthe code that below

post title


<b:include data='post' name='post'/>
4. Replace the code above with the code below

<B: if cond = 'data: blog.homepageUrl
! = date: blog.url '>
<b:if cond='data:blog.pageType != "item"'>
<a expr: href = 'data: post . url '> <data:post.title/> </ a>
<br/>
<b:else/>
<b:include data='post' name='post'/>
</ b: if>
<b:else/>
<b:include data='post' name='post'/>
</ b: if>
5. If you already click Save Template . Please try results

Changing the Author Name Or Name Author In Blog


Have multiple blogs under one account is common for every blogger. Because it's easy to create a blog and not limited in number. If you make a lot of blogs in one account then all the blog author will have the same name. For those of you who do not know what that author name, Author name is the name of the author of the content or the person who has a blog. Well sometimes there are bloggers who are reluctant to show original identity. If that means my friend had to change his name by another name. Then what can? Sure you can. 

Even very simple. Here's how: 

1.Log in to blogger 
2. On the menu Design -> Edit HTML
 3. Tick ​​the " Expand Widget Templates " 
4. Find the code below


author name


<b:if cond='data:top.showAuthor'> 
<data:top.authorLabel/> <data:post.author/> 
</ b: if>
Replace the words are printed in red with the name you want to use. Examples

<b:if cond='data:top.showAuthor'>
<data:top.authorLabel/> Admin
</ b: if>
5. If so click Save Template . 6. Completed. Please see the results.

Color Link Or Make Colorful Rainbow Link Blog


Rainbow rainbow links or a link where if the mouse pointer we were directed to the link the link will flash colorful as a rainbow of colors. If you are still confused. Please visit here then point your mouse cursor to one of the links to see the results. Gmn pulled? Well to put this colorful link is very easy. You simply enter the code in the javascript his blog you then the effect will work immediately. 'll be easier. Please follow these steps: 1. As usual, log into blogger. Then on the menu Edit HTML 2.Put the code below the above code <body>


<script src='http://hbhost.googlecode.com/files/rainbow-link.js'/>
3. Click Save Template . 4. Completed. Please see the results.