Installing Snow Effect in Blog


Installing Snow Effect in Blog - Pingin snowing on your blog to make it look more lively and cool (read: cool)? Well, then you need to put on the blog snow effect you. 

To install snow effect, it is very easy: 
1. Open blogger. Go to the menu Design -> Page Elements 
2. Click the Add a Gadgets -> HTML / Javascript 
3. Insert the following script into the box


<script src='http://hbhost.googlecode.com/files/snow.js' type='text/javascript'> </script>
4. Press Save . Finish is tough is not it? If you do not want to bother ya use any of the following ways 1. click the Add Effect Snow In the blog below


2. Select the blog you want to install snow effect and then click Add Widget
3. Finish. luck ...
How to Change Cursor Display Blog


How to Change Cursor Display Blog - By default, the display cursor on the blog are arrow-shaped, but for those of you who are bored with the look of them or would like to give admiration for visitors. You can replace the icon image so that when a visitor comes to your blog, the display cursor icon will change according to what you use. In order to more clearly you can see here .

change the cursor into the image icon, it is very easy. Here are the steps: 
1. Log in to Blogger. Go to the menu Design-> Edit HTML 
2. Find the code</ head> 
3. Put the following css code above


<style type="text/css">
HTML,BODY{cursor: url("http://downloads.totallyfreecursors.com/thumbnails/cool1.gif"), auto;}
</style>

Description: 


The text in red is the url address of the cursor. Please change the url address you want to use the cursor.

4. After that, save your template. Done If you do not have a cursor icon, try visiting http://www.totallyfreecursors.com . 
The site provides hundreds of thousands of interesting cursor icon that you can choose according to taste. Congratulations creative blog :)

Installing Music Player On Blog

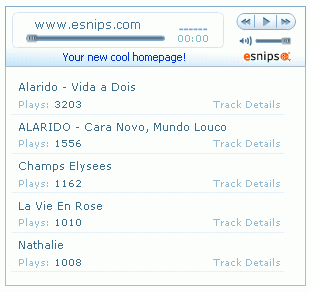
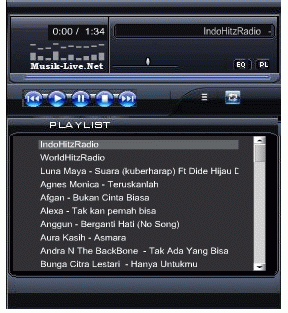
Installing Music Player On Blog - For you fans of music. Play a song through HP, Mp3 player or computer may be used. But what if you play music through the blog? With put music player on the blog then not only you but your blog visitors can also enjoy your favorite songs. So this method is very suitable for those of you who blog contains music or for those who want to promote a personal song. There are many services like this available on the internet. Of the many existing services. I think there are two pretty good music player that is music-live and eSnips . 

Both the music player each has advantages and disadvantages. So please specify yourself which is better. 

1.Music-Live Pros: - Songs are available, stay put - Many skin models you can choose Weaknesses: - Not able to upload your own songs 
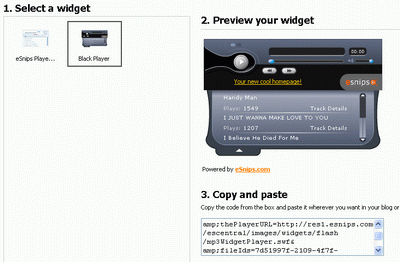
2. eSnips Pros: - can upload songs from your computer - There are songs that you can playWeaknesses: - Only 2 model skins to choose from - looks less attractive Now that the advantages and disadvantages of each. Please specify which one is better suited to your needs. 

In order to more clearly you can see the demo music-live here and eSnips here . If it determines the music player of your choice, here are the installation steps: 


A. Music-Livet.Net 
1. Visit http://musik-live.net/ click Skin Mp3 Player 
2. Select the player you want to display. To see how it looks clickPreview Skin 
3. Copy the code in the 'embed code' and go to the blogger. 
Click the menu Design -> Page Elements 
4. Paste code into the menu HTML / Javascript 
5. Finish. above is how to put a music player with songs that have been provided. 


If you want to choose their own song. 

Here's how: 
1. Music-Live on the page, find your favorite songs with the search box. 
2. Then click the Play & Embed code to display code 
3. Copy and paste the code into the menu HTML / Javascript blogger. Finish 

Note: This method is only able to play one song. If you want to play a lot of songs that use the eSnips. 


B. eSnips 

1. Kunjugi http://www.esnips.com/ . To be able to take advantage of the amenities you need to signup first. If so, sign-in to your account. 
2. Click Upload Files and then clickSelect Files 
3. Select the songs you want to play and select the folder where you want memyimpan song. Make sure the folder you choose is to be Public . Because if private you can not add the song into the playlist. 
4. If you have click Upload Now
5. Wait until the upload is complete. 
6. If it is click the menu folder . Choose the folder where you saved the save song 
7. Select the songs you want to install by clicking Add to quicklist 
8. If so, scroll to the top of the page and then click the Create playlist widgets 
9. Select the skin you want. Then copy the code on the box. 
10. Open blogger. Paste code in the menu HTML / Javascript and then clickSave 
11. Completed. Please see the results. If size does not fit you can adjust the size to edit the width of her on their respective codes.
 Good luck .. 

Fiuhh .. . Finally finished well the experimental results for 3 days.


live music


esnips


esnips add to quicklist
esnips create playlist


esnips widget

Free Backlink from PR5 - PR9 Website Directory

backlink Free Backlink from PR5 - PR9 Website Directory - Backlinks are the only elements to improve pagerank blog. So if you want to increase the page rank of your blog then there is no other way than to find backlinks as much as possible. 

course pagerank is not solely influenced by the quantity of backlinks but also the quality of the backlink. For example, your site got 1 backlink from a PR5 site then the result will be better than 10 backlinks from PR3 stus onwards. Well here I will submit a web directory which contains more than 100 sites PR5 to PR9 directory. 

What is interesting here is that most of these directory sites allow you to submit your blog for free on its website without giving backlinks link means that you can be one way links . 

As we know, one way link has better quality than the two-way link so as to strengthen our international position in search engine pages. those of you who are interested to get a free backlink from PR5 to PR9 directory sites simply visiting http://www.greatdirectories.org/free.html . After that, submit one site to the site directory. Congratulations collecting backlinks

How to Check Backlinks

How to Check Backlinks - For a long plunge into the world of blogging is certainly familiar with the termbacklinks . But for those who are new or do not know what backlinks. In short, Backlinks are links on our site are posted on other sites. Backlink there is one way links and two way link . 
What is meant by One way link is a link to our site posted by another site, but we did not put the link on our site, while two way link is my link on your site and you also link my site or what is often referred to as link exchange.purpose of seeking backlinks is to improve pagerank blog. On how to find backlinks and pagerank understanding.

After learning how to build backlinks. Sure you wanna know how to check backlinks and how many number of backlinks that you have successfully collected. Ok to check it out you can use the tool backlink watch the address at http://www.backlinkwatch.com How to use it very easily. 

After visiting the site. Enter the web address you want to check and click the Check backlinks . For example I put hermanblog.com and here are the results. Specification: 354 is the number of backlinks obtained figures that I circled on the OBL is the number of external links from sites that provide backlinks.The larger the value the better the backlink OBLnya you earn. flags for displaying information part follow or nofollow 

If there is information nofollow tag means that the site provides nofollow on our link, which means we do not get backlinks from these sites. To check other sites do the same. Good luck. May be useful


How to Display Form Comments Only in Specific Postings


How to Display Form Comments Only in Specific PostingsA few days ago, there was a blogger friend who asked me via email about how to display the comment form only in certain posts . Since the question is quite interesting and it is possible there are other bloggers who do not know how. 

So on this occasion I will try to explain it here. Well to display the comments form only in a particular post is very easy, because blogger.com has provided an option for it, so we just want to determine which post comments displayed form and which are not .
these options can be found at the bottom of the page post editor. Watch my column below the red line:


By default, the comments will always be "allow", if you do not want readers to comment on your posts, simply select "Do not allow" the commentary form will disappear. It's as easy a try. If there are less obvious please inquire through the comment form.

Submit your RSS feed to Facebook


Submit your RSS feed to Facebook - If you want your blog posts can be read by more people then one way you have to do is submit your RSS feed to Facebook .
 By submitting your blog RSS feed into Facebook, then every time you post a new article, the article will appear automatically posted on your facebook profile so your friends or your facebook friends can read your blog posts directly on your facebook profile page. If your articles are good they certainly will visit your blog to read further so that it can also promote your blog. 
Regarding how to submit your RSS feed to Facebook actually I've posted on this blog. But because Facebook has changed the display page and to submit RSS feature has also been removed so that way previously been unusable. Though Facebook already does not provide a feature to submit rss feed.But now there are many facebook applications that can perform this task. One that I use is the RSS Graffiti . 

RSS Graffiti will automatically submit your blog posts to your facebook profile page every time you update the post so you do not have to submit articles manually to facebook. What you should do is open the app and graffiti RSS add the address of your blog feed. After that everything will run automatically .. tis .. tis .. tis addition, RSS Graffiti also provides multiple settings so you can customize the display according to the feeds you want. Several features provided by the RSS graffiti such as:


  1. Allows you to set the appearance of the article in the form of regular feed or short messages such as Twitter
  2. Filtering articles from a specific date
  3. Giving an additional message on any article published
  4. Set posting schedule
  5. Tweak to publish twitter facebook

How to submit RSS feeds to RSS Graffiti

1. Log in to Facebook. 
2. Open the RSS Graffiti application and run it. 
3. After that, click Add Feed . 
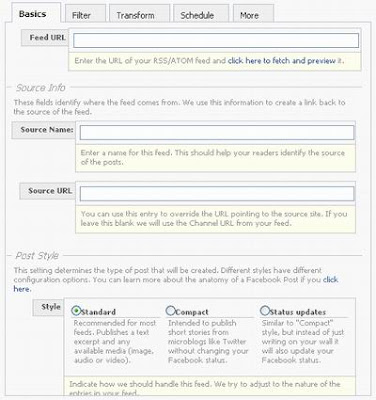
4. Then the page will appear as follows

Feed URL : browse your blog feed address. Examplehttp://bloganda.blogspot.com/feeds/posts/default 
Source Name : Fill in the name of your blog Source URL : Fill out your blog style Post : Let the 'Standard'. If you want to post up in the form of a short message such as Twitter select 'Compact' or 'status updates'

5. If you have press Save . Done Now every time you post an article, the article will automatically appear at page facebook.

What is Alexa Rank and Benefits

alexa logo
What is Alexa Rank and Benefits After discussing the google page rank , this time I want to review a little aboutAlexa rank . Because in addition to google page rank, Alexa rank is one factor to make money on the internet. So if you're serious about making money on the internet then you must know Alexa rank.


What is Alexa rank? Alexa rank is a tool created by Alexa.com to analyze how much traffic or page views of a website based on the number of visitors to install the Alexa toolbar on their browser. After that, the data will be collected and then ranked based on the traffic. The greater the traffic in the lower rank. So how to find our website Alexa ranking? 

There are 2 ways you can use to find your website ranking alexa rank, namely:

 I. Install the Alexa widget on your blog that looks like this way of installation: 

1. Open http://alexa.com then click For Site Owners 
2. Then clickSite Widgets , located on the left 
3. Enter the address of your website on the widget you want to install. For example: hermanblog.com then click Build Widget
4. Copy the code of the widget you want to install and then paste into your blog.
Done 


II. Install the Alexa toolbar in your browser that looks like this. 
way of installation: 

1. On page alexa.com. Click the Toolbar 
2. If using the browserFirefox . Then the page that appears is like this 
3. Click the Get Sparky and follow the prompts to install the Alexa toolbar 
4. If you use the browser Internet Explorerthe page that appears is like this 
5. click Install Now to install the Alexa toolbar on your browser. 
6. If you've restarted your browser and see the result. 

then what good alexa rank for your blog?


 If your blog is used to make money on the internet then alexa rank is very important to you. Because many dollars producing programs on the internet such as TLA , SponsoredReviews , Blogsvertise ,Buyblogreviews , Linkworth , etc. 

which require alexa rank to join. So the smaller the alexa ranking of your blog more and more programs that you can follow which means the greater your chance to make money on the internet. In addition, Alexa rank can also be used to determine whether or not a popular blog. 
Alexa rank blogs that have small usually will be more popular and liked by the advertiser than a blog that has a big alexa rank. 


alexa widget1


alexa toolbar


install alexa toolbar

alexa toolbar for firefox


alexa toolbar for internet explorer

Designer model - how to remove navbar


Designer model - how to remove navbar - If you're already using one of the new Blogger templates, page through Blogger in Draft , know that removing the navbar just got easier.
I have explained in this post How to create a template for Blogger / Blogspot , but it seems that not everyone could understand. Therefore, I will explain in detail.

Access the template designer, click Advanced (1) and then add CSS (2). Paste the code below into the blank portion (3) and press the enter key on your keyboard.

# Navbar-iframe {height: 0px; visibility: transparent; display: transparent;}

retirar_navbar
Click on image to enlarge

Once you paste the code and hit the enter key, the navbar will be invisible. 
To my knowledge, there is no restriction on the part of the Blogger as the withdrawal of navbar: 

Confirmed: Blogger NavBar is optional - User Compulsive blog
While we do not recommend or support the removal of the Blogger navbar, there is nothing in our Terms of Service That Explicitly mandate its use. Source: Blogger forum English


UPDATE - This method is no longer working as well, since the team has been making changes in Blogger Template Designer. The @velosomanel , posted on his blog Blogger Drafts, a way to completely remove the navbar and that can be adapted to new models. Among the html and search for <body class='loading'>
Cole just before the following code:

<- Navbar ->
<script type='text/javascript'>
<! [CDATA [
<-
/ * <body> * /
->
]]>
</ Script>
<- Navbar ->

Accept deleting the widget and save navbar.
 
Sources: Blogger Plugins and Blogger Drafts