How do you integrate a Twitter Follow Button to Blogger Blogspot? How do you integrate a Follow button for Facebook to Blogger Blogspot? How do you integrate a Follow button for Google+ to Blogger Blogspot ?
How do you integrate an RSS feed button a Blogger Blogspot? How do you integrate an eMail button a Blogger Blogspot? How do you integrate a Flattr button a Blogger Blogspot?
There are numerous ways and designs, buttons to integrate the consequences on social networks, or to subscribe to the feed via email or in a Blogger Blogspot.
Often these buttons available in different sizes and it is just a little difficult to create a unified design. In this example, a simple and robust design will be presented, as it can also be seen on this blog.
Follow buttons, RSS feed button and email button integrated on Blogspot
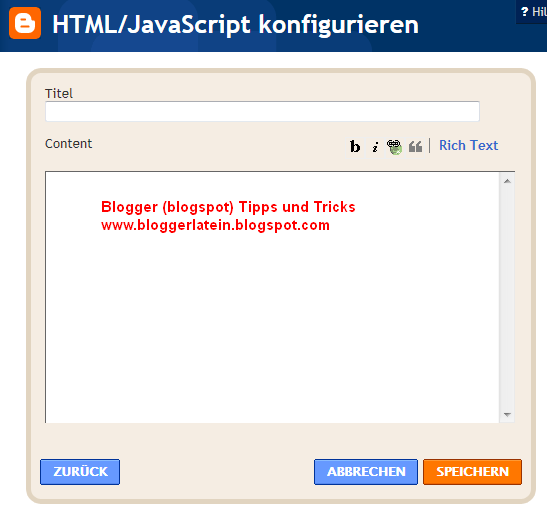
- at blogger.com log and seek appropriate Blog
- Layout >> Add a Gadget >> in HTML / JavaScript on the blue check button, it opens a window, there is the following code inserted >> Save >> Save Layout (orange button at the top right)
- Reload this blog and the new buttons should be seen and fully functional
Code:
<div align="center"><a style="margin-left: 5px; margin-right: 5px;" title="BloggerLatein auf Facebook folgen" href="http://www.facebook.com/pages/BloggerLatein-Blogger-Blogspot-Tipps-und-Tricks/283692315026862" target="_blank"><img src="https://blogger.googleusercontent.com/img/b/R29vZ2xl/AVvXsEj2B7NOCJsv8KhXQD-e1dkI8vN1mPowq8zVo5azKlWv2lfSHb2v8M-KIOPiE-UdRYpef9MbWXhqkQCH-TuUBJsUnGotxU4tnp-OUgbFbA17qfO-2ylN7nEC9IGPu9qdr0eou3WRoQZLatk6/" width="24" height="24" alt="BloggerLatein auf Facebook folgen" border="0" /></a><a style="margin-left: 5px; margin-right: 5px;" title="BloggerLatein auf Twitter folgen" href="http://twitter.com/BloggerLatein" target="_blank"><img src="https://blogger.googleusercontent.com/img/b/R29vZ2xl/AVvXsEjWZzPfshFth9VJDAgALEpzJ4Gu0TRVxG2Qzb26I3Ag2pqZozyRcp4q5N3kK7eqIhvGxTb50Y1N9tfwSq4vrbJP4sP44XM2-YO0a3wC4lw0x3izUtowgQk71wtVtLp9Kk-MJYQWRfESiECP/" width="24" height="24" alt="BloggerLatein auf Twitter folgen" border="0" /></a><a style="margin-left: 5px; margin-right: 5px;" title="BloggerLatein auf Google+ folgen" href="https://plus.google.com/115524128076631144939" target="_blank"><img src="https://blogger.googleusercontent.com/img/b/R29vZ2xl/AVvXsEjTTQf_cTyHl8GimrSe9qypfcX7k3JneeuYaHxUT9-SWIs68ucvsxWD1y1C-WNzhMKzGvSDVaneA89NDjznwnkUMfoAeyuocVUlh3vYC5QhQ6joKlYNX3o0tTEOx9An75H7SAQgLQztwprZ/" width="24" height="24" alt="BloggerLatein auf Google+ folgen" border="0" /></a><a style="margin-left: 5px; margin-right: 5px;" title="Newsfeed abonnieren" href="http://feeds.feedburner.com/Bloggerlatein" target="_blank"><img src="https://blogger.googleusercontent.com/img/b/R29vZ2xl/AVvXsEg-J26bdC0ghiYdeHhzX1XL8ow_lH6jRCNta9ckiMjxlT5-r4dVyhv5tquekid2kwDF8a4ygeHFtEPaq-lJ0fcvDeOVyGVFMpGCyvjdrj26fOSbiJ8cpBvG7LPtWQ9PTl368627CiRM33rI/" width="24" height="24" alt="Newsfeed abonnieren" border="0" /></a><a style="margin-left: 5px; margin-right: 5px;" title="Die neuesten Artikel per eMail erhalten" href="http://feedburner.google.com/fb/a/mailverify?uri=Bloggerlatein&loc=de_DE" target="_blank"><img src="https://blogger.googleusercontent.com/img/b/R29vZ2xl/AVvXsEhXfakMaLGm6P4QKyUnS4zlI-1yUy1d6LMQAxgSPdxYpUpSlmHXRH9FdSdf8l2pR97b7mDD4HgeZ_yQpYqNJgnaHBTrCOnS5c1xq4zGSHQsX3p8Cn-ITtcIAgdUBmpndlXr0RcFq7crzl9y/" width="24" height="24" alt="Die neuesten Artikel per eMail erhalten" border="0" /></a><a style="margin-left: 5px; margin-right: 5px;" title="Flattr this" href="http://flattr.com/thing/482810" target="_blank"><img src="https://blogger.googleusercontent.com/img/b/R29vZ2xl/AVvXsEjZ_yXykzyDznn-hAxTM3oiYPvjjAxoiGKgrTjX1fae3F0PeMX8hyphenhyphenNnUDLgySOk8356xaAmxhUuPrMdKeanqB1Qi1Fi53TmT3vT6w3o_wWrUR_N6nxGu2k_ekinIptq3rAQjL4lqB-CdE40/" width="24" height="24" alt="Flattr this" border="0" /></a></div>
As this code is structured and how it works?
<div align="center">
If you add the code in the side bar of the buttons are centered, that is placed in the middle of the side bar (center). If the buttons are placed to the left, is replaced by center left. If the buttons are aligned to the right, then center is replaced by right.
Will be seen as the same, followed by the structure of the code to a schema. For each button, the image, the corresponding link and the arrangement (layout) is defined.
Facebook button
<a style="margin-left: 5px; margin-right: 5px;" title="BloggerLatein auf Facebook folgen"href="http://www.facebook.com/pages/BloggerLatein-Blogger-Blogspot-Tipps-und-Tricks/283692315026862"target="_blank"><img src="https://blogger.googleusercontent.com/img/b/R29vZ2xl/AVvXsEj2B7NOCJsv8KhXQD-e1dkI8vN1mPowq8zVo5azKlWv2lfSHb2v8M-KIOPiE-UdRYpef9MbWXhqkQCH-TuUBJsUnGotxU4tnp-OUgbFbA17qfO-2ylN7nEC9IGPu9qdr0eou3WRoQZLatk6/" width="24" height="24" alt="BloggerLatein auf Facebook folgen" border="0" /></a>
margin-left: 5px - the distance of the Facebook button to the left side with 5px
margin-right: 5px - the distance of the Facebook button on the right side with 5px
title = "blogger Latin follow on Facebook" and "Follow Latin bloggers on Facebook" alt = is used for labeling of the buttons, you go with your mouse cursor over it then a title is displayed, both lines can be changed as desired or replaced
here to add the link to his Facebook profile, or his Facebook page (from the browser address bar, copy)
target = "_blank" opens the link to the profile and linked to the linked web page in a new window in the browser when you click on the button, if you do not want the piece can be deleted
img src = "https://blogger.googleusercontent.com/img/b/R29vZ2xl/AVvXsEj2B7NOCJsv8KhXQD-e1dkI8vN1mPowq8zVo5azKlWv2lfSHb2v8M-KIOPiE-UdRYpef9MbWXhqkQCH-TuUBJsUnGotxU4tnp-OUgbFbA17qfO-2ylN7nEC9IGPu9qdr0eou3WRoQZLatk6/" is the link to the Facebook button, who wants a different button sets, there just its URL (web address ) for an image: one can copy this link and email address in the address bar of the browser, download the button (upload at Blogspot in a new post of the post must not be published because the image after uploading automatically stored in Picasa Web Album is), click on editor to HTML and the first link (this is the new URL to the button) to copy and use the code above (the post can then be deleted, because the button is now stored in your own Picasa Web Album)
width = "24" - the button is 24px wide
height = "24" - the button is 24px high
border = "0" there is no border around the button created
Twitter Button
<a style="margin-left: 5px; margin-right: 5px;" title="BloggerLatein auf Twitter folgen"href="http://twitter.com/BloggerLatein" target="_blank"><img src="https://blogger.googleusercontent.com/img/b/R29vZ2xl/AVvXsEjWZzPfshFth9VJDAgALEpzJ4Gu0TRVxG2Qzb26I3Ag2pqZozyRcp4q5N3kK7eqIhvGxTb50Y1N9tfwSq4vrbJP4sP44XM2-YO0a3wC4lw0x3izUtowgQk71wtVtLp9Kk-MJYQWRfESiECP/" width="24" height="24" alt="BloggerLatein auf Twitter folgen" border="0" /></a>
- margin-left: 5px - the distance of the Twitter buttons to the left side with 5px
- margin-right: 5px - the distance of the Twitter buttons to the right side with 5px
- title = "blogger Latin follow on Twitter" and "follow on Twitter Blogger Latin" alt = is used for labeling of the buttons, you go with the mouse cursor over it, then a title is displayed, both lines can be changed as desired or replaced
- href = "http://twitter.com/BloggerLatein" (copy from the browser address bar) here to add the link to his Twitter profile is a
- target = "_blank" opens the link to the profile linked in a new window in the browser when you click on the button, if you do not want the piece can be deleted
- img src = "https://blogger.googleusercontent.com/img/b/R29vZ2xl/AVvXsEjWZzPfshFth9VJDAgALEpzJ4Gu0TRVxG2Qzb26I3Ag2pqZozyRcp4q5N3kK7eqIhvGxTb50Y1N9tfwSq4vrbJP4sP44XM2-YO0a3wC4lw0x3izUtowgQk71wtVtLp9Kk-MJYQWRfESiECP/" is the link to the Twitter button, who wants a different button sets, there just its URL (web address ) for an image: one can copy this link and email address in the address bar of the browser, download the button (upload at Blogspot in a new post of the post must not be published because the image after uploading automatically stored in Picasa Web Album is), click on editor to HTML and the first link (this is the new URL to the button) to copy and use the code above (the post can then be deleted because the button is now stored in your own Picasa Web Album)
- width = "24" - the button is 24px wide
- height = "24" - the button is 24px high
- border = "0" there is no border around the button created
Google Plus Button
<a style="margin-left: 5px; margin-right: 5px;" title="BloggerLatein auf Google+ folgen"href="https://plus.google.com/115524128076631144939" target="_blank"><img src="https://blogger.googleusercontent.com/img/b/R29vZ2xl/AVvXsEjTTQf_cTyHl8GimrSe9qypfcX7k3JneeuYaHxUT9-SWIs68ucvsxWD1y1C-WNzhMKzGvSDVaneA89NDjznwnkUMfoAeyuocVUlh3vYC5QhQ6joKlYNX3o0tTEOx9An75H7SAQgLQztwprZ/" width="24" height="24" alt="BloggerLatein auf Google+ folgen" border="0" /></a>
- margin-left: 5px - the distance of the Google Plus button to the left side with 5px
- margin-right: 5px - the distance of the Google Plus button to the right with 5px
- title = "blogger Latin follow on Google+" and "Latin bloggers follow on Google+" alt = is used for labeling of the buttons, you go with your mouse cursor over it then a title is displayed, both lines can be changed as desired or replaced
- href = "https://plus.google.com/115524128076631144939" here to add the link to your Google Plus profile or to its Google Plus page (from the browser address bar, copy)
- target = "_blank" opens the link to the profile and linked to the linked web page in a new window in the browser when you click on the button, if you do not want the piece can be deleted
- img src = "https://blogger.googleusercontent.com/img/b/R29vZ2xl/AVvXsEjTTQf_cTyHl8GimrSe9qypfcX7k3JneeuYaHxUT9-SWIs68ucvsxWD1y1C-WNzhMKzGvSDVaneA89NDjznwnkUMfoAeyuocVUlh3vYC5QhQ6joKlYNX3o0tTEOx9An75H7SAQgLQztwprZ/" is the link to the Google Plus button, who wants a different button is there just a URL (web address) for an image: one can copy this link and email address in the address bar of the browser, download the button (upload at Blogspot in a new post the post must not be published because the image after uploading the automatic Picasa web album is stored), click on editor to HTML and the first link (which is copy the new URL to the button) and (insert in the code above the post can then be deleted, because the button is now stored in your own Picasa Web Album)
- width = "24" - the button is 24px wide
- height = "24" - the button is 24px high
- border = "0" there is no border around the button created
News Feed button
<a style="margin-left: 5px; margin-right: 5px;" title="Newsfeed abonnieren"href="http://feeds.feedburner.com/Bloggerlatein" target="_blank"><img src="https://blogger.googleusercontent.com/img/b/R29vZ2xl/AVvXsEg-J26bdC0ghiYdeHhzX1XL8ow_lH6jRCNta9ckiMjxlT5-r4dVyhv5tquekid2kwDF8a4ygeHFtEPaq-lJ0fcvDeOVyGVFMpGCyvjdrj26fOSbiJ8cpBvG7LPtWQ9PTl368627CiRM33rI/" width="24" height="24" alt="Newsfeed abonnieren" border="0" /></a>
- margin-left: 5px - the distance of the News Feed button to the left side with 5px
- margin-right: 5px - the distance of the News Feed button to the right with 5px
- "Subscribe to News Feed" and title = "Subscribe to News Feed" alt = is used for labeling of the buttons, you go with your mouse cursor over it then a title is displayed, both lines can be changed as desired or replaced
- href = "http://feeds.feedburner.com/Bloggerlatein" here to add the link to his feed
- Who has set up for his feed redirect to FeedBurner can this format href = "http://feeds.feedburner.com/Bloggerlatein." Use and replace it with its own link
- Who has not changed his feed uses the standard link. Blogger Blogspot blogs are the feeds already built and also the structure of the URL (web address) follows a pattern. You can choose between 2 predefined formats, which one is used a matter of opinion. For completeness, both formats will be added:
RSS: http://bloggerlatein.blogspot.com/feeds/posts/default?alt=rss
Atom: http://bloggerlatein.blogspot.com/feeds/posts/default
The blue spot is replaced with your own blog address.
If the feed does not display: Settings >> General >> Site Feed >> Blog Posts Feed >> Complete >> Save Settings (orange button at the top right)
target = "_blank" opens the link to the profile and linked to the linked web page in a new window in the browser when you click on the button, if you do not want the piece can be deleted
img src = "https://blogger.googleusercontent.com/img/b/R29vZ2xl/AVvXsEg-J26bdC0ghiYdeHhzX1XL8ow_lH6jRCNta9ckiMjxlT5-r4dVyhv5tquekid2kwDF8a4ygeHFtEPaq-lJ0fcvDeOVyGVFMpGCyvjdrj26fOSbiJ8cpBvG7LPtWQ9PTl368627CiRM33rI/" is the link to the News Feed button, who wants a different button sets, there just its URL (web address ) for an image: one can copy this link and email address in the address bar of the browser, download the button (upload at Blogspot in a new post of the post does not have to be released because the image after the upload is automatically stored in Picasa Web Album ) in HTML editor and click the first link (this is the new URL to the button) to copy and use the code above (the post can then be deleted, because the button is now stored in your own Picasa Web Album)
width = "24" - the button is 24px wide
height = "24" - the button is 24px high
border = "0" there is no border around the button created
email button
<a style="margin-left: 5px; margin-right: 5px;" title="Die neuesten Artikel per eMail erhalten"href="http://feedburner.google.com/fb/a/mailverify?uri=Bloggerlatein&loc=de_DE" target="_blank"><img src="https://blogger.googleusercontent.com/img/b/R29vZ2xl/AVvXsEhXfakMaLGm6P4QKyUnS4zlI-1yUy1d6LMQAxgSPdxYpUpSlmHXRH9FdSdf8l2pR97b7mDD4HgeZ_yQpYqNJgnaHBTrCOnS5c1xq4zGSHQsX3p8Cn-ITtcIAgdUBmpndlXr0RcFq7crzl9y/" width="24" height="24" alt="Die neuesten Artikel per eMail erhalten" border="0" /></a>
- margin-left: 5px - the distance of the News Feed button to the left side with 5px
- margin-right: 5px - the distance of the News Feed button to the right with 5px
- title = "get the latest articles by email" and "get the latest articles by email" alt = is used for labeling of the buttons, you can take the mouse cursor over it, then a title is displayed, both lines can be changed or replaced as desired will
- href = "http://feedburner.google.com/fb/a/mailverify?uri=Bloggerlatein&loc=de_DE" here to add the link to the form for an email subscription
- Who has set up for his feed redirect to FeedBurner can use this format href = "http://feedburner.google.com/fb/a/mailverify?uri=Bloggerlatein&loc=de_DE" and replace it with its own link.
- Who has not changed his feed would, now the gadget Email Add follow his blog. Then forwards the request to Blogger.com Feedburner, and the form for an email subscription is provided by Feedburner ready. So there is no link to this form, because the above gadget only be added and the release must be enabled in.
- But anyone who wants to try this link, something else. At Blogger.com, log open a new tab in your browser and visit the website of FeedBurner. Since Feedburner is a Google service, as well, is now taken to the login page from the FeedBurner email address with which you are logged into their Blogger Dashboard. When password is the same password you as if you were to log in to Blogger.com. This should now be the feed for the blogs listed on the Blogger dashboard, find. If a very specific feed is missing, then the FeedBurner link the affected blogs under Layout >> Add Gadgets >> Email >> follow FeedBurner Copy URL and open in a new browser tab. Since the feed has now been called at least once, he should after reloading the FeedBurner website will also appear in the index. Then click on the appropriate feed title (actually the blog title), for which it would set up the email subscription. Menu to Publicize >> Email Subscriptions (left) and click on the big button Activate. Set the language on the following page and copy the link from the box below, which should look like this: http://feedburner.google.com/fb/a/mailverify?uri=Bloggerlatein&loc=de_DE
- In Latin bloggers should now find their own blog title. Use this link in the above code and the form for email subscription should be opened by clicking the email button. Bit complicated but doable.
- target = "_blank" opens the link to the profile and linked to the linked web page in a new window in the browser when you click on the button, if you do not want the piece can be deleted
- img src = "https://blogger.googleusercontent.com/img/b/R29vZ2xl/AVvXsEhXfakMaLGm6P4QKyUnS4zlI-1yUy1d6LMQAxgSPdxYpUpSlmHXRH9FdSdf8l2pR97b7mDD4HgeZ_yQpYqNJgnaHBTrCOnS5c1xq4zGSHQsX3p8Cn-ITtcIAgdUBmpndlXr0RcFq7crzl9y/" is the link to the e-mail button, who wants a different button sets, there just its URL (web address ) for an image: one can copy this link and email address in the address bar of the browser, download the button (upload at Blogspot in a new post of the post must not be published because the image after uploading automatically stored in Picasa Web Album is), click on editor to HTML and the first link (this is the new URL to the button) to copy and use the code above (the post can then be deleted, because the button is now stored in your own Picasa Web Album)
- width = "24" - the button is 24px wide
- height = "24" - the button is 24px high
- border = "0" there is no border around the button created
Flattr button
<a style="margin-left: 5px; margin-right: 5px;" title="Flattr this" href="http://flattr.com/thing/482810"target="_blank"><img src="https://blogger.googleusercontent.com/img/b/R29vZ2xl/AVvXsEjZ_yXykzyDznn-hAxTM3oiYPvjjAxoiGKgrTjX1fae3F0PeMX8hyphenhyphenNnUDLgySOk8356xaAmxhUuPrMdKeanqB1Qi1Fi53TmT3vT6w3o_wWrUR_N6nxGu2k_ekinIptq3rAQjL4lqB-CdE40/" width="24" height="24" alt="Flattr this"border="0" /></a>
- margin-left: 5px - the distance of the Flattr buttons to the left side with 5px
- margin-right: 5px - the distance of the Flattr buttons on the right side with 5px
- title =
"Flattr this" and alt =
"Flattr this" is the caption of the buttons, you can take the mouse cursor over it then a title is displayed, both lines can be changed as desired or replaced
- href =
"http://flattr.com/thing/482810" here to add the link to his Flattr profile (from the browser address bar, copy)
- target = "_blank" opens the link to the profile and linked to the linked web page in a new window in the browser when you click on the button, if you do not want the piece can be deleted
- img src =
src="https://blogger.googleusercontent.com/img/b/R29vZ2xl/AVvXsEjZ_yXykzyDznn-hAxTM3oiYPvjjAxoiGKgrTjX1fae3F0PeMX8hyphenhyphenNnUDLgySOk8356xaAmxhUuPrMdKeanqB1Qi1Fi53TmT3vT6w3o_wWrUR_N6nxGu2k_ekinIptq3rAQjL4lqB-CdE40/" is the link to the Flattr button, who wants a different button is there just a URL (web address) for an image: one can copy this link and email address in the address bar of the browser, download the button (upload at Blogspot in a new post the post must not be published because the image after uploading the automatic Picasa web album is stored), click on editor to HTML and the first link (which is copy the new URL to the button) and (insert in the code above the post can then be deleted, because the button is now stored in your own Picasa Web Album)
- width = "24" - the button is 24px wide
- height = "24" - the button is 24px high
- border = "0" there is no border around the button created
Create your own code
- the base system should now become clear
- then you need the "beginning" and "end" of the code, and in between is the code for each button added - just as it is stated above each
- The code begins with
<div align="center"> next row, the code for the desired buttons are ranked (see 1 above code) and behind the very last button code will be
</div> Embed
- the URL's (web addresses) for the profiles or pages will be replaced by your own links
- The URL's for the buttons can also be replaced
Example - for Facebook (gray), Twitter (blue) and newsfeeds (gray)
<div align="center"><a style="margin-left: 5px; margin-right: 5px;" title="BloggerLatein auf Facebook folgen" href="http://www.facebook.com/pages/BloggerLatein-Blogger-Blogspot-Tipps-und-Tricks/283692315026862" target="_blank"><img src="https://blogger.googleusercontent.com/img/b/R29vZ2xl/AVvXsEj2B7NOCJsv8KhXQD-e1dkI8vN1mPowq8zVo5azKlWv2lfSHb2v8M-KIOPiE-UdRYpef9MbWXhqkQCH-TuUBJsUnGotxU4tnp-OUgbFbA17qfO-2ylN7nEC9IGPu9qdr0eou3WRoQZLatk6/" width="24" height="24" alt="BloggerLatein auf Facebook folgen" border="0" /></a><a style="margin-left: 5px; margin-right: 5px;" title="BloggerLatein auf Twitter folgen" href="http://twitter.com/BloggerLatein" target="_blank"><img src="https://blogger.googleusercontent.com/img/b/R29vZ2xl/AVvXsEjWZzPfshFth9VJDAgALEpzJ4Gu0TRVxG2Qzb26I3Ag2pqZozyRcp4q5N3kK7eqIhvGxTb50Y1N9tfwSq4vrbJP4sP44XM2-YO0a3wC4lw0x3izUtowgQk71wtVtLp9Kk-MJYQWRfESiECP/" width="24" height="24" alt="BloggerLatein auf Twitter folgen" border="0" /></a><a style="margin-left: 5px; margin-right: 5px;" title="Newsfeed abonnieren" href="http://feeds.feedburner.com/Bloggerlatein" target="_blank"><img src="https://blogger.googleusercontent.com/img/b/R29vZ2xl/AVvXsEg-J26bdC0ghiYdeHhzX1XL8ow_lH6jRCNta9ckiMjxlT5-r4dVyhv5tquekid2kwDF8a4ygeHFtEPaq-lJ0fcvDeOVyGVFMpGCyvjdrj26fOSbiJ8cpBvG7LPtWQ9PTl368627CiRM33rI/" width="24" height="24" alt="Newsfeed abonnieren" border="0" /></a></div>