Showing posts with label Blogger Gadgets. Show all posts

Installing Snow Effect in Blog


Installing Snow Effect in Blog - Pingin snowing on your blog to make it look more lively and cool (read: cool)? Well, then you need to put on the blog snow effect you. 

To install snow effect, it is very easy: 
1. Open blogger. Go to the menu Design -> Page Elements 
2. Click the Add a Gadgets -> HTML / Javascript 
3. Insert the following script into the box


<script src='http://hbhost.googlecode.com/files/snow.js' type='text/javascript'> </script>
4. Press Save . Finish is tough is not it? If you do not want to bother ya use any of the following ways 1. click the Add Effect Snow In the blog below


2. Select the blog you want to install snow effect and then click Add Widget
3. Finish. luck ...

How to Change Cursor Display Blog


How to Change Cursor Display Blog - By default, the display cursor on the blog are arrow-shaped, but for those of you who are bored with the look of them or would like to give admiration for visitors. You can replace the icon image so that when a visitor comes to your blog, the display cursor icon will change according to what you use. In order to more clearly you can see here .

change the cursor into the image icon, it is very easy. Here are the steps: 
1. Log in to Blogger. Go to the menu Design-> Edit HTML 
2. Find the code</ head> 
3. Put the following css code above


<style type="text/css">
HTML,BODY{cursor: url("http://downloads.totallyfreecursors.com/thumbnails/cool1.gif"), auto;}
</style>

Description: 


The text in red is the url address of the cursor. Please change the url address you want to use the cursor.

4. After that, save your template. Done If you do not have a cursor icon, try visiting http://www.totallyfreecursors.com . 
The site provides hundreds of thousands of interesting cursor icon that you can choose according to taste. Congratulations creative blog :)

Installing Music Player On Blog

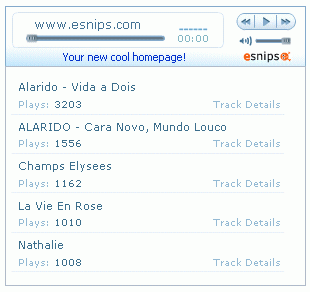
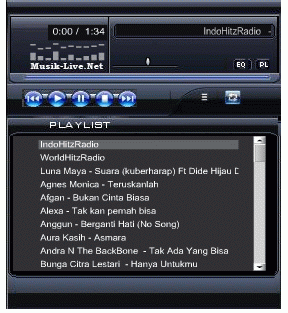
Installing Music Player On Blog - For you fans of music. Play a song through HP, Mp3 player or computer may be used. But what if you play music through the blog? With put music player on the blog then not only you but your blog visitors can also enjoy your favorite songs. So this method is very suitable for those of you who blog contains music or for those who want to promote a personal song. There are many services like this available on the internet. Of the many existing services. I think there are two pretty good music player that is music-live and eSnips . 

Both the music player each has advantages and disadvantages. So please specify yourself which is better. 

1.Music-Live Pros: - Songs are available, stay put - Many skin models you can choose Weaknesses: - Not able to upload your own songs 
2. eSnips Pros: - can upload songs from your computer - There are songs that you can playWeaknesses: - Only 2 model skins to choose from - looks less attractive Now that the advantages and disadvantages of each. Please specify which one is better suited to your needs. 

In order to more clearly you can see the demo music-live here and eSnips here . If it determines the music player of your choice, here are the installation steps: 


A. Music-Livet.Net 
1. Visit http://musik-live.net/ click Skin Mp3 Player 
2. Select the player you want to display. To see how it looks clickPreview Skin 
3. Copy the code in the 'embed code' and go to the blogger. 
Click the menu Design -> Page Elements 
4. Paste code into the menu HTML / Javascript 
5. Finish. above is how to put a music player with songs that have been provided. 


If you want to choose their own song. 

Here's how: 
1. Music-Live on the page, find your favorite songs with the search box. 
2. Then click the Play & Embed code to display code 
3. Copy and paste the code into the menu HTML / Javascript blogger. Finish 

Note: This method is only able to play one song. If you want to play a lot of songs that use the eSnips. 


B. eSnips 

1. Kunjugi http://www.esnips.com/ . To be able to take advantage of the amenities you need to signup first. If so, sign-in to your account. 
2. Click Upload Files and then clickSelect Files 
3. Select the songs you want to play and select the folder where you want memyimpan song. Make sure the folder you choose is to be Public . Because if private you can not add the song into the playlist. 
4. If you have click Upload Now
5. Wait until the upload is complete. 
6. If it is click the menu folder . Choose the folder where you saved the save song 
7. Select the songs you want to install by clicking Add to quicklist 
8. If so, scroll to the top of the page and then click the Create playlist widgets 
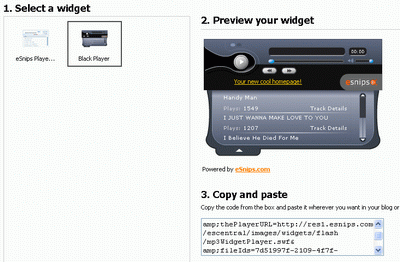
9. Select the skin you want. Then copy the code on the box. 
10. Open blogger. Paste code in the menu HTML / Javascript and then clickSave 
11. Completed. Please see the results. If size does not fit you can adjust the size to edit the width of her on their respective codes.
 Good luck .. 

Fiuhh .. . Finally finished well the experimental results for 3 days.


live music


esnips


esnips add to quicklist
esnips create playlist


esnips widget

Translator Widget - a new translator for blogs


Translator Widget - a new translator for blogsSince I started my promotion templates in foreign sites, I received many emails in other languages. It had been a long time I was looking for a widget with a Google translator to make life easier for my readers gringos, but could not find anything I liked.
After much research on the web, I have gathered several codes and ended up creating a widget to my taste, the result of which can be seen in our first sidebar.
Commenting on Twitter, several readers were interested in using the widget on their blogs, so I decided to make it available for everyone \ o /


TRANSLATOR WIDGET WITH EDGE AND THE BACKGROUND (customizable)

Tradutor com fundo e borda

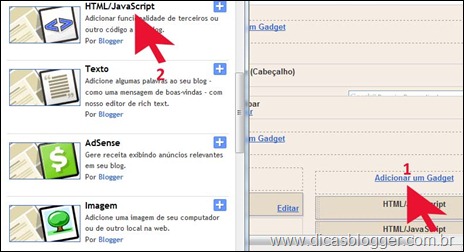
Click the link above and copy all the code. Among the Blogger dashboard and click design. On page elements tab, click add gadget (1) and choose html / javascript (2). Paste the code and save the translator.


The translator comes with edge and dark gray with light gray background. To change the colors, change the following pieces of code (= red border, green background =)

<div style=" solid # ccc border :1px ;padding:10px 4px 3px 4px;text-align:center;background-color:# efefef ;">

If you do not know the color number you want to use, check the color chart web .
If you prefer, we have a translator widget with transparent background.


TRANSLATOR EDGE WIDGET WITHOUT AND WITH TRANSPARENT BACKGROUND

Tradutor com fundo transparente

I ask that the credits are kept at the bottom of the gadget. Thank you.

Creating Navigation For Blog


page navigation widget

Page navigation widget is a widget that serves to open the back page on the blog.Its function is similar to the "older posts" and "recent posts" on the blog. The difference is that with this widget you can be faster to browse the backyard of a blog because you do not have to open one page that can directly jump there but kehalamman next. So that could save your search time. 

Ok for those of you who are interested to apply. Here's how to installation. 

1. Log in to blogger. Open the menuDesign -> Page Elements
2. Click Add a Gadget -> HTML / Javascript and then put the code below into the box


<style>
.showpageArea a {
text-decoration:underline;
}

.showpageNum a {
text-decoration:none;
border: 1px solid #bbb;
margin:0 3px;
padding:3px;
}

.showpageNum a:hover {
border: 1px solid #bbb;
background-color:#bbb;
}
.showpagePoint {
color:#fff;
text-decoration:none;
border: 1px solid #fff;
background: #000;
margin:0 3px;
padding:3px;
}
.showpageOf {
text-decoration:none;
padding:3px;
margin: 0 3px 0 0;
}
.showpage a {
text-decoration:none;
border: 1px solid #bbb;
padding:3px;
}
.showpage a:hover {
text-decoration:none;
}
.showpageNum a:link,.showpage a:link {
text-decoration:none;
color:#333;
}

</style>


<script type="text/javascript">

function showpageCount(json) {
var thisUrl = location.href;
var htmlMap = new Array();
var isFirstPage = thisUrl.substring(thisUrl.length-14,thisUrl.length)==".blogspot.com/";
var isLablePage = thisUrl.indexOf("/search/label/")!=-1;
var isPage = thisUrl.indexOf("/search?updated")!=-1;
var thisLable = isLablePage ? thisUrl.substr(thisUrl.indexOf("/search/label/")+14,thisUrl.length) : "";
thisLable = thisLable.indexOf("?")!=-1 ? thisLable.substr(0,thisLable.indexOf("?")) : thisLable;
var thisNum = 1;
var postNum=1;
var itemCount = 0;
var fFlag = 0;
var eFlag = 0;
var html= '';
var upPageHtml ='';
var downPageHtml ='';


var pageCount=5;
var displayPageNum=3;
var firstPageWord = 'Awal';
var endPageWord = 'Akhir';
var upPageWord ='Sebelumnya';
var downPageWord ='Selanjutnya';


var labelHtml = '<span class="showpageNum"><a href="/search/label/'+thisLable+'?&max-results='+pageCount+'">';

for(var i=0, post; post = json.feed.entry[i]; i++) {
var timestamp = post.published.$t.substr(0,10);
var title = post.title.$t;
if(isLablePage){
if(title!=''){
if(post.category){
for(var c=0, post_category; post_category = post.category[c]; c++) {
if(encodeURIComponent(post_category.term)==thisLable){
if(itemCount==0 || (itemCount % pageCount ==(pageCount-1))){
if(thisUrl.indexOf(timestamp)!=-1 ){
thisNum = postNum;
}

postNum++;
htmlMap[htmlMap.length] = '/search/label/'+thisLable+'?updated-max='+timestamp+'T00%3A00%3A00%2B08%3A00&max-results='+pageCount;
}
}
}
}//end if(post.category){

itemCount++;
}

}else{
if(title!=''){
if(itemCount==0 || (itemCount % pageCount ==(pageCount-1))){
if(thisUrl.indexOf(timestamp)!=-1 ){
thisNum = postNum;
}

if(title!='') postNum++;
htmlMap[htmlMap.length] = '/search?updated-max='+timestamp+'T00%3A00%3A00%2B08%3A00&max-results='+pageCount;
}
}
itemCount++;
}
}

for(var p =0;p< htmlMap.length;p++){
if(p>=(thisNum-displayPageNum-1) && p<(thisNum+displayPageNum)){
if(fFlag ==0 && p == thisNum-2){
if(thisNum==2){
if(isLablePage){
upPageHtml = labelHtml + upPageWord +'</a></span>';
}else{
upPageHtml = '<span class="showpage"><a href="/">'+ upPageWord +'</a></span>';
}
}else{
upPageHtml = '<span class="showpage"><a href="'+htmlMap[p]+'">'+ upPageWord +'</a></span>';
}

fFlag++;
}

if(p==(thisNum-1)){
html += '&nbsp;<span class="showpagePoint"><u>'+thisNum+'</u></span>';
}else{
if(p==0){
if(isLablePage){
html = labelHtml+'1</a></span>';
}else{
html += '<span class="showpageNum"><a href="/">1</a></span>';
}
}else{
html += '<span class="showpageNum"><a href="'+htmlMap[p]+'">'+ (p+1) +' </a></span>';
}
}

if(eFlag ==0 && p == thisNum){
downPageHtml = '<span class="showpage"> <a href="'+htmlMap[p]+'">'+ downPageWord +'</a></span>';
eFlag++;
}
}//end if(p>=(thisNum-displayPageNum-1) && p<(thisNum+displayPageNum)){
}//end for(var p =0;p< htmlMap.length;p++){

if(thisNum>1){
if(!isLablePage){
html = '<span class="showpage"><a href="/">'+ firstPageWord +' </a></span>'+upPageHtml+' '+html +' ';
}else{
html = ''+labelHtml + firstPageWord +' </a></span>'+upPageHtml+' '+html +' ';
}
}

html = '<div class="showpageArea"><span style="padding: 2px 4px 2px 4px;margin: 2px 2px 2px 2px;border: 1px solid #333;background-" class="showpage">Page '+thisNum+' of '+(postNum-1)+': </span>'+html;

if(thisNum<(postNum-1)){
html += downPageHtml;
html += '<span class="showpage"><a href="'+htmlMap[htmlMap.length-1]+'"> '+endPageWord+'</a></span>';
}

if(postNum==1) postNum++;
html += '</div>';

if(isPage || isFirstPage || isLablePage){
var pageArea = document.getElementsByName("pageArea");
var blogPager = document.getElementById("blog-pager");

if(postNum <= 2){
html ='';
}

for(var p =0;p< pageArea.length;p++){
pageArea[p].innerHTML = html;
}

if(pageArea&&pageArea.length>0){
html ='';
}

if(blogPager){
blogPager.innerHTML = html;
}
}

}
</script>

<script src="/feeds/posts/summary?alt=json-in-script&callback=showpageCount&max-results=99999" type="text/javascript"></script>
<div style="text-align:right;font-size:10px;color:000000;margin-top:15px;display:none;"> <a href="http://www.hermanblog.com">Grab this Widget ~ Navigasi Halaman</a></div>

Number five on the " var PageCount "shows the number of posts that will appear on each page. Please be replaced according to your wishes. 3. If you already clickSave . Then place the widget below Blog post like the example below


4. Click on View Blog and see what happens. Good luck .. 
Wibiya: ToolBar Advanced Blogger


Wibiya - one of the websites that provide facilities free toolbar for your blog, toolbar from wibia is very sophisticated. 


feature of the toolbar Wibiya these include: direct search, who's online, live video, translate, timeline, Various Facebook widgets, twitter, youtube , Live chat and sharing your photos. Hmmm not advanced this toolbar? curious to see the Demo??

 immediately wrote visit wibia and look at the bottom of your browser.Once you have a look if you want to install it into your Blogger? Well below this review to make it. 

  • 1. Go to website wibiya.com and click the " Get It Now " 
  • 2.In Form " Create An Account "fill out the form according to your data then kik tomblol" Next " 
  • 3. Then choose your toolbar theme in the " Select a Theme "Then click the" Next " 
  • 4. In the " Application Settings"configuration your accounts into the toolbar, it Seletlah click the" Next " 
  • 5. In the " Add it "final installation or click the logo" Blogger "or install on blogger
  • 6. Make sure you log in to install blogger widgets, blogger logo after you click on the final stage, you are directed to the "Import page elements" blogger 
  • 7.Select the blog you want to install the toolbar, then click the " Add Widget"then the toolbar will be installed automatically and hovering at the bottom of your blog.

 Well done deh review on how to create advanced Wibiya Toolbar, a toolbar is widely used by website owners to enhancing the website , so our blog if you use this toolbar seemed like on Facebook. 
A few may be useful.


Widget Recent Posts Dan Recent Comments Dari Blogger


Recent posts and recent comments and posts or comments last widget is a widget that is often used by bloggers, because the second widget is very useful to know the last comment and the last post on our blog.past I've tried to write about how to make recent comments and recent posts with javascript, but now we do not need to bother anymore to create a widget using javascript because bloggers are already providing this widget in the widget featured blogger.those of you who do not know about how to use this widget please follow the guidelines below. How to use this widget is quite easily is:


  1.  ' Design → Page Elements "
  2. Then Click the " Add a Gadget "
  3. And click on the " Featured "

  4. Find gadget Recent Comments , click the button to use the widgets (+)


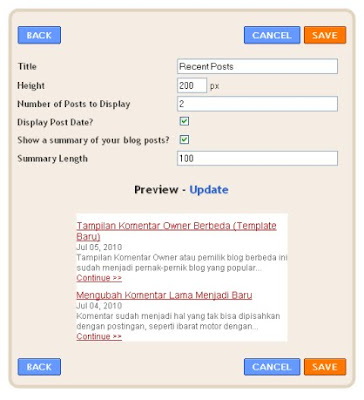
    After the dialog box as above then fill out the widget configuration and press the " SAVE "
  5. And for widget Recent Post on step number 3 search gadget " Recent Posts "and click the (+) the configuration box will appear as below Well after appearing box configuration as above, then fill in the configuration according to your wishes and " SAVE "


  6. Finish and see the results.
Okkey blogger is evidence of progress that you can feel, hopefully more sophisticated bloggers and we are even easier to use blogger. Greetings bloggers

Owner Comments Display Different (New Template)


Views Comment Owner or blog owner has a different trinkets popular blog because with this trick the reader comments can distinguish the author with the user in a comment article.
Previous I've been talking about how to make the owner of the blog comment box is different to the user, but the development of blogger also makes the tutorial can not be used on the new template, as the template of the new code themselves different from the old one. And I had also written about how to change the old into the new comments , and on this occasion I will try to write a tutorial on how to make the box look different blog owner's comments in the new template. Yuk directly to tutorial


  1. Log on menu Design -> Edit HTML and check " Expand Widget Templates "
  2. Put the CSS code below the above code ]]> </ b: skin> 

    . comment-body-author {
    background: # FFFF29; / * Background color * /
    border: 1px dotted # FF2929; / * Border * /
    margin: 0;
    padding: 0 0 0 20px;
    }

  3. Then find the code that is black then paste the code in red , as shown below.

    <dt expr:class='"comment-author "+ data:comment.authorClass' expr:id='data:comment.anchorName'>
    <b:if cond='data:comment.favicon'>
    <img expr : src = 'data: comment.favicon' height = '16px 'style =' margin-bottom:-2px; 'width = '16px' />
    </ b: if>
    <a expr: name = 'data: how. anchorname '/>
    <b:if cond='data:blog.enabledCommentProfileImages'>
    <data:comment.authorAvatarImage/>
    </ b: if>
    <b:if cond='data:comment.authorUrl'>
    <a expr: href = 'data: comment.authorUrl' cond = 'data: comment.AUTHOR == data: post.author'> <dd class='comment-body-author'> <p> <data:comment.body/> </ p> </ dd> <b : else /> <dd expr:class='"comment-body "+ + data:comment.commentAuthorClass' expr:id='data:widget.instanceId data:comment.cmtBodyIdPostfix'><b: if cond = ' data: comment.isDeleted '> <span class='deleted-comment'> <data:comment.body/> </ span> <b:else/> <p><data:comment.body/> <span class = interaction iframe-guide '/> </ p> </ b: if> </ dd> </ b: if> <dd class='comment-footer'>


    Notice truly penempatanya
  4. SAVE and see the results.

Okkeylah so first. may be useful for you and do not be shy to ask if there is trouble because I will try to help you.

Changing Old Becomes New Comment


Comments are things that can not be separated by post, such like motors with gasoline, but in this post I will discuss how to change the shape of the old comments blogger blogger to new comments are more sophisticated with no author photo next to post comments. If you use the Older photo template author should not appear that there is a new blogger on the existing template author photo next to them. Take a look at the image below to distinguish the previous comment with a new comment. Nah visible above scheme there is a difference with the added picture commentators. Would you like to change?The first step to get in on the " Settings "then" Comments "and be sure to choose" YES "to the question" Show profile images on comments? " thenSAVE the second step menu entry Edit HTML and tick box " Expand Widget Templates " Then, find the code below


<dl id='comments-block'>
<b:loop values='data:post.comments' var='comment'>
<dt class = "comment-author 'expr: id ='" comment-"+ Data: comment.id '>
<a expr:name='"comment-" + data:comment.id'/>
<b:if cond='data:comment.authorUrl'>
<a expr: href = ' Data: comment.authorUrl ' class = 'comment-body'> <b:if cond='data:comment.isDeleted'> <span class = 'comment-footer> <span class='comment-timestamp'> <a expr:href='"#comment-" + data:comment.id' title='comment permalink'> <data: comment . timestamp /> </ a> <b:include data='comment' name='commentDeleteIcon'/> </ span> </ dd> </ b: loop> </ dl>


Understand and adapt to your template code themselves. then Replace the code above with the code below


<div expr:class='data:post.postAuthorClass' expr:id='data:widget.instanceId + &quot;_comments-block-wrapper&quot;'>
<dl expr:class='data:post.avatarIndentClass' id='comments-block'>
<b:loop values='data:post.comments' var='comment'>
<dt expr:class='&quot;comment-author &quot; + data:comment.authorClass' expr:id='data:comment.anchorName'>
<b:if cond='data:comment.favicon'>
<img expr:src='data:comment.favicon' height='16px' style='margin-bottom:-2px;' width='16px'/>
</b:if>
<a expr:name='data:comment.anchorName'/>
<b:if cond='data:blog.enabledCommentProfileImages'>
<data:comment.authorAvatarImage/>
</b:if>
<b:if cond='data:comment.authorUrl'>
<a expr:href='data:comment.authorUrl' rel='nofollow'><data:comment.author/></a>
<b:else/>
<data:comment.author/>
</b:if>
<data:commentPostedByMsg/>
</dt>
<dd expr:class='&quot;comment-body &quot; + data:comment.commentAuthorClass' expr:id='data:widget.instanceId + data:comment.cmtBodyIdPostfix'>
<b:if cond='data:comment.isDeleted'>
<span class='deleted-comment'><data:comment.body/></span>
<b:else/>
<p>
<data:comment.body/>
<span class='interaction-iframe-guide'/>
</p>
</b:if>
</dd>
<dd class='comment-footer'>
<span class='comment-timestamp'>
<a expr:href='data:comment.url' title='comment permalink'>
<data:comment.timestamp/>
</a>
<b:include data='comment' name='commentDeleteIcon'/>
</span>
</dd>
</b:loop>
</dl>
</div>

Now living SAVE deh and see what happens. , and if there are any questions please catapult comments here, starting now my passion to reply to your comments. Thank you.

Displays On Page Specific Widget


Hi bloggers, how are you all? hopefully in good health and is always cheerful. In this article, I will share the knowledge I've learned to you is still about bloggers and the topics I discuss this time is about "Showing widgets on specific pages" that are often used in the template megazine, for example you want to display the widget only posted post or no just posted post. Well we just learned together. first step you have to do is enter the menu " Design "and then go to the" Edit HTML "and check the"Expand widget templates " and find code like this widget


<b:widget id='HTML1' locked='false' title='Pesan' type='HTML'>
<b:includable id='main'>

<!-- only display title if it's non-empty -->
<b:if cond='data:title != &quot;&quot;'>
<h2 class='title'><data:title/></h2>
</b:if>
<div class='widget-content'>
<data:content/>
</div>

<b:include name='quickedit'/>

</b:includable>
</b:widget>

To facilitate the search widget Please enter a title such as " Message "box into the browser search (ctrl + F) then add code <b:if cond='data:blog.url == data:blog.homepageUrl'> and closed with a code </ b: if> to put on only the front page alone and placed as below


<b:widget id='HTML1' locked='false' title='Pesan' type='HTML'>
<b:includable id='main'>
<b:if cond='data:blog.url == data:blog.homepageUrl'>
<!-- only display title if it's non-empty -->
<b:if cond='data:title != &quot;&quot;'>
<h2 class='title'><data:title/></h2>
</b:if>
<div class='widget-content'>
<data:content/>
</div>

<b:include name='quickedit'/>
</b:if>
</b:includable>
</b:widget>

Note the placement of code that is green ! then save . , and below is the code that can be used for other placement to put on the front page / index to use code


<b:if cond='data:blog.pageType == data:blog.homepageUrl'>


To put it in the Archive page
<b:if cond='data:blog.pageType == "archive"'>


To place an item posted / posting only use code
<b:if cond='data:blog.pageType == "item"'>


And to the page or pages used static page blogger
<b:if cond='data:blog.pageType == "static_page"'>

And for extra, if you want to put on a specific page by using the URL using the code below
<b:if cond='data:blog.url == "URL_HERE"'>


Replace code URL_HERE the URL you want to display. , and for exceptions, for example, you do not put the widget only on the front page just by changing the sign = first to sign ! Example


<B: if cond = 'data: blog.pageType ! = data: blog.homepageUrl '>

Well not too hard right? may be useful for you. A few please comment if there is a question,: D NB: Code above also can be applied to other bloggers functions which I will discuss in a later

Highlight Post With Tombol Select All


Greetings bloggers, Earlier in the post yesterday I've talked about the " Highlighting a specific text on the post "with a different background image background even I've written there. On this occasion to discuss more about the Post Highlights with extra select button that makes all visitors to the blog will find the text block, suppose you write a tutorial and you insert a script to be copied then select all button is very useful for automatic text block. Such examples below this


Do you remember ...
When you lie to me
and I memaafkanya .. remember you will struggle against you though I could not keep me fighting for my attention you'll remember about you at any time come menyelimutimu But now you respond with a smile pahitmu ...


Hehehe just an example do not need to be interpreted ya .. Okay we move on to how pembuatanya 1. Log in Edit HTML on your blog and then put the javascript code below under the code <head>


<script type="text/javascript">
function fnSelect(objId)
{
fnDeSelect();
if (document.selection)
{
var range = document.body.createTextRange();
range.moveToElementText(document.getElementById(objId));
range.select();
}
else if (window.getSelection)
{
var range = document.createRange();
range.selectNode(document.getElementById(objId));
window.getSelection().addRange(range);
}
}
function fnDeSelect()
{
if (document.selection)
document.selection.empty();
else if (window.getSelection)
window.getSelection().removeAllRanges();
}
</script>

4. Still on the Edit HTML and insert the following CSS code above the code]]> </ b: skin>


/ * __Style_copy_area__ * /
. copybox {/ * - Style Box dalam - * /
padding: 5px;
border: 1px solid # FFC71F;
background: # FFFFCC;
}
. kopiaer { / * - Style Box Luar - * /
background: red;
padding: 7px;
}
. cangkirkopi { / * - Style Tombolnya - * /
background: # B88A00:
border: 1px solid # FFC71F:
color: # FFD65C;
padding: 2px;
font-weight: bold;
}

You can mengunah display CSS code above to suit your taste and SAVE

5. After that the post editor use the following code to highlight the text a


<div class="kopiaer">
<input class = "cangkirkopi" type = "button" value = "Select All" onClick = "fnSelect (' kopihangat ' ) "/>
<div class = "Copybox" id = " kopihangat " > TEKS YANG INI Ingin DITAMPILKAN </ div> </ div>


> Remember replace text in blue is different each 1x use and both have the same > Replace the text in red above with your text 6. Publish dehh and see what happens Well above is a short tutorial I hope is useful to you, please comment if you have a catapult questions about this tutorial.