Showing posts with label Blog Tools. Show all posts

Free Backlink from PR5 - PR9 Website Directory

backlink Free Backlink from PR5 - PR9 Website Directory - Backlinks are the only elements to improve pagerank blog. So if you want to increase the page rank of your blog then there is no other way than to find backlinks as much as possible. 

course pagerank is not solely influenced by the quantity of backlinks but also the quality of the backlink. For example, your site got 1 backlink from a PR5 site then the result will be better than 10 backlinks from PR3 stus onwards. Well here I will submit a web directory which contains more than 100 sites PR5 to PR9 directory. 

What is interesting here is that most of these directory sites allow you to submit your blog for free on its website without giving backlinks link means that you can be one way links . 

As we know, one way link has better quality than the two-way link so as to strengthen our international position in search engine pages. those of you who are interested to get a free backlink from PR5 to PR9 directory sites simply visiting http://www.greatdirectories.org/free.html . After that, submit one site to the site directory. Congratulations collecting backlinks

What is Alexa Rank and Benefits

alexa logo
What is Alexa Rank and Benefits After discussing the google page rank , this time I want to review a little aboutAlexa rank . Because in addition to google page rank, Alexa rank is one factor to make money on the internet. So if you're serious about making money on the internet then you must know Alexa rank.


What is Alexa rank? Alexa rank is a tool created by Alexa.com to analyze how much traffic or page views of a website based on the number of visitors to install the Alexa toolbar on their browser. After that, the data will be collected and then ranked based on the traffic. The greater the traffic in the lower rank. So how to find our website Alexa ranking? 

There are 2 ways you can use to find your website ranking alexa rank, namely:

 I. Install the Alexa widget on your blog that looks like this way of installation: 

1. Open http://alexa.com then click For Site Owners 
2. Then clickSite Widgets , located on the left 
3. Enter the address of your website on the widget you want to install. For example: hermanblog.com then click Build Widget
4. Copy the code of the widget you want to install and then paste into your blog.
Done 


II. Install the Alexa toolbar in your browser that looks like this. 
way of installation: 

1. On page alexa.com. Click the Toolbar 
2. If using the browserFirefox . Then the page that appears is like this 
3. Click the Get Sparky and follow the prompts to install the Alexa toolbar 
4. If you use the browser Internet Explorerthe page that appears is like this 
5. click Install Now to install the Alexa toolbar on your browser. 
6. If you've restarted your browser and see the result. 

then what good alexa rank for your blog?


 If your blog is used to make money on the internet then alexa rank is very important to you. Because many dollars producing programs on the internet such as TLA , SponsoredReviews , Blogsvertise ,Buyblogreviews , Linkworth , etc. 

which require alexa rank to join. So the smaller the alexa ranking of your blog more and more programs that you can follow which means the greater your chance to make money on the internet. In addition, Alexa rank can also be used to determine whether or not a popular blog. 
Alexa rank blogs that have small usually will be more popular and liked by the advertiser than a blog that has a big alexa rank. 


alexa widget1


alexa toolbar


install alexa toolbar

alexa toolbar for firefox


alexa toolbar for internet explorer

Sitemap for Blogger / Blogspot


Sitemap for Blogger / Blogspot - How about having a page on your blog where all your posts are organized by date? We might call this page or Sitemap Blog Archive and it can be quite useful when a visitor can not find any specific post on your blog using search or even if this visitor want to read everything you've posted.
If you want to see how well a page, take a look at what I created on my blog at this link . If you want a page equal to your blog, follow the tutorial below.


First create a new page on your blog (1) and enter the HTML editing mode (2). Copy the code below, changing the part in red the full address of your blog. Paste the code into the html page (3) and click publish now.

<script style="text/javascript" src="http://100rede.com/mapablogger.js"> </ script>
<Script
sitemap_blogger

See the result file's Blogger Tips in the image below: 

Arquivo ou mapa
Remarks:
I got this tip from the blog Abu Farhan , credits the script were kept, and I just translate the month names into Portuguese.
I do not know how Google bots can interpret this new page on your blog full of internal links, I believe it would not yield any punishment in Google search results, but I can not say such a thing with certainty.
Realize that there is a value in the URL that indicates the number of posts to be displayed, in the example above this value is set to 1000 because I wanted to show all of my blog posts on the map.Change the value as the number of posts on your blog, always put a value well above the number of posts on your blog will ensure that all are shown.

Translator Widget - a new translator for blogs


Translator Widget - a new translator for blogsSince I started my promotion templates in foreign sites, I received many emails in other languages. It had been a long time I was looking for a widget with a Google translator to make life easier for my readers gringos, but could not find anything I liked.
After much research on the web, I have gathered several codes and ended up creating a widget to my taste, the result of which can be seen in our first sidebar.
Commenting on Twitter, several readers were interested in using the widget on their blogs, so I decided to make it available for everyone \ o /


TRANSLATOR WIDGET WITH EDGE AND THE BACKGROUND (customizable)

Tradutor com fundo e borda

Click the link above and copy all the code. Among the Blogger dashboard and click design. On page elements tab, click add gadget (1) and choose html / javascript (2). Paste the code and save the translator.


The translator comes with edge and dark gray with light gray background. To change the colors, change the following pieces of code (= red border, green background =)

<div style=" solid # ccc border :1px ;padding:10px 4px 3px 4px;text-align:center;background-color:# efefef ;">

If you do not know the color number you want to use, check the color chart web .
If you prefer, we have a translator widget with transparent background.


TRANSLATOR EDGE WIDGET WITHOUT AND WITH TRANSPARENT BACKGROUND

Tradutor com fundo transparente

I ask that the credits are kept at the bottom of the gadget. Thank you.

Creating Related Posts with Thumbnail


related-post

Previously I've been posting about how to create a related post to display a list of post titles related to the main post. Making it easier for readers to find related topics.To learn more about related post read here . Well this time I want to discuss how to create a more interesting related post is by adding a thumbnail or picture in it .
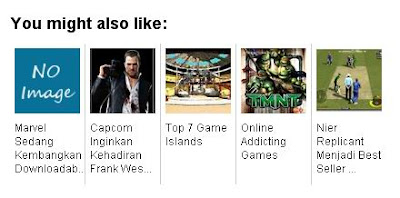
To be more clear the picture below. Interesting is not it? 
This method can be used in conjunction with a related post without thumbnail.
 For those of you who are interested to set it up, follow these steps: 

1. Open the menu Design -> Edit HTML
2. You can check the "Expand Widgets Templates" 3. Put the code following the above </ head>


<!--Related Posts with thumbnails Start-->
<!-- remove --><b:if cond='data:blog.pageType == &quot;item&quot;'>
<style type='text/css'>
#related-posts {
float:center;
height:100%;
min-height:100%;
padding-top:10px;
padding-left:15px;
padding-right:15px;
}

#related-posts h2{
font-size: 1.3em;
color: black;
font-family: Arial;
margin-bottom: 0.75em;
}

#related-posts a{
color:black;
}

#related-posts a:hover {
background-color:#eeeeee;
}
</style>
<script type='text/javascript'>
var defaultnoimage="https://blogger.googleusercontent.com/img/b/R29vZ2xl/AVvXsEgr8IVqGSSpq_wyjyYy6mnRTwD9g7gBxgYledyeQHLb1R3PwklH8GqWu4DvX4rVgueDgrkyHVSGB8utlNJveMV-6GEMeY7d-CsS9PTAHD54J6gihxAkT6oENGOdoJadLj18WasqxYBcN1EC/";
var maxresults=5;
var splittercolor="#cccccc";
var relatedpoststitle="You might also like:";
</script>
<script src='http://hbhost.googlecode.com/files/related-posts-with-thumbnails-for-blogger.js' type='text/javascript'/>
<!-- remove --></b:if>
<!--Related Posts with thumbnails End-->

4. Then look <p class='post-footer-line post-footer-line-1'/>

5. If not found try searching for post-footer-line

6. Put the code follows below.

<!-- Related Posts with Thumbnails Code Start-->
<!-- remove --><b:if cond='data:blog.pageType == &quot;item&quot;'>
<div id='related-posts'>
<b:loop values='data:post.labels' var='label'>
<b:if cond='data:label.isLast != &quot;true&quot;'>
</b:if>
<script expr:src='&quot;/feeds/posts/default/-/&quot; + data:label.name + &quot;?alt=json-in-script&amp;callback=related_results_labels_thumbs&amp;max-results=6&quot;' type='text/javascript'/></b:loop>
<script type='text/javascript'>
removeRelatedDuplicates_thumbs();
printRelatedLabels_thumbs(&quot;<data:post.url/>&quot;);
</script>
</div><div style='clear:both'/>
<!-- remove --></b:if>
<!-- Related Posts with Thumbnails Code End-->

7. If it Save your template. Specification: var images that appear on postings that do not have a picture. You can replace the image with another image . maxresults var = indicate the number of posts that appear on the related post. Please set the number of posts that would appear to change the number . splittercolor var = "#cccccc shows color dividing line. Replace cccccc with code color you want.relatedpoststitle var = " You might also like: show related post titles. Replace the red text with the title you want. those of you who feel the way the above is too difficult, you can use the related post with thumbnail widget provided bylinkwithin.com . For installation very easy way, here are the steps: 1. Go towebsite http://www.linkwithin.com 2. Fill in the required data on the form that has been provided


Email : Your email address Blog link : Video blog where you install the related posts widget with thumbnail Platform : select Other Width : choose the number of related posts that would appear


You can check the little box if you are using a background template, dark 3. ClickGet Widget 4. Copy and paste the code script given above </ body> on your blog template and save your template. Finish If there are less obvious or experience difficulties in installing related post with thumbnails please leave your comment below. I will try to help you.

Download Alexa Booster

Alexa Booster - To increase the page rank and SEO of a blog can use a variety of tricks and how, to use banklink booksmark blog or social qualities of having good PageRank and dofollow. for novice blog or blog which makes it somewhat difficult to increase blog traffic, so it must be a lot of effort to advertise this blog and blog traffic so be good. 


Download Alexa Booster

Download Alexa Booster


No need to worry for beginner bloggers to increase traffic to blog because here hasbihtc.blog will provide tricks to increase blog traffic quickly. not have many visitors, because this softwere our blog will have high traffic and of course from various proxies.


Download Alexa Booster


Directly be ok. softwerenya name is " Alexa Booster ". softwere with this blog we can have high traffic. we just live our blog address and wait until the process is complete.


Download Alexa Booster

Download Alexa Booster


softwere can be downloaded free of charge from your service provider or download alexa driving here to get the softwere. advantage of this softwere able to rapidly increasing traffic various proxies , and IP .

I use it quite easily. 
- Install the application as usual 
- Enter the address of the blog or wibesite
- Follow the instructions 
- Wait until the process is complete


Nb. For bloggers who do not know what it is Alexa Booster or usefulness Understanding Alexa Rank and few tips from my hasbihtc.blog on Download Alexa Booster may be beneficial yours respectfully happy blogging.

Copyright © : http://hasbihtc.blogspot.com/2012/02/download-alexa-booster.html#ixzz28UlKRdeo

How to Display Form Comments Only in Specific Postings


if you want your blog posts can be read by more people then one way you have to do is submit your RSS feed to Facebook . By submitting your blog RSS feed into Facebook, then every time you post a new article, the article will appear automatically posted on your facebook profile, so friends or friends facebook you can read your blog posts directly on your facebook profile page. If your articles are good they certainly will visit your blog to read further so that it can also promote your blog. Regarding how to submit your RSS feed to Facebook actually I've posted on this blog. But because Facebook has changed the display page and to submit RSS feature has also been removed so that way previously been unusable. ThoughFacebook already does not provide a feature to submit rss feed. But now there are many applications facebook that can perform this task. One that I use is the RSS Graffiti . RSS Graffiti will automatically submit your blog posts to your profile pagefacebook every time you update the post so you do not need to submit the articlesmanually into facebook What you should do is open the app and graffiti RSS add the address of your blog feed. After that everything will run automatically .. tis .. tis ..tis addition, RSS Graffiti also provides multiple settings so you can customize the display according to the feeds you want. Several features provided by the RSS graffiti such as:


  1. Allows you to set the appearance of the article in the form of regular feed or short messages such as Twitter
  2. Filtering articles from a specific date
  3. Giving an additional message on any article published
  4. Set posting schedule
  5. Tweak to publish twitter facebook

How to submit RSS feeds to RSS Graffiti

1. Log in to Facebook 
2. Open the RSS Graffiti application and run it. 
3. After that, click Add Feed . 
4. Then the page will appear as follows

Feed URL : browse your blog feed address. Examplehttp://bloganda.blogspot.com/feeds/posts/default 
Source Name : Fill in the name of your blog Source URL : Fill out your blog style Post : Let the 'Standard'. If you want to post up in the form of a short message such as Twitter select 'Compact' or 'status updates'

5. If you have press Save . Done Now every time you post an article, the article will automatically appear at page facebook you.

How to Register FeedBurner


Feedburner is a web publishing service by spreading the content and the rss feed of a blog / website, so the service Feedburner helps promote a blog or website content so it can be a blog or website traffic1.For feedburner register please visit www.feedburner. com When you visit the page will appear as below


2. Please fill in the red circled with the address of your blog or website and then immediately click next and do not need to click on the box I am podcaster then the following page will appear: 3. Fill in the appropriate data and then click Active blog feeds, if no error is usually because the feed address please fill in the name of the other until the window below 4. After the address of your blog feed so, you simply go to the blogger to change blogger feed settings. How to access the settings menu  site feed. Then enter your feed address that you have made ​​to a field posting feed URL changing direction  save. Back to Feedburner. Jump just click skip directly to feed management do not need to click next, then you are setting your feedburner


Setting feedburner


Setting feedburner is intended to optimize our blog feed that already in daftarin on feedburner
feedburner settings to the way, the first step that should be done is to login at feedburner. Please visithttp://www.feedburner.com/ then sign in then there will be a page. There, please enter your username and password, which when I first made ​​the list in feedburner. Then click sign in.


After that you will be taken to a page in your Feedburner feed. Please click on the blog that would feed on the setting. On that page, there are 5 menu on feedburner (Analyze, Optimize, Publicize, Monetize, and Troubleshootize). optimized SmartFeed click menu and then click enable. clicking Publicize menu and activate the email subscription service, Ping shot and FeedCount. Email subsciption service function is to activate the subscription form that you can plug in your blog. To ping shot, serves to inform feedburner directly if your blog is updated. So if you do the ping ping service of the site, can be directly detected quickly by feedburner.


Number of comments again show at Blogspot blogs


The number of comments is no longer displayed on Blogger Blogspot? How can you let the number of comments on Blogspot again? Why the number of comments is not displayed?


Anyone who operates a Blogger Blogspot blog is occasionally "surprised" with small problems or malfunctions. There is no evil intent behind it. Causes are often technical innovations and improvements usually only temporary restrictions.

Blogger leads to changes, it is usually associated with changes in all blogs. Greatly simplified, one can imagine it is an update of a software - it will be re-programmed functions provided. Blogger has also in principle the possibility to integrate these innovations in all blogs. Unfortunately, it often happens without warning and it can be for an uncertain period of time being not find any solutions. It requires a good understanding to these changes in the (X) to detect HTML at all and, if necessary to change it.
Since June 2012, the number of comments on Blogger is no longer displayed. This is especially blogs that use the standard templates (design).


One can wait for now, the problem has been resolved by bloggers or eliminated by changing the code problem itself.
The modification of the code has been tested on several blogs, and worked without problems and limitations.Nevertheless, no guarantee can be given that this tip works with all blogs. For now, you should also try this first implementation on a test blog. If the test was successful, and the change is to be implemented then in the main blog, make a backup of the blog and the template (design) is to be made and these can then be uploaded as needed.
The solution is to share some code, and it is important to note that when changing the template (design), this step may be repeated.

Access to the HTML code in the old Blogger interface
  • at blogger.com log and seek appropriate Blog
  • Design >> Edit HTML

Access to the HTML code in the new Blogger interface
  • at blogger.com log and seek appropriate Blog
  • Live in the template >> Blog >> Edit HTML and seeing this message: "The HTML editing can affect the operation of some functions and is recommended only for advanced users. If you edit the HTML code of the template, this can have unforeseen effects on other Blogger features. We recommend first the template designer, where you can add in the "Advanced" CSS. "
  • but whoever wishes to make changes in the HTML code ignores this warning and click Continue

In both surfaces:
  • Check "widget templates show completely"
  • in both surfaces enable the site search (F3 or CTRL + F) and search for the following line:<data:post.commentLabelFull/>:
  • the first result is the yellow highlighted code is deleted


  • The following code will be inserted and "Save Template" then:
<b:if cond='data:post.numComments == 1'> 1 Comment <b:else/> <b:if cond='data:post.numComments 0'> == 0 Kommentare <b:else/> <data:post.numComments/> Kommentare </ b: if> </ b: if>


  • If needed, the words 1 " comment ", 0" comments "and (multiple)" Comments changed "(eg answer / answers, thoughts / opinions, etc.)
Reload the blog and the number of comments should be shown again:


By BlogSpot users that have this implementation works well, a brief comment would be great. For demonstration purposes, the functionality for other readers links to your own blog are welcome.

Blogger AdSense Code Converter


hy guys If you want to add Adsense Ad units or any other ad scripts inside the Blogger Post or anywhere in the Blog, You can't directly Paste it in the template code. You need to first convert the code using this HTML Entities Encoder tool and then you can put ads anywhere you want ;)

hhmmm its work


Instructions:
  1. Fill the Adsense/other Code in the Below Box
  2. Click  "Convert Ad Code".
  3. Next, Sign into Blogger Dashboard » Layout » Edit html and then Paste the code where ever you want the ad to be displayed.
Good LUCK


Online free, header, edit images for Blogspot


How can you edit their photos for free, or header images for Blogspot? Where can I find a good free online photo editing program? Is there a free photo editing application for images, headers and photos for Blogger Blogspot ?

If you want his photos - and not just for a Blogger Blogspot blog - edit, sometimes it requires a good software for image processing. Probably you already use some free programs for photo editing and the results were not always satisfactory.

Although it certainly good free photo editing software is, you might even catch yourself, using the program Photoshop (from the Adobe series) flirted. Maybe you did not then have the wherewithal (which should be in three to four figures)?

Anyone with a similar program - a small Photoshop clone - can be satisfied and want to manage their photos online, the  Pixlr  is recommended.


kostenlos fotos, bilder, header  für blogger blogspot bearbeiten


An advantage is that this software can be used online, this is of importance if you are not sitting in front of his PC on which you may have already installed a good photo editing software. Or when using mobile devices (eg mobile phones) blogs, is an online photo editing program can prove to be very handy. Registration for the image processing and to download the images is not due.

The structure and the tools it offers to remember (tools) in Pixlr heavily on Photoshop. The handling of  Pixlr  is relatively easy and you should have tried it out. Pixlr also supports the work with layers and masks and offers several filter and cutting tools.


kostenlos fotos, bilder, header  für blogger blogspot bearbeiten


Through some practice and testing to achieve very good results. But Pixlr has to offer some other interesting tools.

Pixlr Express is an image editing program that can quickly implement a simple manipulation of images. Because of the very simple handling this tool to edit photos or pictures is fun and you have to bring any specialized knowledge. Pixlr Express is free and no registration required.


kostenlos fotos, bilder, header  für blogger blogspot bearbeiten


With Pixlr Express can quickly shrink or rotate photos, contrast and sharpness can be changed very easily. The functional effects has much to offer and the function should try to overlay times. Under Border can easily add context to the pictures and let the text function, producing very nice results. Pixlr Express which offers a very easy to use, which is for beginners or amateur photo editing a true enrichment and with the photo editing can be fun - highly recommended.

Pixlr-O-Matic is another tool that can quickly convert beautiful photo effects. Also with this tool without registering, and the images can be downloaded for free.


kostenlos fotos, bilder, header  für blogger blogspot bearbeiten


Even with  Pixlr-O-Matic  images can be quickly and easily add a nice effect or frame. Of the many effects you can convince yourself quickly when you used to upload the image the two crossed arrows. Also a tool that can be achieved with very nice results with very little effort, and it needs no expertise. A program that brings the same enthusiasm and fun to use with it, and an hour-long photo-editing unnecessary.

With these 3 image editing tools for beginners and amateurs can make to advanced very much. The tools are easy to use and make installing a software for image processing unnecessary.