Changing the Header Template In Blogger

blogger template header

Changing the Header Template In BloggerSo that your blog look unique or different from the others. 
Then you have to change the look of your blog. There are many ways to do it. For example, by changing the template created by a third party but the average template is already using it. Unless you create your own templates, but this method requires a long time and is not easy to make a good template. 

So one of the most convenient and effective way is to change the header on a template . 


Header is the most important element in a template for every visitor that comes to your blog first seen is a header. So changing the header is the most appropriate way. Header does not have to be a picture. You can also use the text as an important header unsightly. 
If you want to use an image as a header but could not make it. Do not worry, because now there are many websites that provide free header images so you just download it. 
Some websites have a pretty good header like: 100pixel.blogspot.com , freewebpageheaders.com ,smashingmagazine.com , and much more. In this post I will discuss about changing the header of freewebpageheaders.com . 


To download it, please follow the steps below: 

1. Go to website http://freewebpagesheaders.com/gallery 
2.To download headers. You must have an account first. Click register to register. 
3.Click Agree . 

Then you will be asked to fill out the Registration form. 
This form consists of 2 parts: Required information and optional information . Required information is the info you need to provide for the registration while the optional information is information that is used to display your data when you login to the visitor. If you feel no need then ignored for this section 

4. Then click Submit Registration Form . If it is you will get a message like this. 
5. Open the email you used to register. Click on the link provided to mengakftifkan your account.
 6. If you have, you will get a message that your account has been activated.
 7. click Return to the front page of free Web Page Headers . 
8. Then click Login to download the image header. 
9. Select a category header you want. If you have found a suitable picture. Click on the image and then click Download . 1
0. Then the picture will open in a new page. Right click on the image and choose Save Image As and press Save . 
11. Completed. 


Now the image is stored on your computer the next step you should do is find out how the size of the header in your template so that when mamasang size fit your template header. 

How: 

1. Click the Layout -> Edit HTML . 
2. Find code # header-wrapper . So that's easy to search for, press Ctrl + Ftype "header-wrapper" and then press Next . 
3. If you have found there is usually a code width and height around. For example, # header-wrapper {background: url} no-repeat; width: 980px; height: 100px; Width is the length of the header andHeight are the width of the header. Meaning you have to resize the image to 980x100 pixels. You can use an image processing program such as MS Paint, ACD See, photoshop for meresizenya. 
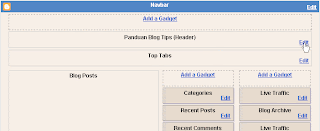
4. Once completed. Go to Blogger , go toDesign -> Page Elements . 
5. Click Edit on the Header. 
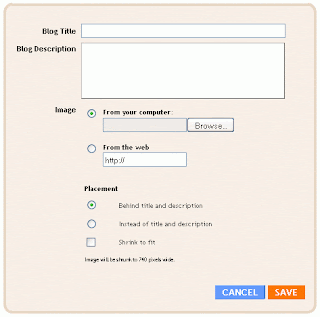
6. Then a new page will appear. 
7. Select Browse from your computer if the picture is stored dikomputer or Browse from the web if the images are stored on image hosting such as Imageshack, Photobucket, and Geocities. 
8. In the "Placement". Select Behind title and description if you want to showing the picture behind the blog title and description or select Instead of title and description if you want to cover the blog title and description. 
9. Then click Save . 
Click View Blog to see the results. 


Note:Not all templates can be mounted image. Some use text only. So choose the template as needed. luck. Good luck ...


How to Make Related Articles / Related Post with scroll

How to Make Related Articles / Related Post with scroll How to Create Articles related - Perhaps the term related post or the linked article is not foreign anymore for bloggers. for who do not know it's related article is a collection of articles relating to or associated with the title of the post mate,, well for related articles this time I modified a little by adding a scroll function. By adding the scrolling function on related posts widget so visitors no longer bothered with related articles that are too long down. Moreover, related post widget is placed on the bottom of the post. nahh for my friend who already install related posts widget long without scrolling function , it must be removed first. Confused how to remove it? How did the backward flow (from bottom up) by following the instructions. Examples Related Articles I mean kaya gini nihh:


Related Articles

In the picture there appears to be a scroll that can be hung upside down to see related postings. Okay, go to  How to Create Related Articles / Related Post with a scroll  in the bottom of the post to your blog.

  1. Login to blogger with your id
  2. Click the Draft
  3. On the tab menu, select Edit HTML
  4. Check the small box Expand Widget Templates
  5. Search code <p> <data:post.body/> </ p> atau <data:post.body/>
  6. Place the following code under the code above:


<b:if cond='data:blog.pageType == &quot;item&quot;'>
<H2>Related Post:</H2>
<div class='rbbox'>
<div style='margin:0; padding:10px;height:200px;overflow:auto;border:1px solid #ccc;'>
<div id='albri'/>
<script type='text/javascript'>
var homeUrl3 = &quot;<data:blog.homepageUrl/>&quot;;
var maxNumberOfPostsPerLabel = 4;
var maxNumberOfLabels = 10;
maxNumberOfPostsPerLabel = 50;
maxNumberOfLabels = 3;
function listEntries10(json) {
var ul = document.createElement(&#39;ul&#39;);
var maxPosts = (json.feed.entry.length &lt;= maxNumberOfPostsPerLabel) ?
json.feed.entry.length : maxNumberOfPostsPerLabel;
for (var i = 0; i &lt; maxPosts; i++) {
var entry = json.feed.entry[i];
var alturl;
for (var k = 0; k &lt; entry.link.length; k++) {
if (entry.link[k].rel == &#39;alternate&#39;) {
alturl = entry.link[k].href;
break;
}
}
var li = document.createElement(&#39;li&#39;);
var a = document.createElement(&#39;a&#39;);
a.href = alturl;
if(a.href!=location.href) {
var txt = document.createTextNode(entry.title.$t);
a.appendChild(txt);
li.appendChild(a);
ul.appendChild(li);
}
}
for (var l = 0; l &lt; json.feed.link.length; l++) {
if (json.feed.link[l].rel == &#39;alternate&#39;) {
var raw = json.feed.link[l].href;
var label = raw.substr(homeUrl3.length+13);
var k;
for (k=0; k&lt;20; k++) label = label.replace(&quot;%20&quot;, &quot; &quot;);
var txt = document.createTextNode(label);
var h = document.createElement(&#39;b&#39;);
h.appendChild(txt);
var div1 = document.createElement(&#39;div&#39;);
div1.appendChild(h);
div1.appendChild(ul);
document.getElementById(&#39;albri&#39;).appendChild(div1);
}
}
}
function search10(query, label) {
var script = document.createElement(&#39;script&#39;);
script.setAttribute(&#39;src&#39;, query + &#39;feeds/posts/default/-/&#39;
+ label +
&#39;?alt=json-in-script&amp;callback=listEntries10&#39;);
script.setAttribute(&#39;type&#39;, &#39;text/javascript&#39;);
document.documentElement.firstChild.appendChild(script);
}
var labelArray = new Array();
var numLabel = 0;
<b:loop values='data:posts' var='post'>
<b:loop values='data:post.labels' var='label'>
textLabel = &quot;<data:label.name/>&quot;;
var test = 0;
for (var i = 0; i &lt; labelArray.length; i++)
if (labelArray[i] == textLabel) test = 1;
if (test == 0) {
labelArray.push(textLabel);
var maxLabels = (labelArray.length &lt;= maxNumberOfLabels) ?
labelArray.length : maxNumberOfLabels;
if (numLabel &lt; maxLabels) {
search10(homeUrl3, textLabel);
numLabel++;
}
}
</b:loop>
</b:loop>
</script>
<small><p>Widget by [ <a href='http://iptek-4u.blogspot.com' target='new'>Iptek-4u</a> ]</p></small>
</div>
<script type='text/javascript'>RelPost();</script>
</div>
</b:if>


7. If so, now find this code ]]> </ b: skin>

8. Place the following code in the code above:
/ * - Modified by http://blogs-id.blogspot.com-- related posts * /
. rbbox {border: 1px solid # D8D8D8; padding: 5px;
background-color: # E0F8E0;-moz-border-radius : 5px; margin: 5px;}
. rbbox: hover {background-color: # EFFBEF;}


9. Click SAVE TEMPLATE 


10. Done 


There is a script in red Related Posts can be replaced with your favorite text. For color codes too, customize your template design. Now let's see one of your posts. Thus  Related Articles / Related Posts with scroll  will be under the posts. It looks even more beautiful with the box that surrounds this widget. Easy is not it, okay good luck. ^ _ ^


How to Make Related Articles / Related Post with scroll  
How to Make Related Post How to Make Related Articles / Related Post with scroll  How to Make Related Post How to Make Related Articles / Related Post with scroll  How to Make Related Post How to Make Related Articles / Related Post with scroll  How to Make Related Post How to Make Related Articles / Related Post with scroll  How to Make Related Post How to Make Related Articles / Related Post with scroll  How to Make Related Post How to Make Related Articles / Related Post with scroll  How to Make Related Post How to Make Related Articles / Related Post with scroll  How to Make Related Post How to Make Related Articles / Related Post with scroll  How to Make Related Post How to Make Related Articles / Related Post with scroll  How to Make Related Post How to Make Related Articles / Related Post with scroll  How to Make Related Post How to Make Related Articles / Related Post with scroll  How to Make Related Post How to Make Related Articles / Related Post with scroll  How to Make Related Post How to Make Related Articles / Related Post with scroll  How to Make Related Post How to Make Related Articles / Related Post with scroll  How to Make Related Post

Eliminating paper Blogger Showing Post With Label


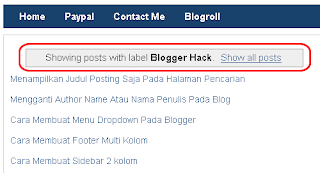
When you search for content through the search box or label or category. So usually a small box will appear containing Showing Post With Label as pictured below. If you feel disturbed by the presence of the box and also to relieve loading blog. 

You may use the following ways: 
1. Go to the menu Design -> Edit HTML 
2.Tick ​​the " Expand Widgets Templates " 
3. Find the code below:


showing post with label


<b:includable id='status-message'> 
<b: if 


style = 'clear: both;' /> 
</ b: if> 
</ b: includable>
4. Replace the code above with the code below

<b:includable id='status-message'>
<b:if cond='data:navMessage'>
<div>
</ div>
<div style='clear: both;'/>
</ b: if>
< / b: includable>
5. If so click Save Template . 6. Completed. Please see the results. Hopefully useful

Displaying Post Title Only On Page Search


Usually if there are visitors who are looking for our blog articles either by label or the search box or search box. So that appears is the title of post and its contents. Try to imagine if the content contains the keywords you want to search visitors reached 50-100 articles. How long does it take the viewer to search for items of interest.Moreover, items of interest are posted on the back of the visitor might be blurred before finding content. thus you will need to deal with it show the title post it on the search page. Examples like the picture. Which appears only title posting only. Ok then how to implement it? 1. Log in to blogger. Open the menu Edit HTML 2.Backup your template and then check the " Expand Widget Templates " 3. Findthe code that below

post title


<b:include data='post' name='post'/>
4. Replace the code above with the code below

<B: if cond = 'data: blog.homepageUrl
! = date: blog.url '>
<b:if cond='data:blog.pageType != "item"'>
<a expr: href = 'data: post . url '> <data:post.title/> </ a>
<br/>
<b:else/>
<b:include data='post' name='post'/>
</ b: if>
<b:else/>
<b:include data='post' name='post'/>
</ b: if>
5. If you already click Save Template . Please try results

Changing the Author Name Or Name Author In Blog


Have multiple blogs under one account is common for every blogger. Because it's easy to create a blog and not limited in number. If you make a lot of blogs in one account then all the blog author will have the same name. For those of you who do not know what that author name, Author name is the name of the author of the content or the person who has a blog. Well sometimes there are bloggers who are reluctant to show original identity. If that means my friend had to change his name by another name. Then what can? Sure you can. 

Even very simple. Here's how: 

1.Log in to blogger 
2. On the menu Design -> Edit HTML
 3. Tick ​​the " Expand Widget Templates " 
4. Find the code below


author name


<b:if cond='data:top.showAuthor'> 
<data:top.authorLabel/> <data:post.author/> 
</ b: if>
Replace the words are printed in red with the name you want to use. Examples

<b:if cond='data:top.showAuthor'>
<data:top.authorLabel/> Admin
</ b: if>
5. If so click Save Template . 6. Completed. Please see the results.

Color Link Or Make Colorful Rainbow Link Blog


Rainbow rainbow links or a link where if the mouse pointer we were directed to the link the link will flash colorful as a rainbow of colors. If you are still confused. Please visit here then point your mouse cursor to one of the links to see the results. Gmn pulled? Well to put this colorful link is very easy. You simply enter the code in the javascript his blog you then the effect will work immediately. 'll be easier. Please follow these steps: 1. As usual, log into blogger. Then on the menu Edit HTML 2.Put the code below the above code <body>


<script src='http://hbhost.googlecode.com/files/rainbow-link.js'/>
3. Click Save Template . 4. Completed. Please see the results.

Installing Snow Effect in Blog


Pingin snowing on your blog to make it look more lively and cool (read: cool)? Well, then you need to put on the blog snow effect you. To install snow effect, it is very easy: 1. Open blogger. Go to the menu Design -> Page Elements 2. Click Add a Gadgets -> HTML / Javascript 3. Insert the following script into the box


<script src='http://hbhost.googlecode.com/files/snow.js' type='text/javascript'> </script>
4. Press Save . Finish is tough is not it? If you do not want to bother ya use any of the following ways 1. clicking the Add Effect Snow In the blog below


2. Select the blog you want to install snow effect and then click Add Widget 3.Finish. luck ... 


smile

How to Overcome Add Widget HTML / Javascript Untitled


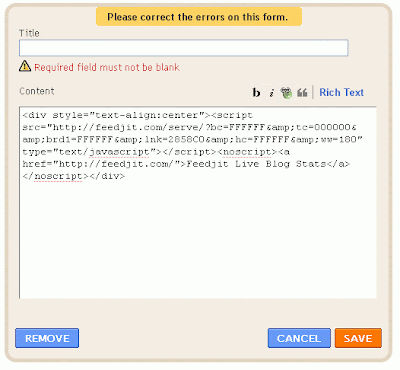
Yesterday when I want to edit one of the widget HTML / Javascript without the title, I am experiencing a problem where when i press the button Save the error message that says I have to give the title of the column title. This also happens when I want to add the widget HTML / javascript new. Whereas before I could do it without a title.Initially I thought maybe this blog template that error then I try it on another blog, but the result is the same. I was trying to figure out this problem by Googling but no one has discussed it. With anxiety I was trying to ask some other bloggers. Apparently they are also experiencing the same thing. Calm had my heart because blogger.com itself that changes the system not because my account is problematic I do not know why blogger.com to do this because I think so little flexibility. What do you think?Btw, as a user I can only accept it: ( So is there any way to get this widget title does not appear? Yup after check and re finally I found one way to titlenya not appear on the blog pages by removing the code of the widget title . similar results exactly with the old look. those of you who want to add the widget HTML / javascript without a caption. following way: 1. Make first widget HTML / Javasript you want to add to your blog title any premises up. 2. If so, go to menu Design -> Edit HTML . You can check the "Expand Widget Templates." To be safe backup of your template after the title search widget that you created earlier example you give the title of " banner ads "then find the word in your template. 3. order more easily, use the Find box to search for it. Press Ctrl + F and enter a key word and then tap Next . 4. If you have found searching the code <h2 class='title'> <data:title/> </ h2> which is located several line below. Consider the figure below ( click to enlarge).

widget error


widget title

5. Delete the code are then tap Save Template . Finish. If at any time you want to bring back titlenya stay just add code <h2 class='title'> <data:title/> </ h2> in the same place or remove the widget and create a new one. Gampangkan? May be useful. those of you who have a more effective way could share here. thanks 

Creating Navigation For Blog


page navigation widget

Page navigation widget is a widget that serves to open the back page on the blog.Its function is similar to the "older posts" and "recent posts" on the blog. The difference is that with this widget you can be faster to browse the backyard of a blog because you do not have to open one page that can directly jump there but kehalamman next. So that could save your search time. 

Ok for those of you who are interested to apply. Here's how to installation. 

1. Log in to blogger. Open the menuDesign -> Page Elements
2. Click Add a Gadget -> HTML / Javascript and then put the code below into the box


<style>
.showpageArea a {
text-decoration:underline;
}

.showpageNum a {
text-decoration:none;
border: 1px solid #bbb;
margin:0 3px;
padding:3px;
}

.showpageNum a:hover {
border: 1px solid #bbb;
background-color:#bbb;
}
.showpagePoint {
color:#fff;
text-decoration:none;
border: 1px solid #fff;
background: #000;
margin:0 3px;
padding:3px;
}
.showpageOf {
text-decoration:none;
padding:3px;
margin: 0 3px 0 0;
}
.showpage a {
text-decoration:none;
border: 1px solid #bbb;
padding:3px;
}
.showpage a:hover {
text-decoration:none;
}
.showpageNum a:link,.showpage a:link {
text-decoration:none;
color:#333;
}

</style>


<script type="text/javascript">

function showpageCount(json) {
var thisUrl = location.href;
var htmlMap = new Array();
var isFirstPage = thisUrl.substring(thisUrl.length-14,thisUrl.length)==".blogspot.com/";
var isLablePage = thisUrl.indexOf("/search/label/")!=-1;
var isPage = thisUrl.indexOf("/search?updated")!=-1;
var thisLable = isLablePage ? thisUrl.substr(thisUrl.indexOf("/search/label/")+14,thisUrl.length) : "";
thisLable = thisLable.indexOf("?")!=-1 ? thisLable.substr(0,thisLable.indexOf("?")) : thisLable;
var thisNum = 1;
var postNum=1;
var itemCount = 0;
var fFlag = 0;
var eFlag = 0;
var html= '';
var upPageHtml ='';
var downPageHtml ='';


var pageCount=5;
var displayPageNum=3;
var firstPageWord = 'Awal';
var endPageWord = 'Akhir';
var upPageWord ='Sebelumnya';
var downPageWord ='Selanjutnya';


var labelHtml = '<span class="showpageNum"><a href="/search/label/'+thisLable+'?&max-results='+pageCount+'">';

for(var i=0, post; post = json.feed.entry[i]; i++) {
var timestamp = post.published.$t.substr(0,10);
var title = post.title.$t;
if(isLablePage){
if(title!=''){
if(post.category){
for(var c=0, post_category; post_category = post.category[c]; c++) {
if(encodeURIComponent(post_category.term)==thisLable){
if(itemCount==0 || (itemCount % pageCount ==(pageCount-1))){
if(thisUrl.indexOf(timestamp)!=-1 ){
thisNum = postNum;
}

postNum++;
htmlMap[htmlMap.length] = '/search/label/'+thisLable+'?updated-max='+timestamp+'T00%3A00%3A00%2B08%3A00&max-results='+pageCount;
}
}
}
}//end if(post.category){

itemCount++;
}

}else{
if(title!=''){
if(itemCount==0 || (itemCount % pageCount ==(pageCount-1))){
if(thisUrl.indexOf(timestamp)!=-1 ){
thisNum = postNum;
}

if(title!='') postNum++;
htmlMap[htmlMap.length] = '/search?updated-max='+timestamp+'T00%3A00%3A00%2B08%3A00&max-results='+pageCount;
}
}
itemCount++;
}
}

for(var p =0;p< htmlMap.length;p++){
if(p>=(thisNum-displayPageNum-1) && p<(thisNum+displayPageNum)){
if(fFlag ==0 && p == thisNum-2){
if(thisNum==2){
if(isLablePage){
upPageHtml = labelHtml + upPageWord +'</a></span>';
}else{
upPageHtml = '<span class="showpage"><a href="/">'+ upPageWord +'</a></span>';
}
}else{
upPageHtml = '<span class="showpage"><a href="'+htmlMap[p]+'">'+ upPageWord +'</a></span>';
}

fFlag++;
}

if(p==(thisNum-1)){
html += '&nbsp;<span class="showpagePoint"><u>'+thisNum+'</u></span>';
}else{
if(p==0){
if(isLablePage){
html = labelHtml+'1</a></span>';
}else{
html += '<span class="showpageNum"><a href="/">1</a></span>';
}
}else{
html += '<span class="showpageNum"><a href="'+htmlMap[p]+'">'+ (p+1) +' </a></span>';
}
}

if(eFlag ==0 && p == thisNum){
downPageHtml = '<span class="showpage"> <a href="'+htmlMap[p]+'">'+ downPageWord +'</a></span>';
eFlag++;
}
}//end if(p>=(thisNum-displayPageNum-1) && p<(thisNum+displayPageNum)){
}//end for(var p =0;p< htmlMap.length;p++){

if(thisNum>1){
if(!isLablePage){
html = '<span class="showpage"><a href="/">'+ firstPageWord +' </a></span>'+upPageHtml+' '+html +' ';
}else{
html = ''+labelHtml + firstPageWord +' </a></span>'+upPageHtml+' '+html +' ';
}
}

html = '<div class="showpageArea"><span style="padding: 2px 4px 2px 4px;margin: 2px 2px 2px 2px;border: 1px solid #333;background-" class="showpage">Page '+thisNum+' of '+(postNum-1)+': </span>'+html;

if(thisNum<(postNum-1)){
html += downPageHtml;
html += '<span class="showpage"><a href="'+htmlMap[htmlMap.length-1]+'"> '+endPageWord+'</a></span>';
}

if(postNum==1) postNum++;
html += '</div>';

if(isPage || isFirstPage || isLablePage){
var pageArea = document.getElementsByName("pageArea");
var blogPager = document.getElementById("blog-pager");

if(postNum <= 2){
html ='';
}

for(var p =0;p< pageArea.length;p++){
pageArea[p].innerHTML = html;
}

if(pageArea&&pageArea.length>0){
html ='';
}

if(blogPager){
blogPager.innerHTML = html;
}
}

}
</script>

<script src="/feeds/posts/summary?alt=json-in-script&callback=showpageCount&max-results=99999" type="text/javascript"></script>
<div style="text-align:right;font-size:10px;color:000000;margin-top:15px;display:none;"> <a href="http://www.hermanblog.com">Grab this Widget ~ Navigasi Halaman</a></div>

Number five on the " var PageCount "shows the number of posts that will appear on each page. Please be replaced according to your wishes. 3. If you already clickSave . Then place the widget below Blog post like the example below


4. Click on View Blog and see what happens. Good luck ..